Air flow measurement
Choice of methods of flow measurement
There is a variety of different methods of flow measurement, each of which has its own advantages and characteristics. The choice in any particular circumstances will depend on a number of factors, eg the pressure, temperature and desired accuracy. For determination of compressor performance, the method of measurement is prescribed, as in BS 1571Parts 1 and 2 (also ISO 1217). Refer to the chapter on Compressor Acceptance Tests.
Use of nozzles in measurement
For the most accurate method of measurement of compressor delivery, the method of BS 1571 Part 1 is recommended. Part 2 offers a simplified method. The principle adopted is that where the pressure drop through an orifice is small, the flow through it is adiabatic, sub-critical and so is proportional to (pressure drop)05 • The size and shape of the orifice are chosen so that these conditions are met.
The nozzle can be placed either on the intake or the delivery side of the compressor. When on the delivery side, the discharge can be to the atmosphere or into a pipeline under pressure. In order that the flow through the nozzle shall be smooth and free from pulsations, a smoothing receiver and a perforated plate must be used (Figure 1). Similar
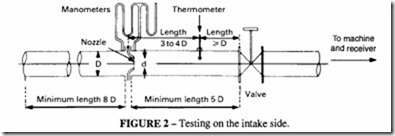
methods can be used for accurate measurements of the flow rate in other applications than in compressor acceptance tests, but in these cases, simpler methods are preferred. The arrangement of the test method is given in Figure 2.
A receiver of adequate size must be fitted between the compressor and control valve to dampen out any pulsations and thus ensure accurate flow measurement.
Where the pressure drop across the control valve is greater than 30% of the upstream pressure, an adequate capacity receiver is one which would contain, at the receiver pressure, the output of the compressor or exhauster during 50 complete pulsations.
Where the pressure drop across the control valve is less than 30% of the upstream pressure or where no control valve is used between the receiver and the nozzle, a larger receiver may be necessary.
Other damping arrangements may be used provided that it can be shown that no pulsations exceeding ±2% of the differential pressure occur at the nozzle inlet.
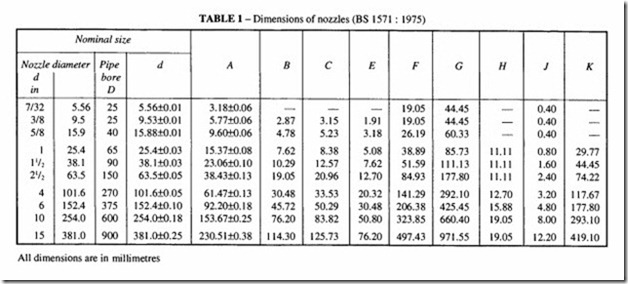
The pipe connecting the machine and receiver should be as short as possible to minimise the risk of false readings due to a resonance effect. Pipe flanges are preferably faced so that a metal-to-metal joint is made with the nozzle. Ifjointing material is used between the flanges and the nozzle, its thickness must not exceed 1.6 mm and the inner diameter of the joint ring must be not less than the appropriate value of the dimension G given in Table 1.
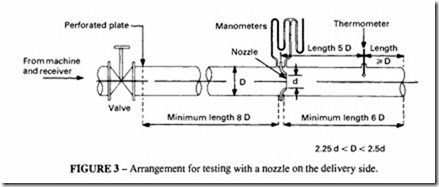
Testing with nozzles on the delivery side
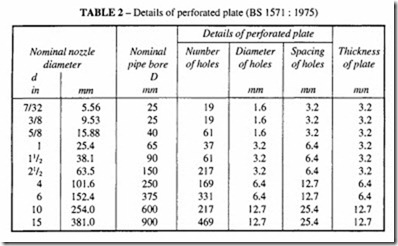
The control valve may be either the same nominal size as the nozzle approach pipe or smaller. The latter may be preferred because of ease of control and it then should be connected to the nozzle approach pipe by a cone piece. In either case a perforated plate must be fitted at the inlet flange of the approach pipe to smooth the flow, which leaves the control valve in a violently turbulent condition. The perforated plate must have an hexagonal pattern of holes drilled in the central portion, the centres of the holes being uniformly spaced and located at the corners of equilateral triangles. The number, size and spacing of the holes, and thickness of the plate are specified in Table 2.
The pressure drop across this perforated plate is about four times the nozzle head, hence if it is desired to test up to the maximum nozzle head of 1000 mm H20 the minimum pressure would need to be about 0.5 bar gauge when discharging to atmosphere. If tests are to be made at lower supply pressures, the nozzle size can be chosen to work at a lower head.
Generally the air pressure on the outlet side of the nozzle is only slightly in excess of atmospheric, because the exit pipe discharges freely into atmosphere or through an exhaust silencing system to atmosphere.
Downstream from the perforated plate the approach pipe to the nozzle must be straight with a length not less than 8 pipe diameters. The pipe bore must not be greater than 2.5 nor less than 2.25 nozzle diameters, except for the two smallest nozzle sizes in Table I where it must be 25.4 ±3.2 mm.
The exit pipeline from the nozzle to atmosphere must be straight for a distance not less than 4 pipe diameters and of the same diameter as the approach pipe.
The roughness of the internal surface of the pipes need not be reduced below that of ordinary commercial finish, but there must be no obstructions in the pipelines such as thick welding ridges.
Testing with nozzles on the intake
When the nozzle is on the intake, the approach pipe to the nozzle must have minimum straight length of 8 pipe diameters and the exit pipe a minimum straight length of 5 pipe diameters. If aspiring from atmosphere, the inlet end may be plain, flanged or flared but must not be restricted. As the control valve is on the downstream side of the nozzle, a perforated plate is not necessary.
Ifdrawing from another pipe system, special precautions should be taken to avoid swirl or other flow disturbances eg by using an appropriate perforated plate at the entry to the straight pipe of 8 pipe diameters length.
Nozzle selection
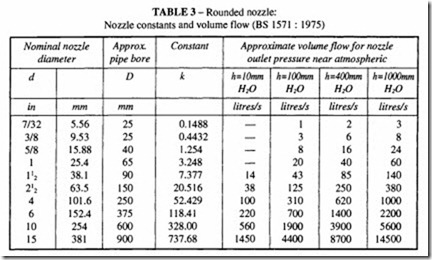
The following empirical rule can be used to ascertain a size of nozzle suitable for a particular test, when the pressure at the nozzle is approximately atmospheric. Calculate times the maximum expected volume flow in 1/s and select a nozzle with a nozzle
constant, k, next larger than that number. Nozzle constants for BS rounded nozzles are given in Table 3. For pressures other than atmospheric, the approximate value of k may be found from the value of Q (see later) using a value of h within the range given in Table 3.
Observations and measurements
The following observations are necessary to conform to British Standard practice.
(i) Atmospheric pressure
Measured in mm Hg by means of a barometer. If there is no barometer on site, readings can be obtained from a local recognised weather bureau and corrections applied to allow for the difference in altitude.
(ii) At the agreed inlet point
The difference in pressure between the agreed inlet point and the local barometer reading. For the purpose of calculation, the pressure at the inlet point is the barometer pressure less the depression at the agreed inlet point.
The temperature of the air at the agreed point in °C. The thermometer shall be so placed that it is not affected by radiant heat from the surroundings.
(iii) At the receiver
The receiver pressure in bar measured by means of a pressure gauge. This is taken as a record of performance but is not used in the calculation of the flow except where necessary to allow for any small change occurring during test. Such changes shall not exceed 2% of the absolute pressure at the receiver.
(iv) At the nozzle
The head across the nozzle, measured as the difference in pressure given by the reading of a double-leg manometer.
The difference in pressure between the downstream side of the nozzle and the atmosphere. This shall be measured by means of a second manometer connected as shown in Figure 2.
The temperature in the pipeline, measured by means of a thermometer as shown in Figure 2. The thermometer shall be placed between three and four pipe diameters from the mouth of the nozzle and not closer than one pipe diameter to an open end.
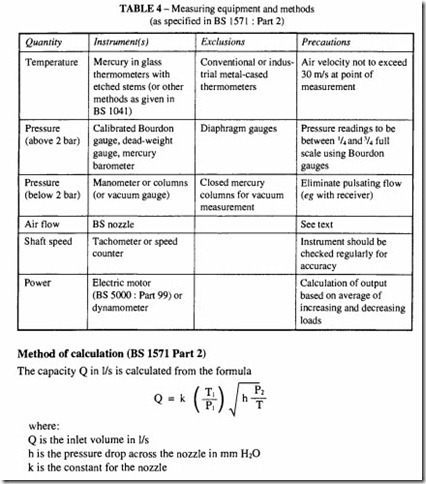
Instruments used for these and other measurements are summarised in Table 4.
The absolute pressures are obtained by adding to or subtracting from the atmospheric pressure, as given by the barometer, the water gauge reading obtained from the appropriate manometer. The water gauge readings are converted to mm Hg by dividing by 13.6.
Alternative tests
The discharge may have to be made into a pipeline into pressure instead of into the atmosphere, or it may be desirable to measure the flow at the delivery pressure in order to reduce the dimensions of the pipe line required. The test layout should be the same as that shown in Figure 3, with the addition of a second perforated plate across the downstream pipe at least five pipe diameters away from the nozzle and before the flow reaches any bends, valves or obstructions. The pressure at the downstream side of the nozzle is measured by a pressure gauge substituted for the second manometer and the reading converted to mm Hg.
Bourdon gauges are mounted vertically and must be readable to 0.5% of the full scale reading. They must be used only between one-quarter and three-quarters of their full scale reading. They must be calibrated against a dead-weight gauge before and after the test.
Care must be taken to ensure that the high pressure pipeline into which the air is discharged is free from pulsations.
The calculations are made in the same way as for discharge to atmosphere.
A round-edged orifice is preferable for highest accuracy. With nozzles manufactured to the dimensions given in BS 1571, the nozzle coefficient is very close to the theoretical value of unity (in fact, the value is 0.985). A rounded orifice is expensive to manufacture, so as a cheaper alternative, a sharp- edged orifice plate can be used, using the appropriate value of the flow coefficient. The pressure loss through an orifice plate can be consider able.
Selection of the primary device to be used
When determining the flow by measuring pressure difference across a nozzle or orifice, a number of factors influence the choice of the primary device. Apart from the rounded nozzle discussed, it is possible to use a simple orifice plate, a classical venturi tube or a venturi nozzle. A venturi has pressure tappings upstream and at the throat, rather than upstream and downstream as in the case of the nozzles . All the different methods are described in BS I 042 Section 1.1, where the flow coefficients and the accuracy of each method is given.
For each primary device there exists a limiting value of pipe diameter, diameter ratio, ‘and Reynolds number. If the chosen value of differential pressure and flow rate for an orifice plate exceeds the permissible limit for ‘ a nozzle may be used since it allows the use of a lower value.
The pressure loss through an orifice plate or nozzle is 4 to 6 times the loss in a venturinozzle or classical venturi tube.
A classical venturi tube requires shorter straight lengths of pipe than the other devices, but the mounting distance of venturi nozzles and tubes is significantly larger than for nozzles or orifice plates.
Orifice plates are cheaper and simpler than any of the other devices.
If the flow is pulsating, the accuracy of flow measurement is suspect.
High pressure nozzles
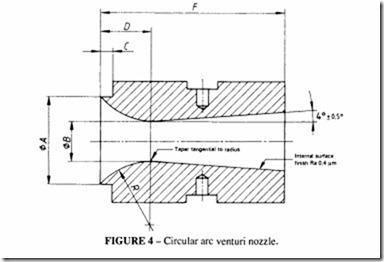
For slightly less accurate determination of the tlow rate of compressors, high pressure nozzles can be used. The recommended technique is the use of a circular arc venturi nozzle under critical flow conditions. This method is described in BS 1571 Part I and uses a nozzle of the shape given in Figure4, to the dimensions of Table 5. The accuracy is quoted
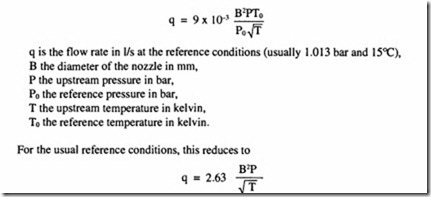
as ± 2.5%. It is recommended as being satisfactory for determining the flow rate of compressors when subject to EC noise testing, where the only purpose of the flow measurement is to determine the noise emission category into which the compressor is placed; but it can be used in other applications where the lower accuracy is adequate. As with other nozzle methods, a flow straightener is placed upstream of the venturi and both temperature and pressure are to be taken. Provided that the nozzle size is chosen so that there is sonic velocity at the throat, only the upstream pressure and temperature need be taken. The advantage of this method is its simplicity. The expression for the volumetric flow is given by the expression:
Strictly, these formulas apply where the temperature is between 20 °C and 70 °C, and the pressure between 2 and 8 bar; outside this range, a different multiplying constant can be found from BS 1571.
Because the flow is in the critical regime, the flow rate is directly proportional to pressure, rather than to (pressure)05 as in the case of the other nozzle methods.
Flow measurements using alternatives to nozzles
In many instances it is not practical to adopt the complexities of measurement by nozzles. A major drawback in their use is the limited range over which a given nozzle can be used.
If the flow varies over a wide range, it is not practical to use a nozzle. Also a direct measurement method is more appropriate for applications such as assessing the flow rate in various parts of a main circuit, for determining the air consumption of tools and in process applications. In studying the velocity pattern across large pipe diameters or at the exit of a compressor impeller, more localised techniques are needed. The direct reading methods are more suitable when included as part of an overall monitoring facility. Some of the modem flow measuring methods use electronic instrumentation and so make it easier to provide a remote readout of the flow. A manometer is not easy to adapt to remote readout.
Some of the alternative metering methods suitable for air flow determination are:
• Pitot tube
• Hot wire anemometer
• Variable area flowmeters (spring loaded or dead weight)
• Multi-blade turbine meters
• Vortex shedding
• Coriolis effect mass meters
Pitot tubes
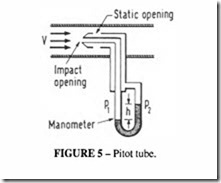
This measures the dynamic and static head of the flowing gas, Figure 5. The measurements can be taken by a manometer in the same way as in the previous methods. These are used for establishing flow patterns in large pipes and in unconfined passages such as wind tunnels. As with nozzles and venturi meters, the flow velocity is proportional to (pressure
Hot wire anemometer
This determines the flow velocity by measuring the cooling effect of a flowing air stream. A hot wire is inserted into the stream and the heat convection from the wire produces an imbalance in a bridge circuit. The relation between the flow velocity and the bridge potential is not readily determined, so they have to be calibrated against another measurement method.
Variable area flowmeter
There are two common types: the cone and float meter, and the variable orifice spring loaded meter.
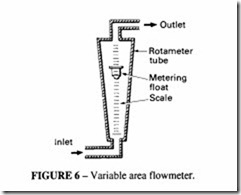
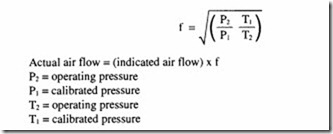
The cone and float meter, Figure 6, can have either a glass or metal tube. Gas flows vertically through a conical tube in which a free float or bobbin is located. The float has a constant weight, so increasing flow requires it to move up the tube to increase the area of the aperture. They are suitable for measuring over a large flow range, from zero up to the maximum allowed through the flow area. The use of a glass tube allows the float to be viewed directly, but in applications where safety is of prime concern, stainless steel or non ferrous tubes may be used and the float position determined magnetically. As supplied, these meters are calibrated at a specified temperature and pressure, typically 7 bar and 20°C. A table of correction factors is usually supplied with the meter, but if these are not available, the factors can be calculated:
The same flowmeter can be used for gases other than air, in which case a further factor using the specific gravity is introduced. The pressure loss through this device is the weight of the float divided by its cross-section area; this is likely to be small. The accuracy depends on the accuracy of manufacture of the tapered tubes; typically it is of the order of± 1%.
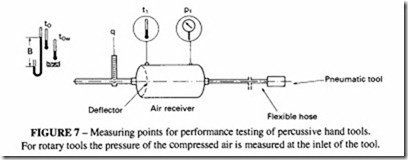
When using this equipment for the measurement of the air consumption of tools, it is customary to build a portable test facility (commonly known as a “pig”), consisting of a
flowmeter, an air receiver, a pressure gauge and a thermometer as in Figure 7. With a freely floating bobbin, the damping is practically non-existent, and without a receiver to suppress the pulsations generated by the varying tool demand, the meter scale would be unreadable .
The size of the receiver is calculated from
where q is the maximum free air flow (1/s), P is the pressure in bar and A is the cross-section area of the receiver.
It may also be necessary to incorporate a pressure reduction valve to reduce the mains pressure to the desired test pressure .This valve can sometimes produce its own pulsations , or there may be pressure variations from other components in the main circuit, in which case a second air receiver upstream of the flowmeter is required.
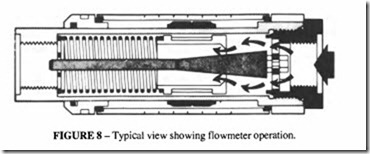
Spring loaded variable-area meters work on a similar principle, except that the spring allows it to be used at any angle, see Figure 8. The pressure loss through this type of meter is several times that of the float type described above. The accuracy is of the order ±5%. Glass (or more often plastic) tubes allow visual sighting; metal tubes with magnetic sensors are available, as in the float type.
The spring-loaded meter has greater damping and is less accurate than the float type, so it is usually employed in less critical measurement situations. Although it may not be
worthwhile incorporating a flow straightener, it makes sense to take reasonable precau tions to situate such a meter in a place where pulsating flow has minimal effect.
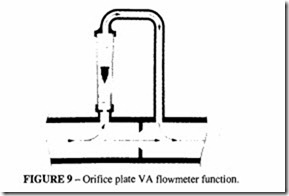
A combination of a variable area and an orifice plate can also be used; this arrangement is shown in Figure 9. It is suitable for direct reading, with the flow through the float meter scaled in flow units through the orifice plate. It is useful for insertion in large pipes.
Multi-blade meters
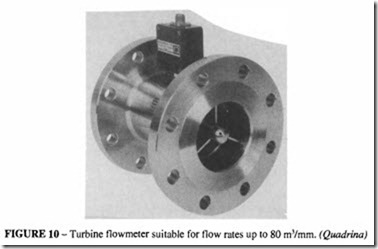
This type of meter is an indirect device in that the flow rate is obtained from the rotation of a turbine. In Figure 10, the unit consists of a turbine, mounted on low friction bearings and inserted directly into the pipe. The flow rate is proportional to the rotational frequency of the turbine. The accuracy is of the order of± I%. For accuracy of measurement, a flow straightener fitted into a straight length of pipe is essential as shown in Figure II. A turbine, because of its rotational inertia, has an averaging effect in the presence of a
pulsating flow, so it may not be apparent that the meter is affected by the pulsations. If pulsations are known to exist or are suspected, the same kind of air receiver should be employed as for the variable area type of meter.
The rotational speed of the turbine is measured by an external pickup, of which there are two types- magnetic and electronic. The magnetic pickup is simple and inexpensive; however due to magnetic attraction, drag is imposed on the rotor and at low flow rate its performance is unreliable. It should not normally be used for airflow measurement, except where an approximate reading is adequate. The alternative electronic pickup uses the principle of variable reluctance so there is negligible drag on the rotor; a further advantage is that it produces a high output signal of constant amplitude over the whole of the operating range of the meter.
The signal from either type of pickup is fed into a counter or a direct reading frequency panel meter. The flow is proportional to frequency so it is easy, when using a panel meter for direct read-out, to calibrate the scale in flow units.
A turbine meter can also be used to measure the velocity profile across a large diameter
pipeline. An insertion flowmeter is mounted on the end of an insertion tube, which allows movement of the measurement head to a point across the diameter of the pipe.
A meter similar to a turbine meter is a pel ton wheel meter, in which the flow impinges on a rotating wheel tangentially. This is suitable for accurate measurement of small
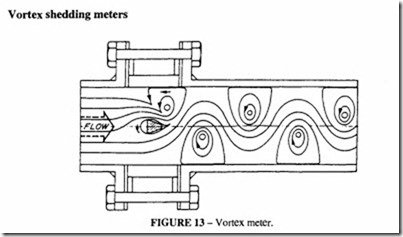
Figure 13 shows a section through a vortex flowmeter. The gas flows past a fixed flow element (a pillar with a delta-shaped cross-section) and generates a succession of vortices which are formed alternately on opposite flanks of the flow element. The frequency of vortex shedding is a linear function of velocity. Within the range covered by a given flowmeter, it is independent of density, viscosity and temperature and is given by:
n is the frequency, Vis the velocity, is the width of the flow element and S is the Strouhal number or shape factor. From a knowledge of the velocity and the cross-sectional area, the total flow can be determined. For the flow to generate vortices, it has to be in the turbulent regime, which condition is dependent on the Reynolds number.
The velocity and pressure of the gas in contact with the flow element oscillate in time with the vortex frequency. A variety of different methods of measuring the frequency are possible according to the manufacturer:
• Differential pressure fluctuations at the shedding element measured by a pressure sensor.
• Measurement of the twisting of the shedder with a piezo-electric sensor.
• Pressure fluctuations at the shedder causing a disc to oscillate, which is measured by a magnetic pickup.
• Temperature sensors measuring the change in velocity at the shedder.
• Ultrasonic measurement of the pressure fluctuations downstream of the shedder.
As with all velocity metering devices, an upstream flow straightener is essential, which can be a straight length of pipe at least IS times the internal pipe diameter. The accuracy is ±I%, the measuring range is I 0: I and the pressure drop is 0.0I bar. Determination of the flow, as in all indirect methods, relies on the accuracy of the manufacturer’s calibration.
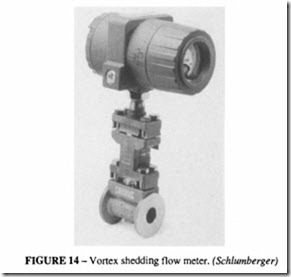
Figure I4 shows a vortex shedding flowmeter in which the vortices are measured by pressure fluctuations at the shedder.
Coriolis effect mass meters
This is one of the few techniques which directly measures mass flow rather than velocity.
It is useful where the flow rate is required in conditions of varying temperature and pressure. A further advantage is the absence of any requirement for upstream flow straightening. The major applications of this technique are fordifficult liquids and slurries, but it is equally suitable for gas measurements.
Figure 15 shows the principle of operation. One or two U-shaped tubes are vibrated at their natural frequency by a drive coil. The flowing fluid is forced to take on the vertical movement of the vibration, increasing as it flows towards the bend and decreasing as it flows away from the bend. The forces induced by the fluid on the tubes are the Coriolis forces and although they are very small, they are sufficient to cause the tubes to twist. When the tube moves upward, during half the vibration cycle, the tube twists in one direction and when the tube moves downward during the second half of the cycle, the tube twists in the opposite direction. The twist is proportional to mass flow and is sensed by the pair of magnetic position detectors. These detectors feed the information into an electronic processor for subsequent display.

