Pressure measurement
Behaviour of a fluid can generally be deduced from measurements of flow or pressure. A flow transducer or transmitter has to be plumbed, in line, into a pipe, whereas pressure transmitters can be added non-intrusively as tappings to the side of a pipe. The basic fault-finding tool in both pneumatic or hydraulic systems is therefore a pressure gauge. Often this is a simple gauge which can be plugged into various parts of the system via a flexible connection.
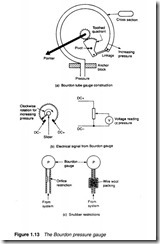
These test pressure gauges invariably measure gauge pressure with the simple Bourdon pressure gauge shown in Figure 1.13. This consists of a flattened C shaped tube which is fixed at one end, shown in Figure 1.13a. When pressure is applied to the tube it tends to straighten, with the free end moving up and to the right. For low pressure ranges a spiral tube is used to increase the sensitivity.
This movement is converted to a circular pointer movement by a mechanical quadrant and pinion. If an electrical output signal is required for remote indication, the pointer can be replaced by a potentiometer, as shown in Figure 1.13b.
Hydraulic and pneumatic systems tend to exhibit large pressure spikes as loads accelerate or decelerate (a typical example being shown on Figure 1.12c.) These spikes can be irritating to the observer, can mislead, and in extreme cases could damage a pressure indicator. The response of a pressure sensor can be dampened by inclusion of a snubber restriction, as shown in Figure 1.13c.
Bourdon gauge-based transducers are generally robust but are low accuracy (typically ± 2%) devices. As the limit of visual resolution of a pointer position is no better than± 2% anyway, rugged ness of these transducers makes them ideal for plant mounted monitoring.
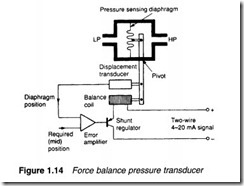
Where more accurate pressure measurement is required, transducers based on the force balance principle of Figure 1.14 are generally used. This is essentially a differential pressure transducer, in which the low pressure inlet (LP) is left open to atmosphere and the high pressure (HP) inlet connects to the system. The signal given (HP-LP) is thus gauge pressure.
A pressure increase in the system deflects the pressure sensitive diaphragm to the left. This movement is detected by the displace-
ment transducer which, via a servo amplifier, leads to an increase in current in the balance coil.
Because the force from the balance coil always exactly balances the force arising from the pressure difference between LP and HP, current through the transducer is directly proportional to the differential pressure.
Remote indicating transducers are generally arranged with a remote power supply and the indicator and/or recorder connected into one line as Figure 1.15 to give a two-wire system. A signal range of 4 to 20 rnA is commonly used, with the 4 rnA zero level providing a current supply for the transducer’s servo amplifier and also indicating circuit continuity (0 rnA indicating a open circuit fault condition).

