Valve System Service
CHECK ING COMPRESSION
If an inspection shows that the valve operating clearan ce is correct, that no valve springs are brok en, and that no valves are sticking in their guid es, a compression test should be made to determine whether the source of trouble is at the valve seats or is a broken cylinder head gasket. The procedure for making this test is herewith given but bear in mind that if the compression is low in two adjacent cylinders, a broken cylinder head gasket is indicated.
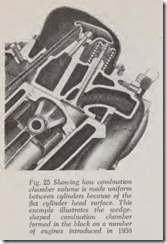
In using a compression gauge, the location of th e combustion chamber must be taken into consideration. Except for engines in which the com bustion chamber is formed in the block, Fig. 25, all other engines have the combustion chamber cast in the cylinder head. When checking com pression pressure on engin es with cylinder head combustion chambers, it must be realized that the compression pressures in the cylinders of such an engine in perfect condition are not uniform. Car company engineers will tell you that the pressures in the different cylinders of an engine may vary up to 20 pounds. The variation in pressure in some makes of engines is small and large in others. The variation is due principally to lack of uni formity in combustion chamber volumes since it is impossible to make all the combustion chambers in a cylinder head exactly the same size.
In a given engine with a 10 to 1 compression ratio with all combustion chambers the same vol ume, the compression pressure might be about 160 pounds in all cylinders. However, if the com bustion chamber is 1/3 cubic inch too small the pressure will be 168 pounds and if % cubic inch too large it will be 152 pounds. This is a variation of 16 pounds.
In the engines where the combustion chamber is formed in the block, this variation is largely elimi nated. In the example shown in Fig. 25 the top of the block, instead of being perpendicular to the cylinder bore, forms an angle of 16 degrees from perpendicular, creating a circular wedge with its thin side toward the center of the engine. The underside of the cylinder head is flat, except for slight recesses which provide for valves and spark plugs. The top of the piston is peaked. Half of the top surface is parallel to the cylinder head, and the other half forms an angle of 32 degrees from the lower surface of the head. Inasmuch as this design forms a smooth machined surface, com bustion chamber volumes are naturally more uni form and, therefore, not subject to possible variations as are cast cylinder head combustion chambers .
Just to satisfy the reader’s curiosity, below is a table showing the approximate relationship be tween compression ratio and compression pres sure at cranking speeds:
| Ratio | Pressure |
| 6.5 | 110 |
| 7.0 | 120 |
| 7.5 | 130 |
| 8.0 | 140 |
| 9.0 | 150 |
| 10.0 | 160 |
Various design factors affect the compression pressure. Therefore this table may apply to some engines but not to all. Not e also that a carbon deposit will raise the compression pressure at any given ratio by reducing the combusti on chamber volume. The greater the d eposit the higher the pressure.
However, even if a table such as this could be trusted, there is the question of gauge accuracy. A gauge passes inspection at th e factory if it is not more than two pounds high or low when the pressure is 100 pounds. Thus there is a possible error of as much as four pounds to begin with ( 98 to 102) although of cours e some of the gauges will be almost perfectly accurate.
But even if the gauge is accurate when made it is not likely to remain so. It is a delicate instru ment and th e first time it is dropped it may read five pounds too high or too low.
Use of Compression Gauge
A compression test should be made with all the spark plugs out. When this is done it is unneces sary to remove the air cleaner or to hold the throttle open becaus e th ere are always two or more intake valves open when the engine is being cranked.
When testing the compression of a cylinder, hold the gauge in place until th e pointer reaches a maximum reading, even though this may require cranking the engine through ten revolutions or so. The pressure in the curved tube within the gauge builds up slowly becaus e the compressed air must pass throu gh a small orifice at th e entrance to the tube.
Note that if a compression test is made after putting oil in th e cylinder to seal the rings, the compressi on reading may be much too high be cause the oil reduces th e volume of the combus tion chamber.
If any eylinder in an engine is 25 pounds (or more) lower than the highest eylinder it is prob ably that the valves in that eylinder are leaking. It does not make any differenee whether this test is made with engine warm or cold.
On engines with eylinder head eombustion ehambers, it is a mistake to assume that a cylinder whieh is five to ten pounds lower than the highest has leaky valves because, as previously stated, the variation with tight valves may be mueh more than ten pounds.
Other Compression Testing Methods
A more positive method of determining eylinder leakage is to employ a leak tester.
Another positive method is to apply air pressure to the eylinders one by one and then listen for leakage. This is an old and tried method although not well known. Remove the poreelain from an old spark plug shell and braze a tire valve in the shell.
Remove all spark plugs. Bring No. 1 piston up to top dead center on the eompression stroke. Serew the device just deseribed into the spark plug hole. Apply air pressure. If necessary have an assistant hold the air ehuek on the valve through out the test.
The piston must not move from its top dead eenter position while making test with air pr es sure. It won’t move if the erankpin is within about five degrees before or after top dead center. The faet that it is not neeessary to have the piston exaetly on eenter will speed up the work. When the air is applied, listen for a hiss:
1. At the muffler tail pipe for a leaking exhaust valve.
2. At the air eleaner for a leaking intake valve.
3. At the oil filler opening for leaking rings.
4. Remove the filler cap on the radiator and look for bubbles whieh indieate a leaking eylinder head gasket.
Bring No. 2 piston up to top dead eenter on the eompression stroke and repeat the tests-and so on for the other eylinders.
STICKING VALVES
A valve stieking open in the valve guide will eause the engine to misfire and, at times, eause baekfiring. The smooth running of the engine will be radieally interrupted and aeeompanied by a loud, sharp, tapping sound. When a stieking valve is suspected, crank the engine and observe whether any valve is stuek open, regardless of the aetion of the valve lifter or roeker arm. A valve that stieks in its guide may show some movement but this movement will be slow when compared with the rapid movement of a free-aeting valve. A stuek valve will have exeessive elearanee between the valve stem tip and roeker arm tip, or between the valve tip and valve lifter on L-head engines.
FREEING STUCK VALVE
There are several ways that stuek valves ean usually be freed but before trying any of them be sure that the engine is warm. If, after the treat ments deseribed below, the valve still sticks, re move the eylinder head and the valve and thor oughly elean both the valve stem and its guide.
One way to free a stuek valve is to squirt kerosene or penetrating oil onto the valve stem where it enters the guide. This is readily done on overhead valve engines. On L-head engines, re move the spark plug and use a squirt can with a long nozzle to reaeh the valve stem. Allow several minutes for the oil to penetrate. Twist the blade of a serewdriver between the coils of the valve spring to separate the eoils. This will inerease the spring tension and seat the valve. Apply an additional dose of oil and crank the engine several times. As the valve moves, the oil will flow along the stem and guide, flushing dirt and gum from the stem.
Another method of freeing a stuck valve is to pour a pint of special oil made j ust for this purpose in the crankcase. The oil will often free the valve almost immediately. On the other hand, considerable running of the engine may be nec essary.
Still another method of freeing a stuck valve is to start the engine and allow it to run at a fast idle speed, otherwise the engine will stall. After re moving the air cleaner, slowly pour kerosene, light engine oil or one of the several preparations made especially for the purpose into the carburetor. While the engine is running the liquid works around the valve stem and guide and should free the valve.
VALVE LASH ADJUSTMENT
Valves must be adjusted after they have been ground or refaced. Also note that after valves have been in use for some thousands of miles they may go out of adjustment. Thus, if the clearance be comes too small, the valve eventually may leak because it is unable to seat fully. If valves are too noisy the clearance should be checked and the valves adjusted to the proper specifications.
On some cars the clearance specifications for intake and exhaust valves are the same while on others more clearance is specified for the exhaust valves than for intake valves.
If the car is often driven at high speed for long periods it may be desirable to increase the exhaust valve clearance by .002″ for L-head engines and .3 ” for overhead valve engines.
If intake and exhaust valves have different clearance specifications, it is necessary to deter mine the location of intake and exhaust valves in each cylinder. Usually this can be done by in specting the branch arms of the intake and ex haust manifolds where they are bolted to the engine. Make a chalk mark to indicate the location of each exhaust valve.
Cold Valve Adjustment
On some engines it is recommended that the valves be adjusted cold although many car makers specify a warm adjustment.
In most cases the need for adjusting valves is because they have just been ground. Therefore, if the car maker recommends adjusting the valves with cold engine, the work should be done on L-
head engines before the head is replaced. The adjustment must be made with valves closed and this is readily done by bringing the piston up on top dead center at the end of the compression stroke.
If a cold adjustment is required on L-head engines when the cylinder head is on, th ere are two methods of determining whethe r the valves are closed in a given cylinder. The valves are closed when the valve lifter can be turned freely by hand. This condition exists on the compression stroke and also on the power stroke.
Remove the distributor cap and turn th e engine until the rotor points to the distributor segm ent to which the spark plug wire leading to No. 1 cylin der is connected. When the valves in this cylinder are adjusted, turn the engine slowly in the direc tion it rotates when running until the rotor points to the next segment. If, for example, the firing order is 153624, the rotor, after pointing to No. 1, successively points to 5, 3, 6, 2, 4.
Warm Valve Adjustment
Before adjusting valve clearance, it is extremely important that the engine be thoroughly warmed up for about 30 minutes to normalize the expan sion of all parts. This is very important because during the warm-up period the valve clearances will change considerably. To adjust the valves during or before this warm-up period will pro duce clearances which will be far from correct after the engine reaches normal operating tem perature.
Covering the radiator will not materially h asten this normalizing process because even with the water temperature quickly raised, it does not change the rate at which the oil tem perature increases and becomes stabilized, or the engine parts became normalized.
The actual temperature of the oil is not as important as stabilizing the oil temperature . The expansion or contraction of the valve mech anism, cylinder head and block arc relative to this oil temperature. These parts stop expanding and valve clearance changes cease to take place only after the oil temperature is stabilized. Then the valves are adjusted with the engine run nin g at normal idling speed.
Some mechanics prefer to adjust the exhaust valves first and then the intake. This is sound practice if the exhaust valves require a diff erent clearance than the intake valves. But if the clear ance is the same for both intake and exh aust valves, it is better to start at the front and work toward the rear of the engine.
Whether it be an L-head or overhead valve engine, if the exhaust valves require a greater clearance than the intake valves, set either the intakes first and then all the exhaust valves. In this way only one thickness feeler gauge is in use at a time and the chances of using the wrong feeler gauge are largely eliminated.
L-HEAD VALVE ADJUSTMENT
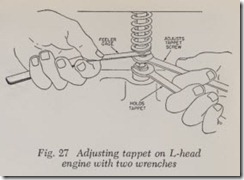
The valve lifter (tappet) adjusting screw is threaded into the tappet body, Fig. 26, and is held against rotation by a lock nut. The adjustment may be accomplished with two wrenches after loosening the lock nut slightly, Fig. 27. One hand manipulates the wrenches while the other holds the feeler gauge.
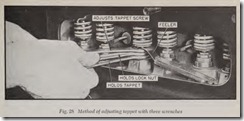
Fig. 28 illustrates how to make the adjustment with three wrenches. The two lower wrenches are held in one hand and the upper wrench which operates the adjusting screw is in the other. After an adjustment is made, all three wrenches are held in one hand while the clearance is checked with the feeler gauge with the other hand. Most mechanics prefer to insert the feeler only when checking the clearance. To leave the feeler in place as shown is likely to damage the feeler blade. When the adjustment is correct a slight drag should be felt on the feeler.
Self-Locking Tappet Screw
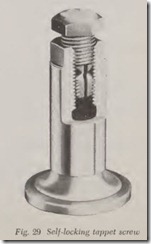
In the self-locking tappet screw, Fig. 29, the lower portion of the screw is split and is a suffi ciently tight fit in the lifter body so that the screw may be adjusted without any danger of the ad justment changing during its operation.
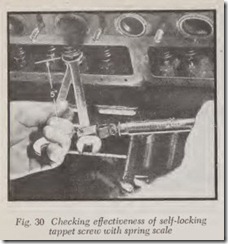
Studebaker recommends that when replacing a screw that it be checked with a spring scale, Fig. 30, to see that it will hold its adjustment effec tively.
If a pull of less than 25 inch-pounds will turn the screw a new one should be tried but it also should be checked. When checking the screw tension the scale should be at right angles to the wrench. To determine the inch-pounds, first mea sure the distance in inches from the center of the screw to the point on the wrench where the spring scale is attached.
If a pull of five pounds is required to turn the screw, then the torque is 25 inch-pounds ( 5 pounds times 5 inches). A reading of five pounds indicates that the screw is satisfactory. Similarly, if a longer wrench were used and the spring scale attached eight inches from the screw, a three pound reading on the scale would indicate a torque of 24 inch-pounds ( 3 times 8) which is very close to 25 inch-pounds. If the reading is less than 25 inch-pounds, the screw may work loose during operation, in which case install a new screw.
Ford L-Head Valve Adjustment
On Ford and Mercury engines up to and includ ing 1953 as well as Ford Sixes up to 1947, valve clearance is adjusted by grinding the tips of the valve stems if the clearance is too small. In the rare event that the clearance is too great, it may be reduced by grinding the valve further into its seat.
OVERHEAD VALVE ADJUSTMENT
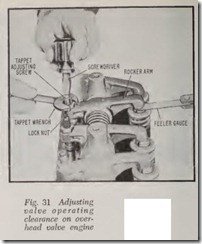
In some overhead valve engines, the valves are adjusted by turning the screw in the end of the rocker arm after loosening the lock nut just enough to free the screw, Fig. 31. In other engines of this type, where the rocker arms are mounted on individual studs instead of on a shaft, the adjustment is made by turning the self-locking rocker arm stud nut.
screw to the point on the wrench where the spring scale is attached.
If a pull of five pounds is required to turn the screw, then the torque is 25 inch-pounds ( 5 pounds times 5 inches). A reading of five pounds indicates that the screw is satisfactory. Similarly, if a longer wrench were used and the spring scale attached eight inches from the screw, a three pound reading on the scale would indicate a torque of 24 inch-pounds ( 3 times 8) which is very close to 25 inch-pounds. If the reading is less than 25 inch-pounds, the screw may work loose during operation, in which case install a new screw.
Ford L-Head Valve Adjustment
On Ford and Mercury engines up to and includ ing 1953 as well as Ford Sixes up to 1947, valve clearance is adjusted by grinding the tips of the valve stems if the clearance is too small. In the rare event that the clearance is too great, it may be reduced by grinding the valve further into its seat.
OVERHEAD VALVE ADJUSTMENT
In some overhead valve engines, the valves are adjusted by turning the screw in the end of the rocker arm after loosening the lock nut just enough to free the screw, Fig. 31. In other engines of this type, where the rocker arms are mounted on individual studs instead of on a shaft, the adjustment is made by turning the self-locking rocker arm stud nut.
Normally, when the manufacturer specifies that valve adjustment should be carried out when the engine is hot, it is done with the engine running. However, with some engines this is not easy as they are liable to squirt oil over the me chanic, or splash oil all over the outside of the engine. So either a guard of some sort must be rigged to protect the mechanic, or the adjustme nt must be made with the engine stopped. On those engines where it is specified that the clearance should be measured when cold, the adjustment is always made with the engine stopped.
To make the adjustment, insert a feeler gauge of the correct thickness between the valve stem and the tip of the rocker. During the instant that the valve is closed (engine running), if a very slight drag is felt on the feeler the adjustm ent is correct. To “feel” the drag, pull gently on the feeler while turning the screw. When the adjust ment is correct, hold the serew against turning and tighten the loek nut. Then eheek the clearance again in order to be sure that tightening the loek nut did not change the adjustment. To prevent the screwdriver from slipping off the serew it is a good idea to alter the blade of a wide-edged screwdriver as shown in Fig. 32.
Some engines use hex head self locking screws in the rocker arms instead of the slotted head screws and loek nuts.
If adjustment is to be carried out with engine stopped, it pays to remove the spark plugs and turn the engine over by pulling on the fan belt or on the fan blades. Take eare, however, not to leave your fingers between the belt and its pulley. The engine ean also be “bumped” over with the starter, using a remote control starter switch. In either ease, watch the distributor rotor arm when turning the engine. When it points to the segment in the distributor eap that is connected to the cylinder whose valves arc to be adjusted, the engine is in the eorreet position with those valves
closed.
Adjustment with Hydraulic lifters
On some overhead valve engines with hydraulic valve lifters, an initial adjustment is specified after the valves have been ground or whenever the rocker mechanism has been disturbed.
Adjustment is made with the engine stopped,
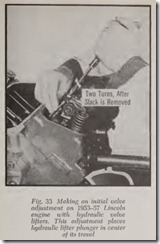
and the valve that is to be adjusted closed. The procedure is to turn the adjusting serew down ( eloekwise) while moving the push rod up and down until all slaek is removed. The correct posi tion can best be found by spinning the push rod between thumb and finger while turning the nut down until it just cannot be spun any more. Be careful not to foree the hydraulic plunger down into the lifter body by tightening the valve adjust ment too mueh.
After removing all slaek, turn the adjusting serew or nut the additional number of turns specified for the particular engine, whieh will plaee the lifter plunger in the center of its travel in the lifter body. When the adjustment is eorreet, tighten the locknut, if any. Fig. 33 shows the adjustment being made on a Lincoln engine.
ROCKER ARMS
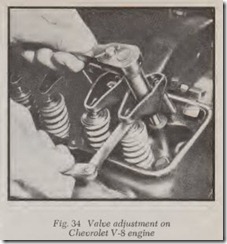
On some engines, rocker arms oscillate on sta tionary tubular shafts mounted on suitable sup ports fastened to the cylinder head. On other engines, the roekcr arms are mounted on indi vidual studs pressed or screwed into the head, and fastened by a nut which is also used for adjusting the valve elearanee, as already explained. This design, Fig. 34, eliminates the con ventional shaft and gives the engine designer more freedom to position the valves and coolant passages to the best advantage.
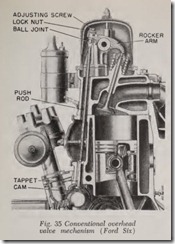
On engines using rocker arm shafts, the upper end of the push rod usually terminates in a cup which fits around a ball on the rocker arm, Fig. 35. The lower end of the push rod rests on the valve lifter, or tappet. The engine oil pump supplies oil under pressure to the hollow rocker arm shafts. Drilled openings in the shaft deliver the oil to the rocker arm bearings. From here oil flows through a channel in the rocker arm which supplies lubri cant to the cup and ball at the top of the push rod.
With individually mounted rocker arms the arrangement is somewhat different. Usually these rocker arms are stamped from sheet steel and their upper surface forms a sort of trough (see Fig. 34). With this type of rocker arm, the pus’ rod upper end is ball-shaped, and fits into an upside down cup in the end of the rocker arm. The push rods are hollow, and oil is pumped up from the hydraulic lifters through them into the rocker arms. It then runs down to the rocker arm pivot and to the valve end of the arm.
This type of rocker arm and push rod is also SOP1etimes used in conjunction with rocker arm shafts.
Other variations include adjustable and non adjustable rocker arms, adjustable and non adjustable push rods and various combinations of the two.
