Monitoring Systems
I define monitoring system as a device or devices that monitor condi- tions, alarms, and events and report them to a data collection computer system or programmable logic controller (PLC).
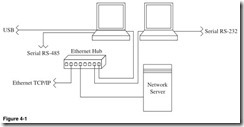
Figure 4-1 is a computer-based monitoring system. This type of system is used to monitor and collect data from the process or environments, and it can have some control functions, which are usually limited to the control of a few control I/O. When more complex control is required, then a PLC is used to control and collect data. The network shown has the most commonly used network protocols. The types of networks that are most used in the field for monitoring are the serial daisy-chained network RS-232, serial multipoint network RS-485, USB interface, and Ethernet topology. I will look at each, and we will see how they are used. Each one is explored in the following pages.
Programmable Logic Controllers
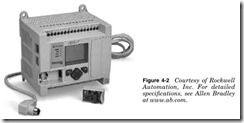
Programmable logic controllers such as the Allen Bradley Micrologix 1100 in Fig. 4-2 are used to collect and control systems with a couple
of inputs to 80 digital and analog inputs and outputs. For the purposes of this book we will look at the data collection of a few I/O. One of the main advantages of using a PLC for data collection is that it can commu- nicate the information on multiple networks. The Micrologix 1100 can use 10/100 Mbps Ethernet/IP and RS-3232 and RS-485, which makes it very flexible as a monitoring/data collection system.
Monitoring and Control Modules
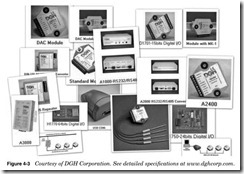
Monitoring and control modules are devices that allow the monitoring and control of processes and environmental conditions. Modules use RS-232 and RS-485 and Modbus protocols to communicate with monitor- ing computer systems. A lot of equipment today, such as computer room air conditioning (CRAC) units and kilowatt meters, have built-in mod- ules that support Modbus on RS-485 communication. When equipment that needs to be monitored does not have an internal Modbus module, external modules such as the DGH Corporation modules in Fig. 4-3 can be used. Modules and devices like those offered by DGH Corporation also allow for the conversion from one network topology to another. For a complete list of modules and converters offered by DGH Corporation or for specifications, visit their website at www.dghcorp.com.
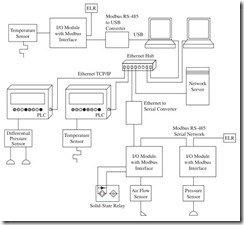
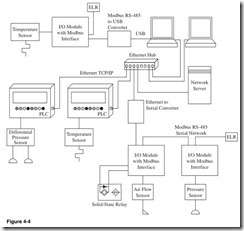
Figure 4-4 is a very busy diagram and uses many network protocols and interfaces. In the next pages we will take the network apart and look at each type of system.
RS-232 Introduction and Specifications
RS-232, the best-known serial interface, is implemented on almost all computers available today.
RS-232 is an interface most often used to connect one data terminal equipment (DTE) to one data communication equipment (DCE) at a maxi- mum speed of 20 kbps with a maximum cable length of 50 ft or the cable length equal to a capacitance of 2500 pF. [1 picofarad (pF) = 1 trillionth of a farad (F).] This latter rule is often forgotten. This means that using a cable with low capacitance allows you to span longer distances with- out going beyond the limitations of the standard. If, for example, UTP CAT-5 cable is used with a typical capacitance of 17 pF/ft, the maximum allowed cable length is 2500 pF/17 pF = 147 ft. This is sufficient where computer equipment is connected using a modem or short cables. Using twisted-pair shielded cable will reduce or eliminate noise and communication errors. Line noise is the chief cause of communication errors (see Fig. 4-6a).
Interface communication as defined in the RS-232 standard is an asyn- chronous serial communication method. The term serial means that the information is sent 1 bit at a time. The term asynchronous tells us that the information is not sent in predefined time slots. Data transfer can start at any time, and it is the task of the receiver to detect when a message starts and ends.
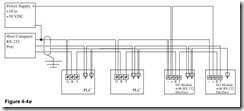
Devices in a daisy-chain RS-232 network are looped in series. Please refer to Fig. 4-4e.
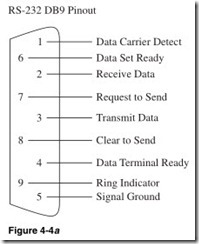
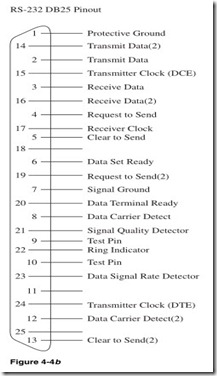
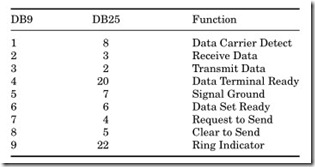
The original pin out for RS-232 was developed for a 25-pin sub D con- nector. Since the introduction of the smaller serial port on the IBM-AT, 9-pin RS-232 connectors are commonly used. Most of the computers now have USB ports; if equipped with a serial port, they will have the DB9 serial port version.
The following table compares DB9 to DB25:
Figure 4-4c shows typical RS-232 connections. In this example there is a modem connected to a single computer. This is the most used con- figuration of the RS-232 interface.
Figure 4-4d is an example of a daisy-chained RS-232 network. RS-232 multidrop networks can have 124 devices of DGH Corporation modules in the network.
Figure 4-4e is a wiring diagram of an RS-232 daisy-chain network. Shielded cable is used to reduce or eliminate noise (see Fig. 4-6a). When terminating the wire, make the exposed (stripped) end of the wire as short as possible, and keep it away from power conductors to minimize the introduction of noise. This diagram is based on the specification for the DGH Corporation modules. Check the job specification to ensure proper wiring of the modules.
1. Host computer with RS-232 serial port. This will usually be a 9-pin connector; see Fig. 4-4a for pin out.
2. Green pin 5 signal ground, on a 9-pin connector. This is not the shield earth or frame ground. Make sure that the connection is electrically and mechanically secure. If the wire should come loose, the entire network will be lost.
3. Black pin 2 receive data, on a 9-pin connector, is looped through the devices. I like to terminate the wire with a crimp-type wire nut to ensure that the connection will not vibrate loose. On the last device in the chain it is terminated on the T (transmit data). Make sure that the connection is electrically and mechanically secure. If the wire should come loose, the entire network will be lost.
4. Red pin 3 transmit data, on a 9-pin connector, is connected to the R (receive data) in the first device. Then it is connected to T (transmit data) to loop to the next device. In the last device it is terminated on the R terminal. Make sure that the connection is electrically and mechanically secure. If the wire should come loose, the entire network will be lost.
5. Blue is the shield that is grounded in the panel to the earth or frame ground. The shield is only grounded at one end in the panel. This is to prevent a ground loop and eliminate noise. I like to use
heat shrink tubing to insulate the ground. If this is not possible, then tape the shield ground so that it does not short or touch the ground. Use the good tape—not the 12 rolls for a dollar stuff. I like to terminate the wire with a crimp-type wire nut to ensure that the connection will not vibrate loose.
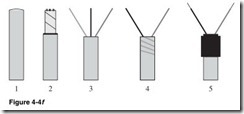
Figure 4-4f is a method for terminating a shielded twisted-pair cable.
1. Shielded twisted-pair cable.
2. Strip the cable, keeping the stripped wire as short as possible, being careful not to nick the wires and expose the shield. Keep the stripped wire away from power conductors to minimize noise.
3. Remove the shield and separate the wires. In Fig. 4-4f the light gray wire is the shield, the black wire is the R (receive data), and the dark gray wire is the T (transmit data).
4. Twist the shield back around the wire to keep it from grounding or shorting.
5. Insulate the shield. I like to use heat shrink tubing. If that is not possible, then wrap tape around the shield, insulating the shield. If you use tape, then use the good tape; it is important that this does not come loose with heat or humidity.
Figure 4-4g is a method for terminating a shielded twisted-pair cable for an RS-232 loop network.
1. Shielded twisted-pair cables.
2. Strip each of the cables, keeping the stripped wire as short as pos- sible, being careful not to nick the wires and expose the shield. Keep the stripped wire away from power conductors to minimize noise.
Remove the shield and separate the wires. In Fig. 4-4g the light gray wire is the shield, the black wire is the R (receive data), and the dark gray wire is the T (transmit data).
3. Join the cables and twist the shield together.
4. Twist the shields back around the wire to keep it from grounding or shorting.
5. Insulate the shield. I like to use heat shrink tubing. If that is not possible, then wrap tape around the shield, insulating the shield. If you use tape, then use good tape; it is important that this does not come loose with heat or humidity.
6. Twist the stripped ends of the black wires [R (receive data)] together and connect using a crimp-type wire nut.
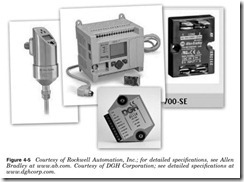
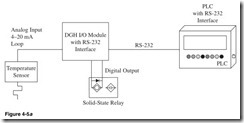
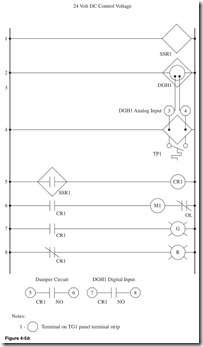
Figure 4-5 shows an Allen Bradley 837E temperature sensor with 4- to 20-mA output; an Allen Bradley MicroLogix 1100 PLC with RS-232,
RS-485, and Ethernet; an Allen Bradley 700SE solid-state relay; and a DGH Corporation D1000 RS-232 I/O module with analog input and digital output.
Shown in Fig. 4-5b:
Line 1 Power for SSR1.
Line 2 Power for DGH1.
Line 3 Analog input of 4 to 20 mA to DGH1.
Line 4 Power to temperature sensor. Output from sensor of 4 to 20 mA to input of DGH1.
Line 5 Normally Open contact SSR1, CR1 coil. When the tempera- ture sensor is in the preset range, the DGH1 module outputs a signal to the digital output, which energizes the SSR1, closes the contact, and holds it closed until the temperature is outside of the preset range. This energizes control relay CR1. DGH1 will communicate the temperature to the PLC over the RS-232 network, and the PLC can react and run the required program.
Line 6 Normally Open contact CR1, coil motor starter M1, Normally Closed overload contact of M1. When CR1 is energized, the motor will start the blower motor.
Line 7 Normally Open contact CR1, green pilot light. When CR1 is energized, the green pilot light will be illuminated.
Line 8 Normally Closed contact CR1, red pilot light. The red pilot light will be illuminated until CR1 is energized.
