Objectives
After studying this unit, the student will be able to:
• Interpret a wiring diagram
• Develop a wiring diagram from a schematic diagram
• Connect a control circuit using a wiring or schematic diagram
Wiring diagrams will now be developed for the three circuits just discussed. The method used for developing wiring diagrams is the same as the method used for installing new equipment. To il lustrate this principle, the components of the sys tem will be placed on paper and connections will be made to the various contacts and coils. Using a little imagination, it will be possible to visualize actual relays and contacts mounted in a panel, and wires connecting the various components.
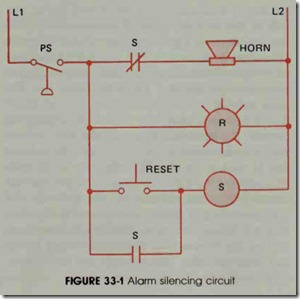
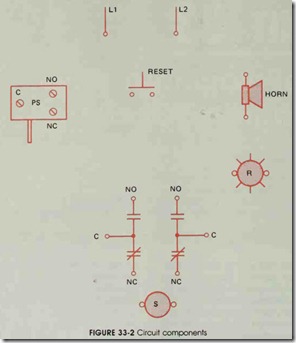
Figure 33-1 shows the schematic for the alarm silencing circuit, and figure 33-2 shows the components of the system. The connection of the circuit is more easily understood with the aid of a simple numbering system. The rules for this sys tem are as follows:
A. Each time a component is crossed the num ber must change.
B. Number all connected components with the same number.
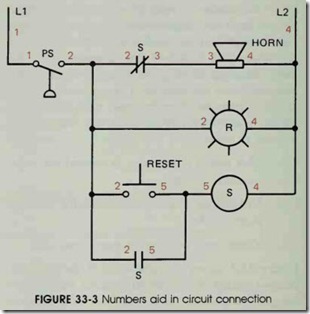
C. Never use a number set more than once. Figure 33-3 shows the schematic of the alarm silencing circuit with numbers placed beside each component. Notice that a 1 has been placed beside L1 and one side of the pressure switch. The pres sure switch is a component. Therefore, the num ber must change when the pressure switch is crossed. The other side of the pressure switch is numbered with a 2. A 2 is also placed beside one ide of the normally closed S contact, one side of the red warning light, one side of the normally open reset push button, and one side of the nor mally open S contact. All of these components are connected electrically; therefore, each has the same number.
When the normally closed S contact is crossed, the number is changed. The other side of the normally closed S contact is now a 3, and one side of the horn is a 3. The other side of the horn is connected to L2. The other side of the red warning light and one side of relay coil S is also connected to L2. All of these points are labeled with a 4. The other side of the normally open reset button, the other side of the normally open S contact, and the other side of relay coil S are numbered with a 5.
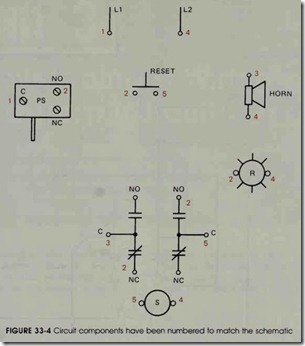
The same numbers that are used to label the schematic in figure 33-3 are used to label the com ponents shown in figure 33-4. L1 in the schematic is labeled with a 1; therefore, 1 is used to label L1 on the wiring diagram in figure 33-4. One side of the pressure switch in the schematic is labeled with a 1 and the other side is labeled with a 2. The pressure switch in the wiring diagram is shown with three terminals. One terminal is labeled C for common, one is labeled NO for normally open, and one is labeled NC for normally closed. This is a common contact arrangement used on many pilot devices and control relays (see figure 15-1). In the schematic the pressure switch is connected as a normally open device; therefore, termi als C and NO will be used. A 1 is placed by terminal C and a 2 is placed beside terminal NO. Notice that a 2 has also been placed beside one side of the normally open reset button, one side of the nor mally closed contact located on relay S, one side of the normally open contact located on relay S, and one side of the red warning light. A 3 is placed beside the common terminal of relay con tact S which is used to produce a normally closed contact, and beside one of the terminal connec tions of the horn. A 4 is placed beside L2, the other terminal of the horn, the other side of the red warning light, and one side of relay coil S. A 5 is placed on the other side of relay coil S, the other side of the normally open reset button, and on the common terminal of relay contact S which is used as a normally open contact.
Notice that the numbers used to label the components of the wiring diagram are the same as the numbers used to label the components of the schematic. For instance, the pressure switch in the schematic is shown as being normally open and is labeled with a 1 and a 2. The pressure switch in the wiring diagram is labeled with a 1 beside the common terminal and a 2 beside the NO terminal. The normally closed S contact in the schematic is labeled with a 2 and a 3. Relay S in the wiring diagram has a normally closed contact labeled with a 2 and a 3. The numbers used to label the com ponents in the wiring diagram correspond to the number used to label the same components in the schematic.
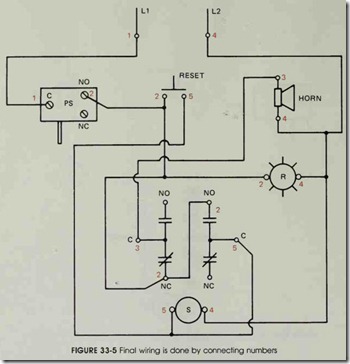
After labeling the components in the wiring diagram with the proper numbers, it is simple to connect the circuit, figure 33-5. Connection of the circuit is made by connecting like numbers. For example, all of the components labeled with a 1 are connected, all of those labeled with a 2 are connected, all of the 3s are connected, all of the 4s are connected, and all of the Ss are connected.
REVIEW QUESTION
1. Why are numbers used when developing a wiring diagram from a schematic diagram?
