Assembling and Make–Up
Assembling is the operation of putting together the various lengths of pipe and fittings used in an installation.
If no mistakes have been made in cutting the pipe to the right length or in following the dimensions on the blueprint, the pipe and fittings may be installed without difficulty. In other words, the last joint (either a right or left union, or long screw joint) will come together smoothly or, as they say in the trade, make up.
Screwed joints are put together with red or white lead pigment mixed with graphite and linseed oil, or with some standard commercial joint compound.
It is unnecessary to put much material on the threads because it will be simply pushed out and wasted when the joint is screwed up.
It should be put on evenly and cover all the threads, with care being taken not to let any touch the reamed end of the pipe where it may get inside. The red lead is preferably obtained in the powder form and mixed with oil and a little dryer at the time the pipe is to be made up. Get a clean piece of glass on which to prepare the lead. The toothbrush should be laid on the glass after applying the lead in order to avoid getting grit on the brush and paint on the table. When grit becomes mixed with the lead, it prevents close contact of the filling and pipe, thus making the joint less efficient.
The following steps should be taken before making up a screwed joint:
1. Ream the pipe ends.
2. Remove burrs from both the inside and outside of the pipe.
3. Thoroughly clean the inside of the pipe.
4. Thoroughly clean the threads.
Clean threads, a suitable joint compound, and proper tightening (neither too much nor too little) are all necessary for a satisfactory screwed joint.
There are four requirements for satisfactorily making up a flanged joint. In the proper order of sequence, these four requirements are as follows:
• Thorough cleaning
• Accurate alignment
• Using the proper gasket
• Tightening bolts in proper order
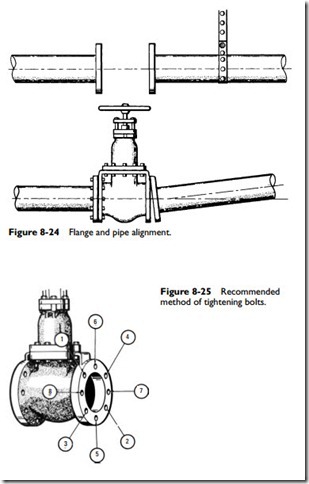
Thoroughly clean the flange face with a solvent to remove any grease, and wipe it dry. The alignment must be accurate for satisfactory makeup. This is particularly important where valve flanges are involved. If the alignment is poor, a severe stress on the valve flanges may distort the valve seats and prevent tight closure (see Figure 8-24).
Selecting a suitable gasket for the service is also very important. Using the wrong gasket may result in a leak.
Figure 8-25 illustrates the recommended method of tightening the bolts with a wrench. This must be done not in rotation but in sequence as indicated by the numbers. This is the crossover method. Do not fully tighten on the first round but go over them two or preferably three times to fully tighten.


