Boiler and Furnace Conversions
Sometimes it becomes necessary to convert an existing boiler or furnace to another fuel. This is usually the case when the fuel for which it was originally designed has become too expensive relative to others or does not meet the desired level of efficiency. During the early 1950’s when coal was becoming more and more expensive as a domestic heating fuel and before oil and gas burners were offered as integral parts of heating units by manufacturers, converting boilers and furnaces was much more widespread than it is today.
A number of manufacturers have made available gas-fired and oil-fired burners specifically designed for boiler and furnace con versions. It would be impossible within the space limitations of this chapter to cover all the different models of conversion burners offered by these manufacturers. Consequently, this chapter will emphasize all the ramifications involved in converting a boiler or furnace from one fuel to another rather than examining the specifications and operating characteristics of one or more conver sion burners.
PREPARATION FOR CONVERSION
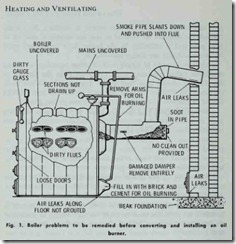
Before constructing a combustion chamber and installing a burner, the heating system should be carefully checked for defects and cleanliness. A boiler or furnace in need of repairs will not give satisfactory results after the burner is installed. Be certain that all flue passages are cleaned so that the maximum amount of heat generated is absorbed by the boiler. Soot or ash are good insulators and both are always undesirable.
All doors should fit tightly and all other openings or cracks should be tightly cemented shut. The stack from the furnace to the chimney should have tight joints. Dampers should not close off more than 80% of the cross sectional area of the stack. Stacks should be inspected for leaks and obstructions of any kind.
Remove the old fuel handling parts (e.g. the coal handling parts in a coal-fired furnace or boiler) and thoroughly clean the interior surfaces, removing all soot, scale, tars and dirt.
Any cracks in the heat exchanger should be repaired or re placed. On boilers, any water leaks should be sealed, broken gauges replaced, and loose boiler doors repaired or replaced. Air leaks along the floor should be grouted.
No positive catches should be used on firing doors. File off any catches so that the firing door will open easily to relieve pressure. A spring loaded door holder is recommended.
If a conversion burner with a direct spark ignition system is installed, no provision need be made for top venting or horizontal or downdraft furnace. Check the local codes for further informa tion.
Fig. 1 illustrates some of the typical problems encountered when converting a coal-fired boiler to oil. It is highly doubtful that a boiler would have all of these problems at the same time, but for your convenience they are included in the illustration to serve as a reference.
BASIC COMBUSTION CHAMBER REQUIREMENTS
An essential requirement for combustion chambers is that the flame be in the presence of refractory materials so that it will not come into contact with any of the relatively cold heating sur faces of the boiler.
When the flame is burned in suspension in a combustion cham ber of refractory material, the refractory walls will reflect the heat back into the flame and thereby increase its temperature. This increase in flame temperature due to reflected heat greatly increases the rapidity of combustion and thereby makes possible the burning of every particle of fuel with the zone of combustion.
The combustion chamber walls should be high enough so that the flame will not come in contact with the relatively cool walls of the boiler. At the burner end, the refractory wall need not be higher than the grate line of the boiler.
Finally, a well designed combustion chamber should provide rapid heating at the beginning of each firing cycle.
COMBUSTION CHAMBERS FOR CONVERSION GAS BURNERS
Conversion gas burners are designed for firing into a refractory lined combustion chamber constructed in the ashpit of a boiler or furnace. It is recommended that built-up combustion chambers used for this purpose be constructed of 2300°F. insulating fire brick, and cemented with insulating firebrick mortar.
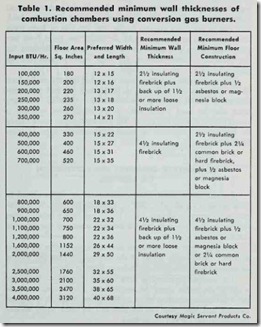
Recommended minimum wall thicknesses and floor areas of these combustion chambers are based on the maximum rated
Btu capacity (Table 1).
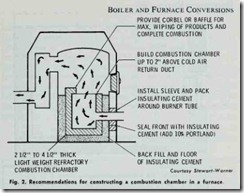
The height of combustion chamber walls will usually be de termined by the grate line. Build the side and front walls about 2 inches above the grate line. The grate lugs and base of the water legs of boilers should be covered by about 3 or 4 inches to avoid heating sections that may be filled with sediment. Carry the back wall one or two brick courses higher than the side or front walls and allow it to overhang in order to deflect hot gases from im pingement on the heat exchanger surfaces. Use a hard firebrick for the overhang section because the high velocity gases moving against it tend to erode a softer brick.
If the combustion chamber is to be placed directly on the floor of the ashpit, a layer of asbestos millboard (112 inch minimum thickness) should underlay the combustion chamber. Ordinary brick may be used if the floor of the combustion chamber is
·raised off the floor of the ashpit. The remaining open space should be filled with vermiculite or some other suitable type of loose insulation.
COMBUSTION CHAMBERS FOR CONVERSION OIL BURNERS
A combustion chamber for a conversion oil burner should be constructed of lightweight 2000 °F. insulating firebrick. With light weight refractory materials, there is no long smoky delay waiting for the fire box to reach the temperature necessary for complete combustion.
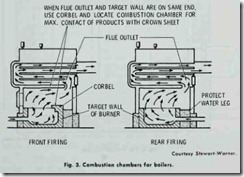
Different types of combustion chamber construction are shown in Figs. 2 and 3. The shape of the combustion chamber will be determined by the shape of the boiler or furnace.
The combustion chamber area (space) is equal to the inside width of the boiler times the length times the distance from the the combustion chamber floor to the crown sheet. It is recom mended that one cubic foot be provided for each boiler HP, or three cubic feet per G.P.H. oil-fired.
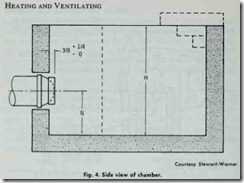
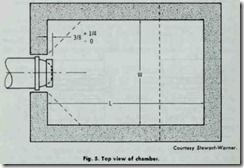
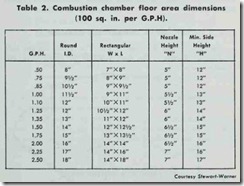
The floor area of the combustion chamber should be based on 1 00 square inches per gallon of oil (see Table 2 and Figs. 4 and 5). The minimum side wall height should conform to the recom mended measurements listed in Table 2.
An overhang in the form of stepped corbels will deflect hot gases from impingement on the heat exchanger surfaces, increase combustion chamber temperatures, and thereby promote good combustion.
High flame retention burners provide an intense flame that eliminates the need for refractory combustion chambers above
G.P.H., and has greatly reduced the need for such chambers in the 1.00 to 3.00 G.P.H. range.
CONSTRUCTION MATERIALS
The construction materials used in building combustion cham bers for conversion burners should consist of the best grade of insulating firebrick and a good, high temperature firebrick ce ment. The shape of the bricks is also important, with arch or circled brick of 4lh inch wall thickness being preferred. The ce ment filled joints between the bricks should be not more than 1/s inch. Always use the cement furnished or recommended by the brick manufacturer for cementing the insulating firebrick. The cement should be thinned to the consistency of a very thick cream before it is used. The usual method for applying the cement is to dip each brick into the cement and set it in place as you lay each course.
The insulating firebricks are usually backed up by a second insulating layer which will consist of one of the following materials:
1. Asbestos,
2. Common brick,
3. Magnesia block insulation,
4. Hard firebrick,
5. Expanded mica products (e.g. vermiculite or zonolite).
6. Dry sand,
7. Dry sand mixed with an expanded mica product.
Approved insulating firebricks recommended for use in constructing combustion chambers are:
1. Babcock & Wilcox No. K-23 and No. K-26,
2. A.P. Green No. G-23 and No. G-26,
3. Armstrong Cork No. A-23 and No. A-26,
4. Johns-Manville No. JM-23 and No. JM-26.
The spaces between the outer edges of the firebrick should be filled with high temperature cement and small pieces of firebrick to obtain firm construction and prevent infiltration of vapors through the wall.
BUILDING A COMBUSTION CHAMBER
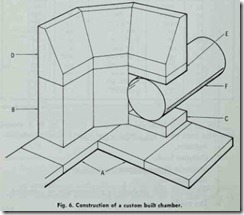
Fig. 6 illustrates the construction of a typical custom built combustion chamber. The steps involved in constructing this chamber are as follows:
1. Place split brick A on the ash pit floor to form the floor of the combustion chamber.
2. Mix the refractory binder in a shallow pan to the consist ency of a heavy cream.
3. Dip the bottom and sides of brick B in the binder and place it in a circular position on the combustion chamber floor. You should start at the back and work toward the front of the chamber.
4. Follow the same procedure with the rest of the bricks in the tier (i.e. those containing brick B).
5. When the tier is finished, tighten it in position with bands suitable for this purpose.
6. Fill behind the first tier with asbestos or rock wool.
7. Install top tier D in the same manner described in Steps 1-5, however use only one band to tighten it.
8. Cap the chamber with a mixture of 3 parts asbestos and 1 part fire clay and trowel smooth.
9. Place metal sleeve F in the opening and cement it tightly in place.
10. Insert the draft tube tin metal sleeve and pack with as bestos rope or rock wool.
Fig. 7 shows an old round cast iron boiler that has been con verted to oil. Note the height of the combustion chamber wall. The procedure for setting up the oil burner to the combustion chamber is illustrated in Fig. 8.
