Nonferrous Pipes, Tubing, and Fittings
Both brass and copper are used as materials for this type of pipe and tubing. The construction may be either cast or wrought, and the methods of joining include screwed, flared, and soldered.
The technique used with screwed fittings is the same as with ordinary malleable-iron fittings. This has already been described in the first part of this chapter.
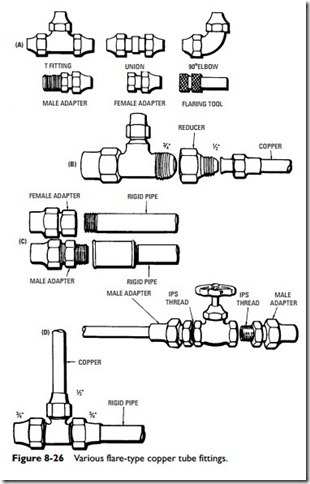
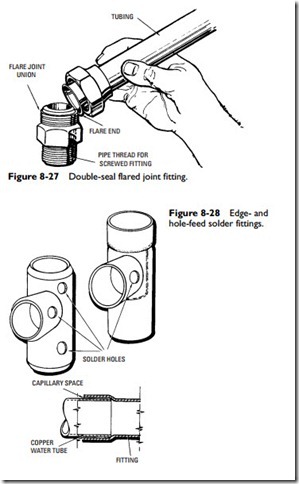
The fittings used for flared soft tube end joints are cast fittings. These are usually used on oil burner construction and supply lines. Flared joint fittings include elbows, tees, couplings, unions, and a full range of reducing and adapter combinations in all standard sizes and combinations of sizes from 1⁄8 inch to 2 inches inclusive (see Figure 8-26). A double-seal type of flared joint fitting is illustrated in Figure 8-27.
The sequence of operations required to make a flared joint are as follows:
1. Cut the tube with a hacksaw to the exact length, using a guide to ensure a square cut.
2. Remove all burrs and irregularities by filing both inside and outside.
3. Slip the coupling nut over the end of the tube and insert the flanging tool.
4. Drive the flanging tool into the tube with a few hammer blows, expanding the tube to its proper flare.
5. Assemble the fitting and tighten it by using two wrenches, one on the nut and the other on the body of the fitting.
Soldering Pipe
Solder fittings usually come in cast bronze and wrought copper. The two kinds of fittings used are the edge-feed fitting and the hole- feed fitting (see Figure 8-28).
The basic principle of solder fittings is capillary attraction. Because of capillary attraction, solder can be fed vertically upward between two closely fitted tubes to a height many times the distance required to made a soldered joint, regardless of the size of the fitting.
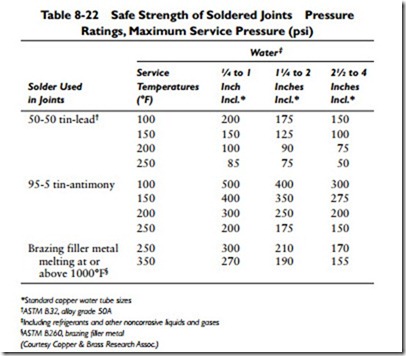
Either a 50-50 tin-lead solder or a 95-5 tin-antimony solder is recommended for joining copper tube. The former is generally used for moderate pressures with temperatures ranging up to 250°F. The 95-5 tin-antimony solder is used where higher strength is required, but it has the disadvantage of being difficult to handle. Pressure ratings for soldered joints using these two solders are listed in Table 8-22. A suitable paste-type flux is recommended for use with these solders.
The series of operations necessary in making a solder fitting joint are as follows:
1. Measure the tube to proper length so that it will run the full length of the socket of the fitting.
2. Cut the tube end squarely.
3. Clean tube end and socket of fitting.
4. Apply soldering flux to the cleaned areas of tube and fitting socket.
5. Assemble the joint.
6. Revolve the fitting if you can, to spread the flux evenly.
7. Apply heat and solder.
8. Remove residual solder and flux.
9. Allow joint to cool.
With a hole-feed fitting that has a feed hole for the solder and a groove inside, the procedure is just the same as for an edge-feed fit- ting except that solder is fed into the feed hole until it appears as a ring at the edge of the fitting. Be sure the hole is kept full of solder, as it shrinks on cooling and solidifying.
Do not select fittings that are oversize because they will result in a loose fit. The capillary action is dependent on a fairly tight fit, although a certain amount of looseness can be tolerated. A loose fit causes the greatest difficulty when working with large-size copper tubes.
A thorough cleaning of the tube surface and the fitting socket is absolutely essential for a strong, tight, and durable joint. This can- not be emphasized too strongly.
Brazing Pipes
Brazing is rapidly taking the place of many operations formerly performed by soldering because it is simpler and quicker and results in a stronger joint. Like soldering, the brazing alloy is applied at temperatures below the melting point of the metal being brazed. In this respect, both brazing and soldering differ from welding, which forms a joint by melting (fusing) the metal at temperatures above its melting point.
During the brazing process, the brazing alloy is heated until it adheres to the pipe surface and enters into the porous structure of the metal. The brazed joint is almost always as strong as the brazed metal surrounding it.
Brazing can be used to join nonferrous metals, such as copper, brass, or aluminum, or ferrous metals, such as cast iron, malleable iron, or steel. The brazing alloy used in making the joint depends on the type of metal being brazed. For example, aluminum requires the use of a special aluminum brazing alloy, whereas a low-temper- ature brazing alloy or a silver alloy is recommended for brazing copper and copper alloys. A local welding supply dealer should be able to provide answers to your questions about which alloy to use.
The procedure for brazing consists essentially of the following operations:
1. Clean both surfaces.
2. Apply a suitable flux.
3. Align and clamp the parts to be joined.
4. Preheat the surface until the flux becomes fluid.
5. Apply a suitable brazing alloy.
6. Allow the surface time to cool.
7. Clean the surface.
The pipe surfaces must be thoroughly cleaned, or the result will be a weak bond or no bond at all. All dirt, grease, oil, and other surface contaminants must be removed, or the capillary attraction so important to the brazing process will not function properly.
Select a flux suited to the requirements of the brazing operation. Fluxes differ in their chemical compositions and the brazing temperature ranges within which they are designed to operate. Apply the flux to the joint surface with a brush.
Align the parts to be joined, securing them in position until after the brazing alloy has solidified. Preheat the metal to the required brazing temperature (indicated by the flux reaching the fluid stage).
After the flux has become fluid, add the brazing alloy. If conditions are right, the brazing alloy will spread over the metal surface and into the joint by capillary attraction. Do not overheat the surface. Remove the heat as soon as the entire surface has been covered by the brazing alloy. Allow time for the joint to cool and then clean the surface.


