Installing Windows and Doors
Windows and doors account for at least 30 percent of the total heat loss (or heat gain) in a structure. Much of this results from air infiltration through cracks around the windows and doors, or in the walls of the structure. Weather stripping is used for window and door cracks, caulking for wall cracks (Fig. 12).
Cold drafts (i.e. cold air infiltration) and warm air leakage can be greatly reduced if the windows and doors of a house are properly weatherstripped and caulked. This method of reducing air leakage or infiltration is much cheaper than installing storm windows, and will reduce heating and cooling costs up to as high as 30 percent.
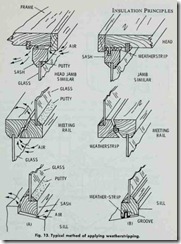
Caulk the frame around all the windows and doors and install weather strip along movable joints , (e.g. the edges of a door). If this is done properly, a mist or fog will form on windows located on the downwind side of the structure. Not only will caulk and weatherstripping reduce heating and cooling costs, it will also provide high and healthy humidity conditions inside the structure. Typical methods of applying weatherstripping to windows are illustrated in Fig. 13.
Using storm windows or windows made from insulating glass will cut heat loss by as much as 40 to 50 percent. Although the initial cost for installing storm windows may seem high, it will be more than off-set by the lowered heating costs. The savings will be highest in those areas in which snow lies on the ground all winter.
Storm windows not only reduce heat loss in the winter, but also heat gain in the summer. That is to say, they are equally ef fective in reducing the amount of summer heat that infiltrates the interior of the structure.
Various methods for double glazing (i.e. the installing of an additional layer of glass) and adding storm sash are illustrated in Figs. 14 and 15.
Overhead and Sidewall Insulation
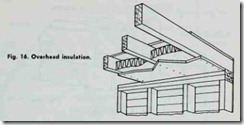
Overhead insulation (Fig. 16) refers to the layer of insulation covering the top floor ceiling. This layer should be a minimum of 6 inches thick over the entire area. By carefully insulating this section of the structure, heating costs can be reduced by 10 to 15 percent. Air conditioning costs in the summer will also be re duced. The overhead insulation should be checked in an older structure, because some building contractors will only install 3 to 4 inches of the material. Adding an additional 2 to 3 inches is not only easy to do, but well worth the effort.
Tacks or staples can be used to attach batt or blanket insulation flanges to the wood joists supporting the ceiling. Blanket, batt, and loose insulation require a water vapor barrier placed be ween the insulating material and the ceiling lath (Fig. 17). Re flective insulation is attached to the middle of the joists so that there is an air space both above and below it. No water vapor barrier is necessary. When using reflective insulation, additional protection is required for the insulating material, which usually takes the form of lath (below) and an attic floor (above).
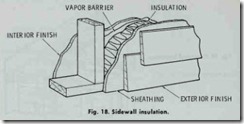
Sidewall insulation (Fig. 18) refers to insulation installed in the exterior sidewalls of a house or building. In new construction, this should be incorporated as a part of the design before ground is broken. An existing house or building presents a different prob lem, because there is always the possibility of moisture condensa tion forming within the walls. If you feel you lack the expertise, then expert technical advice should be obtained before attempting to install insulation in a sidewall.
INSULATING ATTICS, ATTIC CRAWL SPACES, AND FLAT ROOFS
Most houses and many other structures are constructed with an attic or attic crawl space between the roof and the ceiling of the top floor. Unless this space is properly insulated and venti lated, it will produce the following two problems:
1. Condensed moisture formation,
2. Excessive heat loss or gain.
During the winter months, the heat from the occupied lower spaces moves upward (because warm air is lighter) into the cooler attic or attic crawl space. As it moves, the heat follows a number of different pathways including:
1. Through poorly insulated ceilings,
2. Around cracks in attic stairway doors or attic pulldown stairways,
3. Through ceiling fixture holes,
4. Along plumbing vents and pipes,
5. Along air ducts,
6. Through air spaces within interior partitions.
Each of these pathways for heat transmission can be blocked by insulation. Typical attic insulation methods are illustrated in Fig. 19. Attic door cracks can be blocked with weatherstripping. Pipe, duct, vent, and fixture holes can be sealed off by stuffing them with loose insulation torn from batts or blankets.
The ceiling of the top floor should be covered with a mini mum of 6 inches of suitable insulation material to be properly
effective in reducing the heat loss from the occupied spaces dur ing the winter months, or the heat gain during the summer. This can be installed during the initial construction stages of a new house or building, or added to the attic floor surface of an exist ing structure. It is not a particularly difficult thing to do (see OVERHEAD INSULATION in this chapter). Sealing or filling the air spaces within interior partitions is relatively easy to do if it is a question of new construction. An existing structure presents a more difficult problem; one that generally requires considerable experience in installing insulation materials.
Sometimes a half wall (i.e. a knee wall) is installed between the attic floor and the roof. This is most commonly insulated with blanket insulation as illustrated in Fig. 20.
The condensation of moisture in the attic or an attic crawl space is caused by the moisture in the warm air rising from the lower occupied spaces. This moisture comes in contact with the colder air of the attic, condenses and causes the insulation and other building materials to become damp. In time, this dampness will have a damaging effect. Ventilation is an effective method of reducing or eliminating condensation in attics and attic crawl spaces. The air enters and leaves through vents placed in the gables and cornices. The size of the vents will be determined by the area being ventilated.
A fiat roof can be effectively insulated by installing 2-inch thick rigid insulation board before the roofing material is ap plied. Roofing felt should be placed between the bare wood boards of the roof deck and the insulation. Additional insulation is placed under the deck boards (i.e. between the deck boards and the ceiling of the room below) (Fig. 21).
FOUNDATION CRAWl SPACES
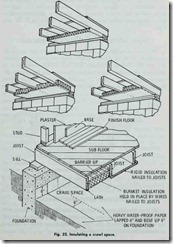
Some houses and buildings are constructed so that the first floor is raised slightly above the ground , leaving a crawl space between the two. These foundation crawl spaces can be effectively insulated by attaching blanket or batt insulation between the joists supporting the floor, or by nailing rigid insulation to the bottom of the joists (Fig. 22). Placing waterproof paper on the surface of the ground in the crawl space and extending it up along the inside of the foundation walls will increase the effectiveness of the insulation.
Condensation can aiso occur in foundation crawl spaces. The accumulation of moisture resulting from condensation can be prevented or effectively reduced by providing adequate ventila tion. Foundation crawl space vents should be placed in the side walls.
![fig.-12.-Caulking-around-windows-and[1] fig.-12.-Caulking-around-windows-and[1]](http://machineryequipmentonline.com/hvac-machinery/wp-content/uploads/2020/04/fig.-12.-Caulking-around-windows-and1_thumb1.jpg)

![Fig.-14.-Typical-double-glazing_thum[1] Fig.-14.-Typical-double-glazing_thum[1]](http://machineryequipmentonline.com/hvac-machinery/wp-content/uploads/2020/04/Fig.-14.-Typical-double-glazing_thum1_thumb1.jpg)
![Fig.-15.-Typical-storm-sash-construc[2] Fig.-15.-Typical-storm-sash-construc[2]](http://machineryequipmentonline.com/hvac-machinery/wp-content/uploads/2020/04/Fig.-15.-Typical-storm-sash-construc2_thumb1.jpg)

![Fig.-17.-Three-methods-of-insulating[2] Fig.-17.-Three-methods-of-insulating[2]](http://machineryequipmentonline.com/hvac-machinery/wp-content/uploads/2020/04/Fig.-17.-Three-methods-of-insulating2_thumb1.jpg)

![Fig.-19.-Attic-insulation-methods._t[1] Fig.-19.-Attic-insulation-methods._t[1]](http://machineryequipmentonline.com/hvac-machinery/wp-content/uploads/2020/04/Fig.-19.-Attic-insulation-methods._t1_thumb1.jpg)
![Fig.-20.-Insulating-a-knee-wall-with[2] Fig.-20.-Insulating-a-knee-wall-with[2]](http://machineryequipmentonline.com/hvac-machinery/wp-content/uploads/2020/04/Fig.-20.-Insulating-a-knee-wall-with2_thumb1.jpg)
![Fig.-21.-Insulating--a-flat-roof._th[2] Fig.-21.-Insulating--a-flat-roof._th[2]](http://machineryequipmentonline.com/hvac-machinery/wp-content/uploads/2020/04/Fig.-21.-Insulating-a-flat-roof._th2_thumb1.jpg)
