Connecting rods
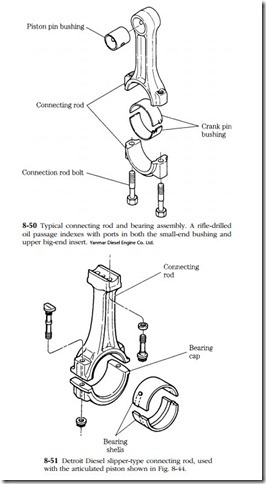
No part is more critical than the connecting rod and none more conservatively designed (Fig. 8-50).
Construction
All diesel engines employ two-piece, H-section rods, heavily faired at the transitions between bearing sections, and forged from medium-carbon steel or from that ubiquitous alloy, SAE 4140. The small end is generally closed and fitted with a replaceable bushing (some automotive OEMs do not catalog replacement bushings, but a component machinist can work around that). The big end carries a two-piece precision insert bearing. A few rods terminate in a slipper, which bolts to the piston pin, as shown in Fig. 8-51. Open construction makes the whole length of the pin available as a bearing surface.
Whenever possible, interface between the shank and cap should be perpendicular to the crankshaft centerline. This configuration reduces side forces on the cap. However, the rod must be split at an angle to allow disassembly through the bore when crankpin diameter is large (as in Onan engines) or to prevent contact with other parts (Deere 6076).
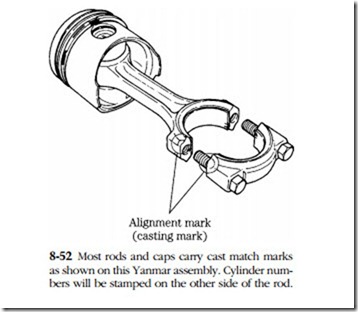
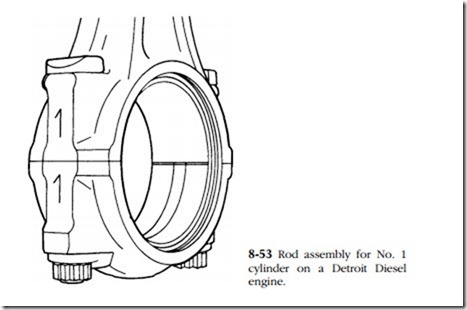
Connecting rods have a definite orientation relative to the piston and to the cap. The former is a function of transverse oil ports, drilled in the rod shank; the latter reflects the way connecting rods are manufactured. The relatively small connecting rods that we are dealing with are forged in one piece. Then the cap is separated (sometimes merely by snapping it off), assembled, and honed to size. Reversing the cap or installing a cap from another rod destroys bearing circularity. Typically, a mismatched assembly overheats and seizes within a few crankshaft revolutions. Rod shanks and caps carry match marks, and both parts are identified by cylinder number (Figs. 8-52 and 8-53). Errors can be eliminated by double- and triple-checking match mark alignment and cylinder numbers. Mechanics do well to observe the rule that no more than one rod cap should be disassembled at a time.
Service
The number stamped on the rod shank and cap should correspond to the cylinder number. Sometimes these numbers are scrambled or missing, and the mechanic must supply them. Stamp the correct numbers on the pads provided and, to prevent con- fusion, deface the originals.
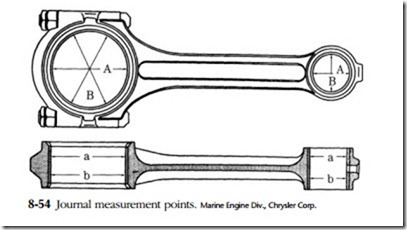
Mike rod journals at several places across the diameter, repeating the measurements on both sides to detect taper (Fig. 8-54). Inertial forces tend to stretch the rod cap and pinch the ends together. When this condition is present, the machinist should mill a few thousandths off the cap interface and, with the cap assembled and
torqued, machine the journal to size. Typically, this is done with a reamer, although automatic honing machines, such as the Sunnen or the Danish-made AMC, produce a finer, more consistent surface.
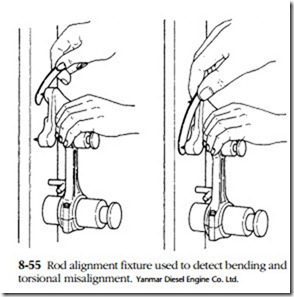
The machinist should check the alignment of each connecting rod with a fixture similar to the one shown in Fig. 8-55. Even so, these matters should not be entirely left to the discretion of the machinist. It is always prudent to check the work against the testimony of the engine. Rod and crankpin misalignment produces telltale wear patterns on piston thrust faces, on pin bores, and on the retainers and retainer grooves.
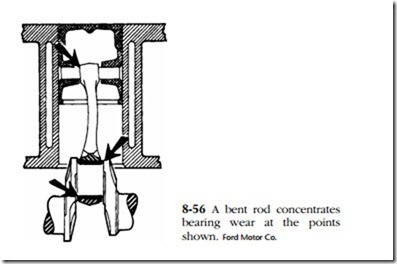
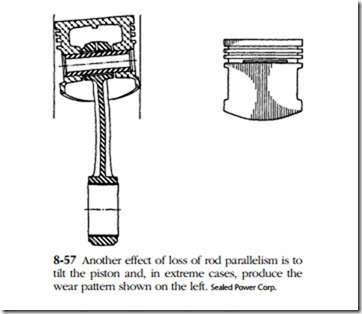
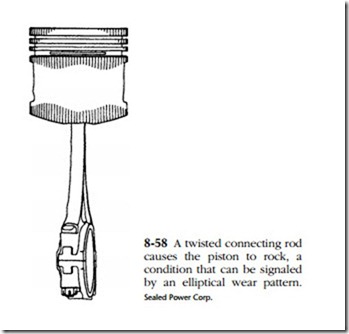
A bent rod tilts the piston, localizing bearing wear at the points shown in Fig. 8-56, This condition might also be reflected by an hourglass-shaped wear pattern on the thrust faces, as illustrated in Fig. 8-57. A twisted rod imparts a rocking motion to the piston, concentrating wear on the ring band and skirt edges (Fig. 8-58). Crankshaft taper generates thrust, which might scuff the skirt and could drive the pin through one or the other retainer.
Bent or twisted rods generally can be straightened, although some manufacturers warn against the practice.
Most rod bolts can be reused, if visual and magnetic-particle testing fails to reveal any flaws. Some recently developed torque-to-yield bolts can also be reused;
earlier types were sacrificial. Rod-bolt nuts should be replaced, regardless of the fastener type.
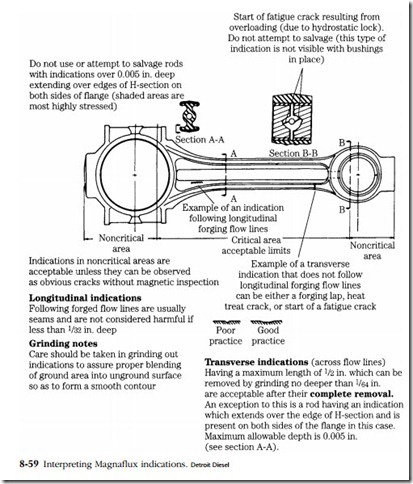
Used rods should be Magnafluxed. Interpretation of the crack structure thus revealed requires some judgment. Any rod that has seen service will develop cracks. One must distinguish between inconsequential surface flaws and cracks that can lead to structural failure. The drawing in Fig. 8-59 can serve as a guide.
In general, longitudinal cracks are not serious enough unless they are 1/32 in. deep, which can be determined by grinding at the center of the crack. Transverse cracks are causes of concern because they can be the first indication of fatigue. If the cracks do not extend over the edges of the H-section, are no more than 1/2 in. long, and less than 1/64 in. deep, they can be ground and feathered. Cracks over the H-section can be removed if 0.005 in. deep or less. Cracks in the small end are cause for rejection.
Small-end bushings are pressed into place with reference to the oil port and are finish-reamed. Loose bushings are a sign that the rod has overheated, and they can cause a major failure by turning and blocking the oil port.
What has been described are standard, industry-wide practices. One can go much further in the quest for a more perfect, less problematic engine. For example, it is good practice to match the weight of piston and rod assemblies to within 10 g or so—even when parts are not to be sent out for balancing. Surplus weight can be ground from the inner edges of the piston skirts. Some mechanics assemble one piston and rod to several crankpins. Differences in deck height between No. 1 and the last cylinder of the bank indicate an alignment problem, either between crankshaft throws or between the crankshaft centerline and deck.
