Objectives
After studying this unit, the student will be able to:
• Define what is meant by the plugging of a motor
• Describe how a control circuit using a zero-speed switch operates to stop a motor
• Describe the action of a time-delay relay in a plugging circuit
• Describe briefly the action of the several alternate circuits which use the zero-speed switch
• Connect plugging control circuits
• Recommend troubleshooting solutions for plugging problems
Plugging is defined by NEMA as a system of braking, in which the motor connections are re versed so that the motor develops a counter torque which acts as a retarding force. Plugging controls provide for the rapid stop and quick reversal of motor rotation.
Motor connections can be reversed while the motor is running unless the control circuits are de signed to prevent this type of connection. Any standard reversing controller can be plugged, ei ther manually or with electromagnetic controls. Before the plugging operation is attempted, how ever, several factors must be considered including:
1. the need to determine if methods of limiting the maximum permissible currents are nec essary, especially with repeated operations and de motors.
2. . the need to examine the driven machine to insure that repeated plugging will not cause damage to the machine.
PLUGGING SWITCHES AND APPLICATIONS
Plugging switches, or zero-speed switches, are designed to be added to control circuits as pilot devices to provide quick, automatic stopping of machines. In most cases, the machines will be driven by squirrel cage motors. If the switches are adjusted properly, they will prevent the direction reversal of rotation of the controlled drive after it reaches a standstill following the reversal of the motor connections. One typical use of plugging switches is for machine tools which must stop sud denly at some point in their cycle of operation to prevent inaccuracies in the work or damage to the machine. Another use is for processes in which the machine must stop completely before the next step of work begins. In this case, the reduced stopping time means that more time can be applied to pro duction to achieve a greater total output.
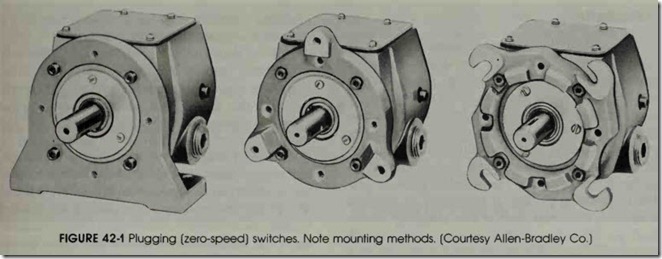
Typical plugging switches are shown in figure 42-1. The shaft of a plugging switch is connected mechanically to the motor shaft or to a shaft on the driven macnine. The rotating motion of the motor is transmitted to the plugging switch con tacts either by a centrifugal mechanism or by a magnetic induction arrangement (eddy current disc) within the switch. The switch contacts are wired to the reversing starter which controls the motor. The switch acts as a link between the mo tor and the reversing starter. The starter applies just enough power in the reverse direction to bring the motor to a quick stop.
Plugging a Motor to a Stop From One Direction Only
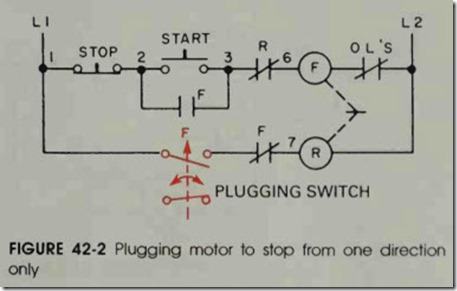
The forward rotation of the motor in figure 42-2 closes the normally open plugging switch contact. When the stop button is pushed, the for ward contactor drops out. At the same time, the reverse contactor is energized through the plug ging switch and the normally closed forward inter lock. Thus, the motor connections are reversed and the motor is braked to a stop. When the mo tor is stopped, the plugging switch opens to dis connect the reverse contactor. This contactor is used only to stop the motor using the plugging operation; it is not used to run the motor in re verse.
Adjustment
The torque that operates the plugging switch contacts will vary according to the speed of the motor. An adjustable contact spring is used to op pose the torque to insure that the contacts open and close at the proper time regardless of the mo tor speed. To operate the contacts, the motor must produce a torque that will overcome the spring pressure. The spring adjustment is gener ally made with screws that are readily accessible when the switch cover is removed.
Care must be exercised to prevent the entry of chips, filings, and hardware into the housing when it is opened. Such material may be attracted to the magnets or hamper spring action. The housing must be carefully cleaned before the cover is removed for maintenance or inspection.
Installation
To obtain the greatest possible accuracy in braking, the switch should be driven from t e shaft with the highest available speed that IS within the operating speed range of the switch.
The plugging switch may be driven by gears,
by a chain drive, or a direct flexible coupling. The preferred method of driving the switch is to con nect a direct flexible coupling to a suitable shaft on the driven machine. The coupling must be flex ible since the centerline of the motor or machine shaft and the centerline of the plugging switch shaft are difficult to align accurately enough to use a rigid coupling. The switch must be driven by a positive means. Thus, a belt drive should not be used. In addition, a positive drive must be used between the various parts of the machine being controlled , especially where these parts have large amounts of inertia.
The starter used for this type of circuit is a reversing starter that interchanges two of the three motor leads for a three-phase motor, reverses the direction of current through the armature for a de motor, and reverses the relationship of the run ning and starting windings for a single-phase motor.
Motor Rotation
Experience shows that there is little way of predetermining the direction of the rotation of motors when the phases are connected externally in proper sequence. This is an important consid eration for the electrician and the electrical con tractor when the applicable electrical code or specifications require that each phase wire of a distribution system be color coded.
If the shaft end of a motor runs counterclock wise rather than in the desired clockwise direc tion, the electrician must reconnect the motor leads at the motor. For example, assume that many three-phase motors are to be connected and the direction of rotation of all the motors must be the same. If counterclockwise rotation is desired, the supply phase should be connected to the mo tor terminals in the proper sequence, T1, Tz, and T3 • If the motor does not rotate in the desired counterclockwise direction using these connec tions, the leads may be interchanged at the motor. Once the proper direction of rotation is estab lished, the remaining motors can be connected in a similar manner if they are from the same manu facturer. If the motors are from different manufac turers, they may rotate in different directions even when all the connections are similar and the sup ply lines have been phased out for the proper phase sequence and color coded. The process of correcting the rotation may be difficult if the mo tors are located in a place that is difficult to reach.
Lockout Relay
The zero-speed switch can be equipped with a lockout relay or a safety latch relay. This type of relay provides a mechanical means of preventing the switch contacts from closing unless the motor starting circuit is energized. The safety feature in sures that if the motor shaft is turned accidentally, the plugging switch contacts do not close and start the motor. The relay coil generally is connected to the Tl and T2 terminals of the motor. The lock out relay should be a standard requirement for cir cuits to protect people, machines, and production processes.
PLUGGING WITH THE USE OF A TIMING RELAY
A time-delay relay may be used in a motor plugging circuit, figure 42-3. Unlike the zero speed switch, this control circuit does not com pensate for a change in the load conditions on the motor. The circuit shown in figure 42-3 can be used for a constant load condition once the timer is preset. If the emergency stop button in figure 42-3(A) is pushed momentarily and the normally open circuit is not completed, the motor will coast to a standstill. (This action is also true of the normal double contact stop button.) If the emergency stop button is pushed to complete the normally open circuit of the push button, contactor S is en ergized through the closed contacts (TD and R). Contactor S closes and reconnects the motor leads, causing a reverse torque to be applied. When the relay coil is de-energized, the opening of contact TD can be retarded. The time lag is set so that contact TD opens at or near the point at which motor shaft speed reaches 0 r/min.
ALTERNATE CIRCUITS FOR PLUGGING SWITCH
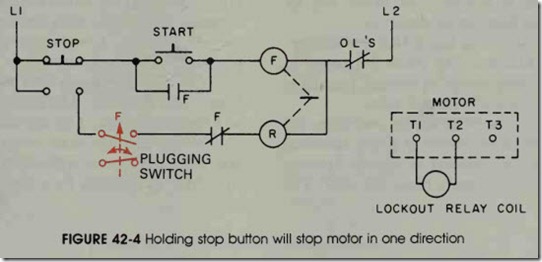
The circuit in figure 42-4 is used for opera tion in one direction only. When the stop push button is pressed and immediately released, the motor and the driven machine coast to a standstill. If the stop button is held down, the motor is plugged to a stop.
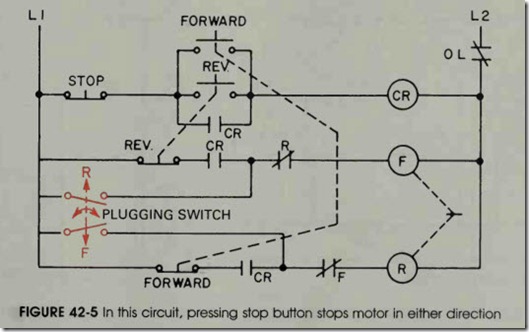
 Using the circuit shown in figure 42-5, the motor may be started in either direction. When the stop button is pressed, the motor can be plugged to a stop from either direction.
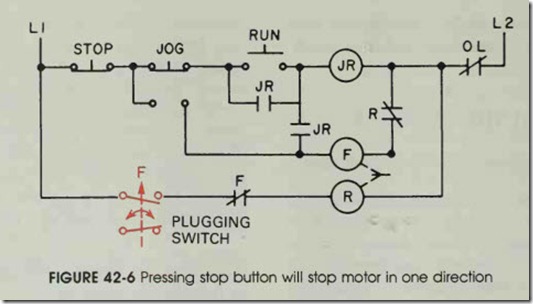
The circuit shown in figure 42-6 provides op eration in one direction. The motor is plugged to a stop when the stop button is pressed. Jogging is possible with the use of a control relay :
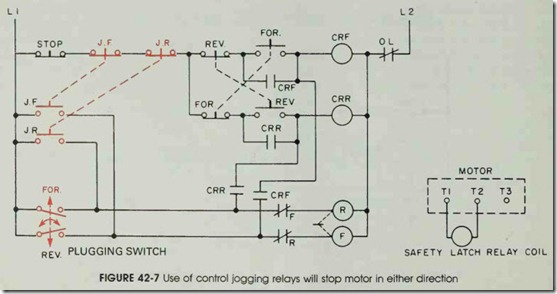
Figure 42-7 shows a circuit for controlling the direction of rotation of a motor in either direction. Jogging in either the forward or reverse direction is possible if control jogging relays are used. The motor can be plugged to a stop from either direc tion by pressing the stop button.
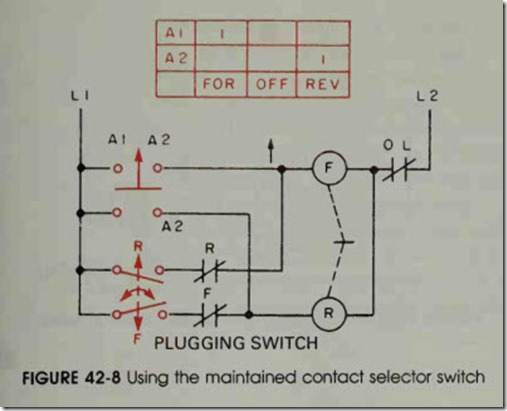
The circuit in figure 42-8 provides control in either direction using a maintained contact selec tor switch with forward, off, and reverse posi tions. The plugging action is available from either direction of rotation when the switch is turned to the off position. Low-voltage protection is not provided with this circuit.
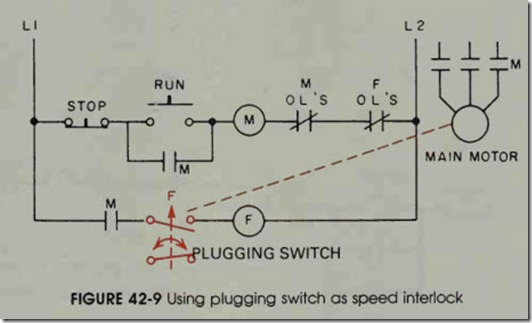
The circuit in figure 42-9 allows motor oper ation in one direction. The plugging switch is used as a speed interlock. The solenoid, or coil F, will not operate until the main motor reaches its run ning speed. A typical application of this circuit is to provide an interlock for a conveyor system. The feeder conveyor motor cannot be started until the main conveyor is operating.
ANTIPLUGGING PROTECTION
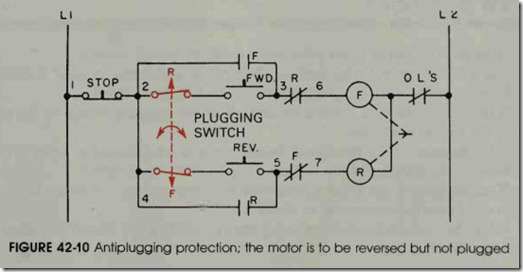
Antiplugging protection, according to NEMA, is obtained when a device prevents the application of a counter torque until the motor speed is reduced to an acceptable value. An anti plugging circuit is shown in figure 42-10. With the motor operating in one direction, a contact on the antiplugging switch opens the control circuit of the contactor used to achieve rotation in the op posite direction. This contact will not close until the motor speed is reduced. Then the other con tactors can be energized.
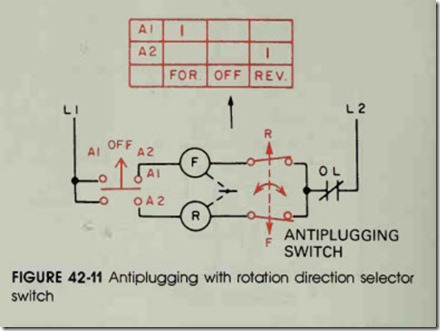
Alternate Antiplugging CircuitsThe direction of rotation of the motor is con trolled by the motor starter selector switch, figure 42-11. The antiplugging switch completes the re verse circuit only when the motor slows to a safe, preset speed. Undervoltage protection is not avail able.
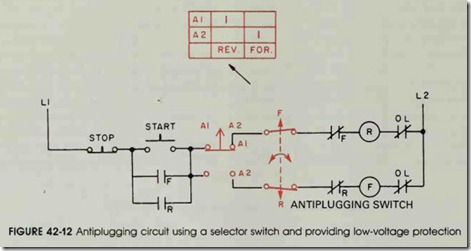
In figure 42-12, the direction of rotation of the motor is selected by using the maintained con tact, two-position selector switch. The motor is started with the push button. The direction of ro tation cannot be reversed until the motor slows to a safe, preset speed. Low-voltage protection is provided by a three-wire, start-stop, push-button station.
REVIEW QUESTIONS
1. In figure 42-2, what is the purpose of normally closed contact (F)?
2. Can a time-delay relay be used satisfactorily in a plugging circuit? Explain.
3. In what position must a plugging switch be mounted? Explain.
4. What is the preferred method of connecting the plugging switch to the motor or the driven machine?
5. What happens if the zero-speed switch contacts are adjusted to open too late?
6. What is the purpose of the lockout relay or safety latch relay?
7. What happens if the reverse push button is closed when the motor is running in the forward direction, as in figure 42-5?
8. What alternate methods of stopping are provided by the circuit described in figure 42-4?
9. If the motor described in figure 42-6 is plugging to a stop and the operator suddenly wants it to inch ahead or run, what action must be taken?
10. In figure 42-7, is it necessary to push the stop button when changing the
direction of rotation? Explain your answer.
11. In figure 42-8, what happens to the motor running in the forward direction if the power supply is lost for 10 minutes?
12. In figure 42-9, how is the feeder motor protected from an overload?
13. What is antiplugging protection?
14. During normal operation, when do the antiplugging switch contacts close?
15. If the supply lines are in the proper phase sequence (L1, L2, and L3) and are connected to their proper terminals on the motor (T1, T2, and T3), will all the motors rotate in the same direction? Why?
