THE HOPSCOTCH METHOD
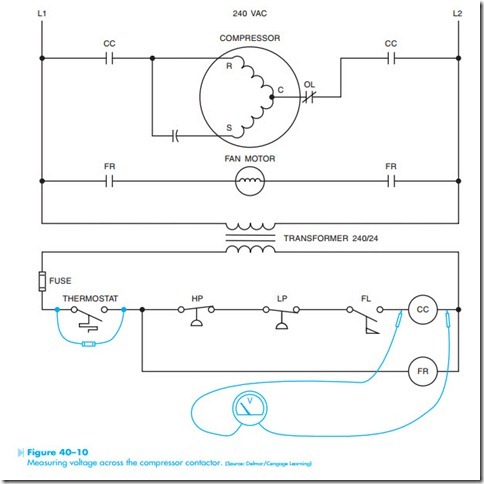
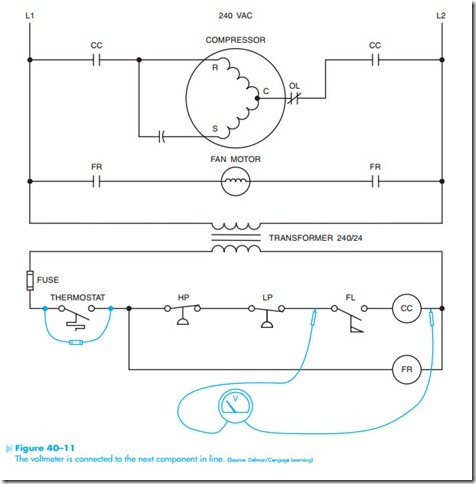
A very common troubleshooting method is called the hopscotch method. As the name implies, you jump from one component to another until the open part of the circuit is found. In the example in Figure 40–10, the voltmeter is connected across the coil of contactor CC. To use the hopscotch method of troubleshooting, leave one voltmeter probe connected to one side of the transformer and connect the other probe on the other side of the next component in line, Figure 40–11. If the voltmeter indicates 24 volts, it means that the flow switch is open and preventing the compressor contractor from energizing. If the voltmeter indicates 0 volts, it means that there is still an open condition somewhere else in the circuit that is preventing the voltmeter from receiving a flow or current. The 0 volt reading does not mean that contact FL is closed. Contact FL could be open but there is something else open in the circuit ahead of it. In this example, it will be assumed that the voltmeter indicates 0 volt.
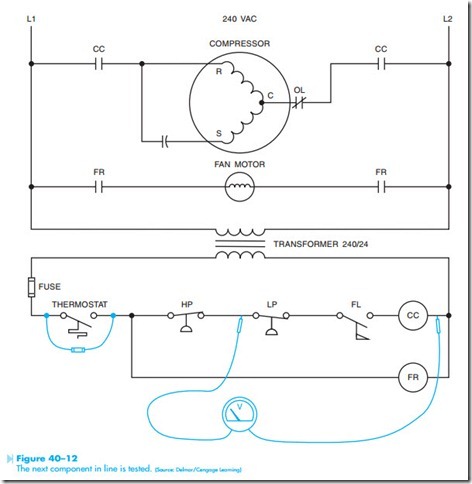
The next step is to hopscotch to the next component, which is the low pressure switch, Figure 40–12. If the voltmeter indicates a voltage of 24 volts, it is an indication that the low pressure switch is open. If the voltmeter indicates 0 volts, the voltmeter probe should be moved across the next component in line. For this example it will be assumed that the voltmeter indicates a voltage of 24 volts. The next step is to determine if the switch is defective or if the system is low on refrigerant.
THE OHMMETER
The ohmmeter is generally used in two primary ways:
1. To measure the amount of resistance in a circuit.
2. To test a circuit for continuity.
Assume that a service technician is sent on a service call. The only information given is that the air conditioner will not run. Using the same circuit in the previous example, assume that the technician places a jumper across the thermostat and discovers that the condenser fan operates but the
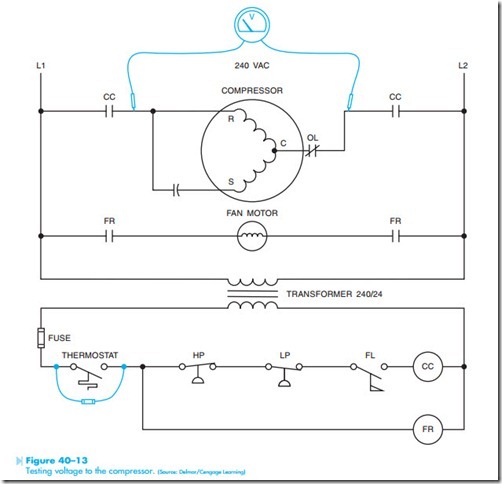
compressor does not. Now assume that he discovers that the compressor contactor is energized. The first step would be to test the voltage across the run/ start and common terminals of the compressor, Figure 40–13. It will be assumed that the voltmeter indicates a value of 240 volts.
The next step is to make mental notes of what could cause this problem.
1. The compressor windings are open.
2. The overload relay is tripped.
Assume that the overload is checked and found not to be tripped. The next step is to check the compressor run and start windings for continu- ity and resistance. This is done by connecting one probe of an ohmmeter to the common terminal of
the compressor and the other terminal to the run and start terminals one at a time, Figure 40–14. The ohmmeter should indicate continuity between the common terminal and the run terminal and continuity between the common terminal and the start terminal. If it does not, it is an indication that the winding is open.
The resistance reading will generally give some indication as to the state of the winding, although trying to determine if a winding is shorted with an ohmmeter is a guess at best. The actual resistance of the winding is determined by the size and type of compressor motor and will probably not be known
by the service technician, but some general guide- lines can be followed.
1. If the resistance of either winding is extremely low as compared with the other, there is a good possibility that the winding is shorted.
2. The start winding should be a little more resistive than the run winding.
The run and start windings should also be tested to ensure that they are not grounded. This can be done by connecting one side of the ohmmeter probe to the case of the compressor and testing for continuity to each winding, Figure 40–15. The ohmmeter should indicate infinite resistance if the winding are not grounded.
Another type of ohmmeter, called a megohmmeter or “megger,” is often used to test the insulation of
wire, Figure 40–16. The megohmmeter is designed to measure resistance in the range of millions of ohms. It is generally used to test the insulation of wire and also produces a much higher voltage than a standard ohmmeter. Often, the insulation around wire will appear to be good when tested with an ohmmeter, but breaks down when it is subjected to a high voltage. Ohmmeters generally use from 1.5 to 9 volts to supply current to the circuit being tested. Meggers generally Muse from 500 to 1,000 volts to supply current to the circuit being tested. This higher voltage will often reveal problems that a low voltage will not.


