Further points on fitting
When fitting gauges to service valve gauge connections, always use two spanners of the correct size to avoid breaking the vapour seal of the gauge unions.
The plant, if operating with a low pressure control, may have the control tubing or capillary connected with a tee union to which the gauge hose is also fitted. Thus when the service valve is back seated, the pressure will be trapped in the control line. When pressure is released during the purging operation, the plant will stop; it will restart when the suction service valve is cracked off to pressurize the control.
When gauges are fitted to a plant which has been closed down, the liquid shut-off valve must be opened so that refrigerant will circulate around the system.
System without a discharge service valve
The procedure for fitting gauges is the same, except that the red hose will be connected to the gauge connection of the service valve on the receiver (Figure 6). When this valve is back seated, the refrigerant will circulate.
Recording
After fitting gauges allow a short time to elapse before recording the pressures, i.e. when the pressures stabilize on the gauges.
Removing gauges
Once again, bearing in mind that high pressures are generated whilst a plant is operating, care must be taken not to pollute the atmosphere when gauges are removed. The following procedure will minimize the loss of refrigerant and discharge to atmosphere:
1 Back seat the discharge service valve.
2 Open both shut-off valves on the manifold and allow the pressures to equalize in the gauges.
3 Close high side valve on the manifold and operate the compressor until a zero pressure is indicated on the compound gauge. Close the low side valve on the manifold.
4 Remove the hose from the discharge service valve union, replace the seal cap and tighten.
5 Back seat the suction service valve.
6 Remove the hose from the suction service valve union, replace the seal cap and tighten.
7 Set both service valves to the operating positions (cracked off the back seat).
8 Replace the service valve caps and tighten.
9 Test for leaks at the valve caps and gauge unions (see Chapter 3).
The low side pressure in systems charged with refrigerants R22 and R502 can be much higher than that in systems charged with refrigerant R12. Thus when removing the hose from the low side, loosen the connection and release the pressure slowly. Although the pressure may be high, the volume of vapour in the hose will be small.
Pressure controls
![]()
![]() It is common practice for systems to be installed with pressure safety controls. When gauges are removed, the service valves must be left in the operating positions cracked off the back seat to allow the controls to be pressurized (see Chapter 6).
It is common practice for systems to be installed with pressure safety controls. When gauges are removed, the service valves must be left in the operating positions cracked off the back seat to allow the controls to be pressurized (see Chapter 6).
Other valves
Schraeder valves
Modern service manifolds incorporate additional hand valves, connections for a vacuum pump, and a liquid-indicating sight glass. Some feature Schraeder
valves in addition to the normal hand valves on the manifold. These additional valves make it possible to perform various operations without the necessity for removal of the manifold or hoses.
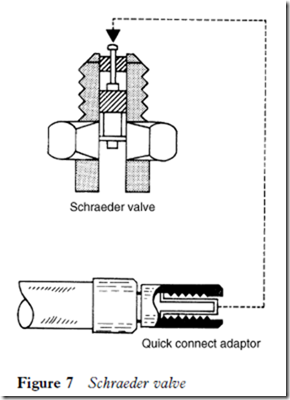
The Schraeder valve is similar to that used in cycle or car tyres (Figure 7). The fitting into a system can vary: it may be brazed in, screwed into a component or supplied as a flare connector.
When connection is made to this type of valve it is necessary for the service hose to include a quick release adaptor. This depresses the valve stem and allows passage of refrigerant into the hose.
