Absolute and gauge pressure
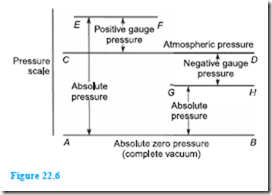
A barometer measures the true or absolute pressure of the atmosphere. The term absolute pressure means the pressure above that of an absolute vacuum (which is zero pressure), as stated earlier. In Figure 22.6 a pressure scale is shown with the line AB representing absolute zero pressure (i.e. a vacuum) and line CD rep- resenting atmospheric pressure. With most practical pressure-measuring instruments the part of the instrument that is subjected to the pressure being measured is also subjected to atmospheric pressure. Thus practical instruments actually determine the difference between the pressure being measured and atmospheric pres- sure. The pressure that the instrument is measuring is then termed the gauge pressure. In Figure 22.6, the line EF represents an absolute pressure which has a value greater than atmospheric pressure, i.e. the ‘gauge’ pressure is positive.
Thus, absolute pressure = gauge pressure + atmospheric pressure. Hence a gauge pressure of, say, 60 kPa recorded on an indicating instrument when the atmospheric pressure is 101 kPa is equivalent to an absolute pressure of 60 kPa + 101 kPa, or 161 kPa.
Pressure-measuring indicating instruments are referred to generally as pressure gauges (which acts as a reminder that they measure ‘gauge’ pressure).
It is possible, of course, for the pressure indicated on a pressure gauge to be below atmospheric pressure, i.e. the gauge pressure is negative. Such a gauge pressure is often referred to as a vacuum, even though it does not necessarily represent a complete vacuum at absolute zero pressure. Such a pressure is shown by the line GH in Figure 22.6. An indicating instrument used for measuring such pressures is called a vacuum gauge.
A vacuum gauge indication of, say, 0.4 bar, means that the pressure is 0.4 bar less than atmospheric pressure. If atmospheric pressure is 1 bar, then the absolute pressure is 1 – 0.4 or 0.6 bar.
The manometer
A manometer is a device for measuring or comparing fluid pressures, and is the simplest method of indicating such pressures.
U-tube manometer
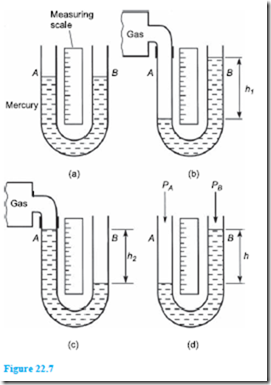
A U-tube manometer consists of a glass tube bent into a U shape and containing a liquid such as mercury. A U-tube manometer is shown in Figure 22.7(a). If limb A is connected to a container of gas whose pressure is above atmospheric, then the pressure of the gas will cause the levels of mercury to move as shown in Figure 22.7(b), such that the difference in height is h1. The measuring scale can be calibrated to give the gauge pressure of the gas as h1 mm of mercury.
If limb A is connected to a container of gas whose pressure is below atmospheric then the levels of mercury will move as shown in Figure 22.7(c), such that their pressure difference is h2 mm of mercury. It is also possible merely to compare two pressures, say, PA and PB, using a U-tube manometer. Figure 22.7(d) shows such an arrangement with (PB – PA) equivalent to h mm of mercury. One application of this differential pressure-measuring device is in determining the velocity of fluid flow in pipes (see Chapter 23). For the measurement of lower pressures, water or paraffin may be used instead of mercury in the U-tube to give larger values of h and thus greater sensitivity.
Inclined manometers
For the measurement of very low pressures, greater sensitivity is achieved by using an inclined manometer, a typical arrangement of which is shown in Figure 22.8. With the inclined manometer the liquid used is water and the scale attached to the inclined tube is calibrated in terms of the vertical height h. Thus when a vessel containing gas under pressure is connected to the reservoir, movement of the liquid levels of the manometer occurs. Since small-bore tubing is used the movement of the liquid in the reservoir is very small compared with the movement in the inclined tube and is thus neglected. Hence the scale on the manometer is usually used in the range 0.2 mbar to 2 mbar.
The pressure of a gas that a manometer is capable of measuring is naturally limited by the length of tube used. Most manometer tubes are less than 2 m in length and this restricts measurement to a maxi- mum pressure of about 2.5 bar (or 250 kPa) when mercury is used.
The Bourdon pressure gauge
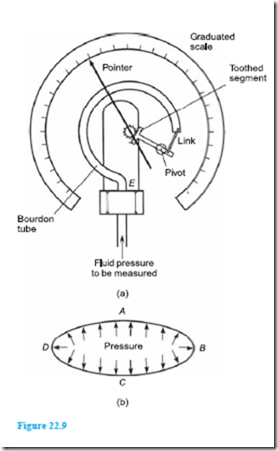
Pressures many times greater than atmospheric can be measured by the Bourdon pressure gauge, which is the most extensively used of all pressure- indicating instruments. It is a robust instrument. Its main component is a piece of metal tube (called the Bourdon tube), usually made of phosphor bronze or alloy steel, of oval or elliptical cross-section, sealed at one end and bent into an arc. In some forms the tube is bent into a spiral for greater sensitivity. A typical arrangement is shown in Figure 22.9(a). One end, E, of the Bourdon tube is fixed and the fluid whose pressure is to be measured is connected to this end. The pressure acts at right angles to the metal tube wall as shown in the cross-section of the tube in Figure 22.9(b). Because of its elliptical shape it is clear that the sum of the pressure components, i.e. the total force acting on the sides A and C, exceeds the sum of the pressure
components acting on ends B and D. The result is that sides A and C tend to move outwards and B and D inwards tending to form a circular cross-section. As the pressure in the tube is increased the tube tends to uncurl, or if the pressure is reduced the tube curls up further. The movement of the free end of the tube is, for practical purposes, proportional to the pressure applied to the tube, this pressure, of course, being the gauge pressure (i.e. the difference between atmospheric pressure acting on the outside of the tube and the applied pressure acting on the inside of the tube). By using a link, a pivot and a toothed segment as shown in Figure 22.9(a), the movement can be converted into the rotation of a pointer over a graduated calibrated scale.
The Bourdon tube pressure gauge is capable of measuring high pressures up to 104 bar (i.e. 7600 m of mercury) with the addition of special safety features.
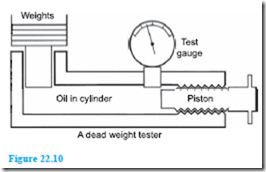
A pressure gauge must be calibrated, and this is done either by a manometer, for low pressures, or by a piece of equipment called a ‘dead weight tester’. This tester consists of a piston operating in an oil-filled cylinder of known bore, and carrying accurately known weights as shown in Figure 22.10. The gauge under test is attached to the tester and a screwed piston or ram applies the required pressure, until the weights are just lifted. While the gauge is being read, the weights are turned to reduce friction effects.


