Replacing the Pilot Burner Orifice
The procedure for replacing a pilot burner orifice depends on whether it is a spud or an insert orifice. For a Honeywell spud ori- fice, the procedure is as follows:
1. Disconnect the gas supply tubing from the pilot burner.
2. Unscrew the spud orifice and throw it away.
3. Remove any burrs from the tubing and square off the ends.
4. Remove the one-piece nut and ferrule from the new assembly and slip them over the tubing.
5. Install the new assembly in the pilot burner and tighten securely.
6. Push the tubing (along with the nut and ferrule) into the burner as far as it will go and engage the nut.
7. Tighten the nut by hand until it will turn no further. Use a wrench to make one final turn.
The connection in step 7 should be tight enough to prevent any gas leakage. Do not tighten it too much or you will run the risk of stripping the threads. Try not to bend the tubing near the fitting after the nut has been tightened.
As shown in Figure 5-59 the procedure for replacing an insert ori- fice presents no serious problems. The gas supply tubing must first be disconnected from the pilot burner by unscrewing the compression fit- ting. The small insert orifice can then be removed. Sometimes a light tap on the pilot burner bracket will be required to dislodge the orifice.
Place the new orifice on the end of the gas tubing and insert both the orifice and tubing into the pilot burner. Tighten the compression nut until it is secure. Use the same procedure described for tightening a spud orifice.
Lighting the Pilot
Read the appliance manufacturer’s lighting instructions before attempting to light the pilot burner. The basic procedure for light- ing a pilot is as follows:
1. Turn the room thermostat to its lowest setting.
2. Shut off the main gas supply to the main burner and the pilot burner.
3. Allow at least 5 minutes for the unburned gas to vent.
4. Light the pilot burner in accordance with the appliance man- ufacturer’s lighting instructions.
Venting the unburned gas (step 3) is very important. This is especially true for LP gas because it is heavier than air and will not vent upward naturally. Every precaution should be taken to ensure that the appliance is properly venting any unburned gas.
Appliance and pilot burner manufacturers provide very detailed lighting instructions for their equipment. Moreover, the development of various types of combination gas controls has simplified the lighting procedure and increased the safety factor (see Combination Gas Valves in this chapter).
Pilot Flame Adjustment
The pilot flame must be adjusted for proper color and size.
Appliance manufacturers refer to this procedure as pilot flame adjustment or pilot gas adjustment.
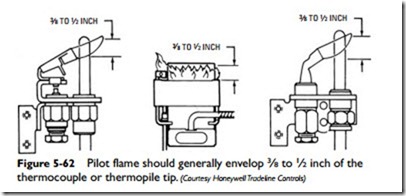
The appliance manufacturer will provide instructions for making pilot flame adjustments. On combination gas valves, this involves the removal of a pilot adjustment cap and turning the adjustment screw until the desired flame characteristics are obtained. The best pilot flame is a steady, nonblowing blue flame that envelops the upper 3⁄8 to 1⁄2 inch of the thermocouple or generator (see Figure 5-62).
Main Burner Ignition
The pilot burner should ignite the main burner quietly and reliably under all operating conditions, including low gas supply pressure. The ignition of the main burner gas should occur within 4 seconds from the time that gas is admitted to the main burner. This should occur when the pilot gas supply is reduced to an amount just above the point of pilot flame extinction.
A main burner ignition test should be performed after the main burner gas input and primary air adjustments have been made. The type of test used to check main burner ignition will depend on the type of pilot used in the gas-fired appliance. For example, in a pilot
generator system, main burner ignition is checked with the pilot flame adjusted to the minimum millivoltage required to open the main valve. The manufacturer’s installation literature for the appliance will probably include instructions for testing main burner ignition. If no literature is available, check with the local gas company.
