Basic Control
You instinctively know about control. You control all sorts of actions in your daily life. In this section we are going to introduce the basic ideas of controls. Your understanding of the rest of the chapter depends on you being really comfortable with the ideas in this section. Take the time to think about the ideas presented and how controls operate.
We are going to start with the simplest of controls, “on-off.” As the name implies, the element being controlled is either “on,” or “off.”
Consider a domestic hot water tank with a thermostatically controlled electric heating element near the bottom. Water becomes less dense as it is heated above 39.4°F, so, as the element heats the water, hot water will rise to the top. When the water at the thermo- statically controlled element is hot, all the water above it is hot and the thermostat will turn off the heating element.
Now, let us assume someone runs a little hot water. Cold water enters the bottom of the tank and cools the thermostat. The thermo- stat switches the element “on” and soon the tank is filled with all hot water once more. Suppose that later, one person runs a shower as someone else is running hot water for washing clothes. Although the element will come on, it can’t keep up with this large load. Very soon all the hot water is gone and the tank is full of cold water. Both users turn off the taps. The element at the bottom of the tank will slowly heat the whole tank back up to the required temperature.
In order to achieve a quick recovery of hot water, we need a second element near the top of the tank. An element near the top of the tank only has to heat the water above it, so it will get a small amount of water up to temperature much more quickly. Now we have two elements. Do we need them on at the same time? No. If the top element is needed, the bottom element is not needed. So, when the top element turns on, for quick recovery, it also breaks the circuit to the bottom element. Once the water above the top element is hot, that element switches “off” and the bottom element switches “on” to heat the rest of the water in the tank. This give us an ‘either/or’ control decision – either the top or the bottom element can be “on.”
The result is a tank that heats a little water quickly, and, in a much longer time, heats the full tank, with the electrical load of one heating element.
This is a simple example of how “on-off” controls can be cascaded to produce simple, but very effective, control. With some ingenuity, quite complex and extremely reliable electric controls can be developed.
Now let us move on from “on-off” to “modulating” controls. Modulating means ‘variable’. One type of modulating control is proportional control. This is best explained with a ‘hands-on’ demonstration.
Take a jug and fill it with water.
Take a tumbler, and place it in a spot that won’t be damaged if water overflows (like in a sink).
Next, see how quickly you can fill the glass so that the water level is right up at the rim of the glass–so full you’d need a very steady hand to drink it!
If you didn’t actually do the task, take a few moments to relax, and visualize the empty glass with the full jug on the table beside it. The jug is heavy as you pick it up and start to pour. You hear the water flowing in, feel yourself tipping the jug, see the level rising and feel that tension as you slow the flow to drips, to make it just reaches the top, and then you stop pouring.
What happens? When you see the glass empty or just starting to fill, the water level is a long way from the rim. Naturally, you start pouring quite quickly. As the glass fills, you slow the flow until you’re just dripping the water in, to get the glass quite full, to the rim, without going over. The change in rate at which you pour is roughly proportional to the distance of the water from the rim. This change in rate is called the gain. You are acting as a “proportional controller.”
Proportional control is the basis of the majority of control loops—the rate is proportional to the distance from the target—the setpoint.
Now imagine this more complicated scenario of proportional control. In this scenario, we will be demonstrating offset and overshoot.
Someone has attached a hose to the bottom of your glass and runs it to a tap downstairs, out of your sight. Your job, now, is to keep the glass full. You fill the glass, and then you notice the level is dropping slowly. In response, you start to pour slowly, just keeping the glass near full. Then, you realize the level is dropping faster, so you tip the jug. Suddenly the glass is full–it is overflowing!
What happened?
Initially, the hose tap was opened just a little, and it was easy for you to pour slowly to keep the level near the rim. When the tap was opened wide, though, the jug had to be tipped a lot to keep up, so when the tap was suddenly closed, it took a moment for you to realize that the water level in the glass was rising rapidly. It took another moment—too long—to straighten the jug and stop the flow, and the water overflowed over the top of the glass.
Just like you, a control system has an easy time with slow steady changes. Note though, you had to notice that the water level had dropped before you started to pour. This created a time delay. Note also that you attempted to keep the glass almost full rather than totally full. This represented an “offset” from target, the setpoint. Then, when the glass started to drain rapidly you poured faster, to keep it from being empty, rather than trying to maintain the level just at the rim – even more offset.
Finally, the drain on your glass stopped, and you were too slow to straighten the jug and stop the flow. The water overflowed – serious “overshoot”! This overshoot could have been reduced if you had been restricted on how fast you could pour. If you had less gain you would have had less ability to keep up with sudden changes and the overshoot would have been much less.
You now have some feel for controls and what they do. There are many added refinements to controller action that are explained in the ASHRAE Course, Fundamentals of Controls1.
Now lets consider some real HVAC examples.
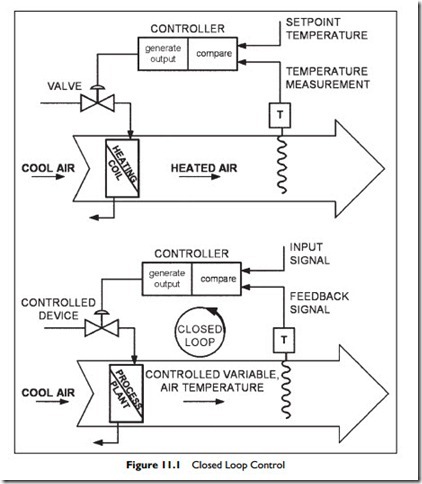
There are two types of control “closed loop” and “open loop.” Let us start by considering the main components of a closed loop control as shown in
The top half of the figure illustrates a simple air heating control loop. A temperature sensor measures the temperature of the heated air and sends that information to the controller. The controller is also provided with the required setpoint (similar to the setting on the front of a room thermostat). The controller first compares the measured temperature with the setpoint and, based on the difference, if any, generates an output signal to the valve. If the sensed temperature were a little higher than the setpoint, the controller would generate an output to close the valve a little. The valve would close, reducing the heating coil output. The air would be warmed less and the temperature sensor would register a lower temperature and sends that information to the controller—and so on round and round the closed control loop.
The lower part of the figure is the same process with the generic names for the parts of the control loop.
The “controlled variable” is the variable, in this case, temperature, that is being controlled. Controlled variables are typically temperature, humidity, pressure and fan or pump speed.
The “setpoint” is the desired value of the controlled variable. In this example it is the air temperature that is required.
The “sensor” measures the controlled variable and conveys values to the controller. In this case the sensor measures temperature.
The “controller” seeks to maintain the setpoint. The controller compares the value from the sensor with the setpoint and, based on the difference, generates a signal to the controlled device for corrective action.
Note that a room thermostat contains the temperature setpoint, which is your adjustment of the setting on the front of a room thermo- stat. It also contains the room temperature sensor and the controller. A humidistat is the same, except that it is sensing relative humidity.
The “controlled device” responds to signals received from the controller to vary the process—heating in this example. It may be a valve, damper, electric relay or a motor driving a pump or a fan. In the example it is the valve controlling hot water or steam to the coil.
To make sure you understand the above definitions, think about the simple example of pouring water in to fill the glass. What do you think were the following?
Setpoint Sensor Controller
Controlled device Controlled variable
Answers are included at the end of this section.
So far, we have been discussing closed loop control—based on feedback, the controller makes continuous adjustments in order to maintain conditions that
are close to the setpoint.
Another type of control called “open loop” control, where there is no feed- back. Consider a simple time clock that controls a piece of equipment. The time clock is set to switch “on” at a specific time and switch “off” at a later time. The time clock goes on switching “on” and “off” whether the equipment starts or not. In fact, it will go on switching even if the equipment is disconnected. There is no feedback to the time clock, it just does what it was set to do.
In Chapter 8 we introduced the idea of “outdoor reset.” Outdoor reset is a method of adjusting the temperature of a heating source, or cooling source, according to changes in outdoor temperature. This is an example of open loop control.
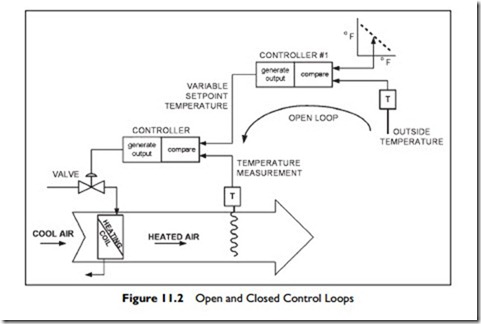
We are going to add outdoor reset to our air heating system, as illustrated in Figure 11.2, below.
Figure 11.2 illustrates the same closed control loop as in Figure 11.1, but with outdoor reset added. The ambient (outdoor) temperature sensor provides
Controller #1 with a signal, and the setpoint is provided as a variable accord- ing to the outdoor temperature. This is illustrated as a little graph, in the top right hand corner, showing a falling supply setpoint temperature (Y axis) as the temperature rises (X axis). The output of Controller #1 is the setpoint for our closed loop controller. The open loop measures temperature and provides an output. It has no involvement with the result; it just does its routine – open loop control – no feedback.
Alternatively, we could have chosen to use a chilled water system and to use outdoor reset to raise the chilled water temperature as the outside temperature dropped.
Outdoor reset is a common requirement, so manufacturers frequently pack- age the two controllers into one housing and call it a ‘reset controller’. This packaging of several components of the control loop is similar to the thermo- stat package where the setpoint, the temperature sensor and the controller are packaged in one little box.

