PROGRAMMING TECHNIQUES: LOOPING. COUNTING, AND INDEXJHG
The examples illustrated in the previous sections are simple and can be solved manually. However, a computer is at its best, surpassing human capability, when it has to repeat such tasks as adding a large set of numbers or copying bytes from one block of memory locations to another. It is fast and accurate.
To perform a given repetitive task, commonly used techniques are looping, counting, and indexing. To add data bytes stored in memory, for example, the following steps are necessary.
I. Define the task to be repeated: Looping .
A loop is set up by using either a conditional Jump or an unconditional Jump as illustrated in Examples.
2. Specify how many times the task is to be repeated: Counting.
The counter is set by loading a count (number of times the task is to be repeated) .into a register or a register pair, and the counting is done by decrementing the count every time the loop is repeated. The counter can also be set up to count from 0 to the final count using increment instructions.
3. Specify the location of the data: Indexing.
The starting location of the data can be specified by loading the memory address into a register pair and using the register pair as a memory pointer or index.
4. Indicate the end of the repetitive task: Setting Flags.
The end of repetition is indicated by the flag of the conditional Jump instruction. When the condition is true, the loop is repeated; when the condition is false, the loop execution is terminated, and the execution goes to the next instruction in memory.
Example
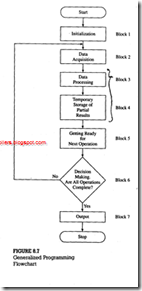
Draw a general flowchart to add ten bytes of data stored in memory starting at a given location, and display the sum. Explain the blocks in the flowchart.
Solution
To draw a flowchart, the problem must be divided into steps as follows:
1. Set up a counter to count the number of bytes.
Set up a memory pointer (index) to locate where data bytes are stored. Clear a register if necessary (either to store partial results or count the number of carries).
2. Transfer data from memory to the microprocessor.
3. Perform addition, checking for carry.
4. Save the partial result.
5. Update the counter and the memory pointer for the next operation.
6. Check the flag to indicate the completion of the task. If the condition is true repeat the task; otherwise go to the next instruction.
7. Display or store the result.
These steps and their sequence can be represented in the form of a flowchart as shown in Figure .
Blocks
1. Initialization
This is a planning stage where all initial conditions and requirements are defined. In our example, this block should set up a counter, memory index (pointer). carry register and temporary storage register.
2. Data Acquisition
Data are generally stored in memory or read from an input port. This step is concerned with bringing data into the microprocessor.
3. Data Processing
This step involves data manipulation, such as arithmetic or logical operations. In the example, we add a data byte, check for a carry, and update the carry register if necessary.
4. Temporary Storage
This step involves storing of partial results so that the pfevious result will not be destroyed by the next data processing operation.
5. Getting Ready for Next Operation
Before we can check whether the task is completed, we need to update the initial conditions; the index and the counter should be incremented or decremented.
6. Decision Making
In this step, the flag is checked, if the condition is true, the loop is repeated; otherwise, the program goes to the next block to display the result.
7. Output
In this Block, the result is either sent to an output port or stored in memory.
LOOKING AHEAD
In the previous sections, we introduced three groups of instructions: data copy, arithmetic, and branching. These instructions were illustrated with examples. In the last section, we discussed the programming techniques with the generalized flowchart (Figure). Now we will illustrate two programs using the instructions and the programming techniques that were introduced and discussed. We will attempt to analyze the programming problems in terms of the blocks shown in Figure and modify these blocks if necessary.
