MIXED ASSEMBLY AND C++ OBJECTS
As mentioned in the prior sections, the inline assembler is limited because it cannot use MACRO sequences and the conditional program flow directives presented in Chapter 6. In some cases, it is better to develop assembly language modules that are then linked with C++ for more flexibility. This is especially true if the application is being developed by a team of programmers. This section of the chapter details the use of different objects that are linked to form a program using both assembly language and C++.
Linking Assembly Language with Visual C++
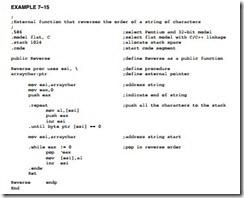
Example 7–15 illustrates a flat model procedure that will be linked to a C++ program. We denote that the assembly module is a C++ module by using the letter C after the word flat in the model statement. The linkage specified by the letter C is the same for the C or C++ languages. The flat model allows assembly language software to be any length up to 2G bytes. Note that the .586 switch appears before the model statement, which causes the assembler to generate code that functions in the protected 32-bit mode. The Reverse procedure, shown in Example 7–15, accepts a character string from a C++ program, reverses its order, and returns to the C++ program. Notice how this program uses conditional program flow instructions, which are not available with the inline assembler described in prior sections of this chapter. The assembly language module can have any name and it can contain more than one procedure, as long as each procedure contains a PUBLIC statement defining the name of the procedure as public. Any parameters that are transferred in the C++ program and the assembly language program are indicated with the backslash following the name of the procedure. This names the parameter for the assembly language program (it can be a different name in C++) and indicates the size of the parameter. The only thing that is not different in the C++ calling program and the assembly program is the order of the parameters. In this example, the parameter is a pointer to a character string and the result is returned as a replacement for the original string.
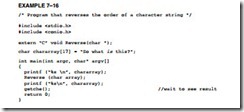
Example 7–16 illustrates a C++ language program for DOS console applications that uses the Reverse assembly language procedure. The EXTERN statement is used to indicate that an external procedure called Reverse is to be used in the C++ program. The name of the procedure is case-sensitive, so make sure that it is spelled the same in both the assembly language module and the C++ language module. The EXTERN statement in Example 7–16 shows that the external assembly language procedure transfers a character string to the procedure and returns no data. If data are returned from the assembly language procedure, data are returned as a value in register EAX for bytes, words, or doublewords. If floating-point numbers are returned, they must be returned on the floating-point coprocessor stack. If a pointer is returned, it must be in EAX.
Once both the C++ program and the assembly language program are written, the Visual C++ development system must be set up to link the two together. For linking and assembly, we will assume that the assembly language module is called Reverse.txt (you cannot add an .asm extension file to the file list for inclusion into a project, so just use the .txt extension and add a .txt file) and the C++ language module is called Main.cpp. Both modules are stored in the C:PROJECTMINE directory or some other directory of your choosing. After the modules are placed in the same project workspace, the Programmer’s Workbench program is used to edit both assembly language and C++ language modules.
To set up the Visual C++ developer studio to compile, assemble, and link these files, follow these steps:
1. Start the developer studio and select New from the File menu.
a. Choose New Project.
b. When the Application Wizard appears, click on Visual C++ Projects.
c. Select C++ Console Application, and name the project Mine.
d. Then click on OK.
2. You will see the project in the Solution window at the left margin in the center. It will have a single file called Main.cpp, which is the C++ program file. Modify this to appear as in Example 7–16.
3. To add the assembly language module, right-click on the line Source Files and select Add from the menu. Choose Add New Item from the list. Scroll down the list of file types until you find Text Files and select it, then enter the file name as Reverse and click on Open. This creates the assembly module called Reverse.txt. You may enter the assembly code from Example 7–15 in this file.
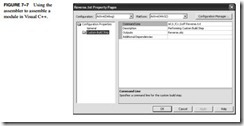
4. Under the Source Files listing in the Solution Explorer, right-click on Reverse.txt and select Properties. Figure 7–7 shows what to enter in this wizard after you click on the Custom Build step. Make sure you enter the object file name (Reverse.obj) in the Outputs box and ml /c /Cx /coff Reverse.txt in the Command Line box. The Reverse assembly language file will assemble and be included in the project.
5. Assuming both Examples 7–15 and 7–16 have been entered and you have completed all steps, the program will function.
At last, you can execute the program. Click on the green arrow. You should see two lines of ASCII text data displayed. The first line is in correct forward order and the second is in reverse order. Although this is a trivial application, it does illustrate how to create and link C++ language with assembly language.
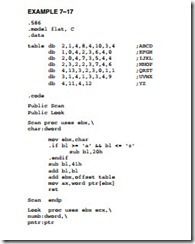
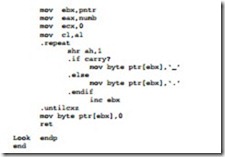
Now that we have a good understanding of interfacing assembly language with C++, we need a longer example that uses a few assembly language procedures with a C++ language pro- gram. Example 7–17 illustrates an assembly language package that includes a procedure (Scan) to test a character input against a lookup table and return a number that indicates the relative position in the table. A second procedure (Look) uses a number transferred to it and returns with a character string that represents Morse code. (The code is not important, but if you are interested, Table 7–2 lists Morse code.)
The lookup table in Example 7–17 contains 2 bytes for each character between A and Z. For example, the code for A is a 2 for a Morse-coded character two of any combination of dashes or dots, and the 1 is the code for the letter a (. – ), where the binary equivalent 01 (for two digits) is a dot followed by a dash. This lookup table is accessed by the Scan procedure to obtain the correct Morse code from the lookup table, which is returned in AX as a parameter to the C++ language call. The remaining assembly code is mundane.
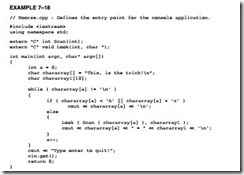
Example 7–18 lists the C++ program, which calls the two procedures listed in Example 7–17. This software is simple to understand, so we do not explain it.
Although the examples presented here are for console applications, the same method of instructing Visual Studio to assemble and link an assembly language module is also used for Visual applications for Windows. The main difference is that Windows applications do not use printf or cout. The next chapter explains how library files can also be used with Visual C++ and also gives many more programming examples.
Adding New Assembly Language Instructions to C/C++ Programs
From time to time, as new microprocessors are introduced by Intel, new assembly language instructions are also introduced. These new instructions cannot be used in C++ unless you develop a macro for C++ to include them in the program. An example is the CPUID assembly language instruction. This will function in an _asm block within C++ because the inline assembler does not recognize it. Another group of newer instructions includes the MMX and SEC instructions. These are also recognized, but in order to illustrate how a new instruction is added that is not in the assembler, we show the technique. To use any new instructions, first look up the machine language code from Appendix B or from Intel’s website at www.intel.com. For example, the machine code for the CPUlD instruction is 0F A2. This 2-byte instruction can be defined as a C++ macro, as illustrated in Example 7–19. To use the new macro in a C++ program, all we need to type is CPUID. The _emit macro stores the byte that follows it in the program.
