PROGRAMMING THE MICROPROCESSOR
INTRODUCTION
This chapter develops programs and programming techniques using the inline assembler pro- gram from Visual C++ Express. The Visual C++ inline assembler has already been explained and demonstrated in prior chapters, but there are still more features to learn at this point.
Some programming techniques explained in this chapter include assembly language modules, keyboard and display manipulation, program modules, library files, using the mouse, using timers, and other important programming techniques. As an introduction to programming, this chapter provides a wealth of background on valuable programming techniques so that programs can be easily developed for the personal computer by using the inline assembler as a springboard for Visual C++ Express applications created for Windows.
CHAPTER OBJECTIVES
Upon completion of this chapter, you will be able to:
1. Use the MASM assembler and linker program to create programs that contain more than one module.
2. Explain the use of EXTRN and PUBLIC as they apply to modular programming.
3. Set up a library file that contains commonly used subroutines and learn how to use the DUMPBIN program.
4. Write and use MACRO and ENDM to develop macro sequences used with linear programming in modules that link to C++ code.
5. Show how both sequential and random access files are developed for use in a system.
6. Develop programs using event handlers to perform keyboard and display tasks.
7. Use conditional assembly language statements in programs.
8. Use the mouse in program examples.
MODULAR PROGRAMMING
Many programs are too large to be developed by one person. This means that programs are routinely developed by teams of programmers. The linker program is provided with Visual Studio so that programming modules can be linked together into a complete program. Linking is also available from the command prompt provided by Windows. This section of the text describes the linker, the linking task, library files, EXTRN, and PUBLIC as they apply to pro- gram modules and modular programming.
The Assembler and Linker
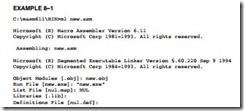
The assembler program converts a symbolic source module (file) into a hexadecimal object file. It is even a part of Visual Studio, located in the C: Program FilesMicrosoft Visual Studio .NET 2003Vc7 bin folder. We have seen many examples of symbolic source files, written in assembly language, in prior chapters. Example 8–1 shows how the assembler dialog that appears as a source module named NEW.ASM is assembled. Note that this dialog is used with version 6.15 at the DOS command line. The version that comes with Visual C will not work for 16-bit DOS programs. If a 16-bit assembler and linker are needed, they can be obtained in the Windows Driver Development Kit (DDK). Whenever you create a source file, it should have the extension of ASM, but as we learned in the last chapter, that is not always possible. Source files are created by using NotePad or almost any other word processor or editor capable of generating an ASCII file.
The assembler program (ML) requires the source file name following ML. In Example 8–1, the /Fl switch is used to create a listing file named NEW.LST. Although this is optional, it is rec- ommended so that the output of the assembler can be viewed for troubleshooting problems. The source listing file (.LST) contains the assembled version of the source file and its hexadecimal machine language equivalent. The cross-reference file (.CRF), which is not generated in this example, lists all labels and pertinent information required for cross-referencing. An object file is also generated by ML as an input to the linker program. In many cases we only need to generate an object file, which is accomplished by using the /c switch.
The linker program, which executes as the second part of ML, reads the object files that are created by the assembler program and links them together into a single execution file. An execution file is created with the file name extension EXE. Execution files are selected by typing the file name at the DOS prompt (C:). An example execution file is FROG.EXE, which is executed by typing FROG at the command prompt.
If a file is short enough (less than 64K bytes long), it can be converted from an execution file to a command file (.COM). The command file is slightly different from an execution file in that the program must be originated at location 0100H before it can execute. This means that the program must be no larger than 64K–100H in length. The ML program generates a command file if the tiny model is used with a starting address of 100H. Command files are only used with DOS or if a true binary version (for a EPROM/FLASH burner) is needed. The main advantage of a command file is that it loads off the disk into the computer much more quickly than an execution file. It also requires less disk storage space than the equivalent execution file.
Example 8–2 shows the linker program protocol when it is used to link the files NEW, WHAT, and DONUT. The linker also links library files (LIBS) so procedures, located with LIBS, can be used with the linked execution file. To invoke the linker, type LINK at the command prompt, as illustrated in Example 8–2. Note that before files are linked, they must first be assembled and they must be error-free. ML not only links the files, but it also assembles them prior to linking.
In this example, after typing ML, the linker program asks for the “Object Modules,” which are created by the assembler. In this example, we have three object modules: NEW, WHAT, and DONUT. If more than one object file exists, type the main program file first (NEW, in this example), followed by any other supporting modules.
Library files are entered after the file name and after the switch /LINK. In this example, library files were not entered. To use a library called NUMB.LIB while assembling a program called NEW.ASM, type ML NEW.ASM /LINK NUMB.LIB.
In the Windows environment you cannot link a program—you can only assemble a pro- gram. You must use Visual Studio to link the program files during the build. You can assemble a file or files and generate objects for use with Visual C++. Example 8–3 illustrates how a module is compiled, but not linked with ML. The /c switch (lowercase c) tells the assembler to compile and generate object files, /Cx preserves the case of all functions and variables, and /coff generates a common object file format output for the object files used in a 32-bit environment.
PUBLIC and EXTRN
The PUBLIC and EXTRN directives are very important to modular programming because they allow communications between modules. We use PUBLIC to declare that labels of code, data, or entire segments are available to other program modules. EXTRN (external) declares that labels are external to a module. Without these statements, modules could not be linked together to cre- ate a program by using modular programming techniques. They might link, but one module would not be able to communicate to another.
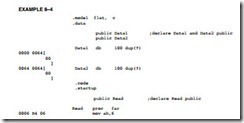
The PUBLIC directive is placed in the opcode field of an assembly language statement to define a label as public, so that the label can be used (seen by) by other modules. The label declared as public can be a jump address, a data address, or an entire segment. Example 8–4 shows the PUBLIC statement used to define some labels and make them public to other modules in a program fragment. When segments are made public, they are combined with other public segments that contain data with the same segment name.
The EXTRN statement appears in both data and code segments to define labels as external to the segment. If data are defined as external, their sizes must be defined as BYTE, WORD, or DWORD. If a jump or call address is external, it must be defined as NEAR or FAR. Example 8–5 shows how the external statement is used to indicate that several labels are external to the pro- gram listed. Notice in this example that any external address or data is defined with the letter E in the hexadecimal assembled listing. It is assumed that Example 8–4 and Example 8–5 are linked together.
Libraries
Library files are collections of procedures that are used by many different programs. These procedures are assembled and compiled into a library file by the LIB program that accompanies the MASM assembler program. Libraries allow common procedures to be collected into one place so they can be used by many different applications. You may have noticed when setting up Visual C++ to build the assembly language modules in Chapter 7 that many library files were in the link list used by Visual C++. The library file (FILENAME.LIB) is invoked when a program is linked with the linker program.
Why bother with library files? A library file is a good place to store a collection of related procedures. When the library file is linked with a program, only the procedures required by that program are removed from the library file and added to the program. If any amount of assembly language programming is to be accomplished efficiently, a good set of library files is essential and saves many hours in recoding common functions.
Creating a Library File. A library file is created with the LIB command, which executes the LIB.EXE program that is supplied with Visual Studio. A library file is a collection of assembled
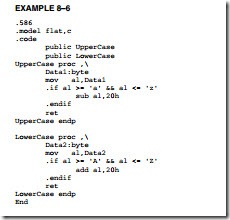
.OBJ files that contains procedures or tasks written in assembly language or any other language. Example 8–6 shows two separate functions (UpperCase and LowerCase) included in a module that is written for Windows, which will be used to structure a library file. Please notice that the name of the procedure must be declared PUBLIC in a library file and does not necessarily need to match the file name, although it does in this example. A variable is transferred to each file, so the EXTRN statement also appears in each procedure to gain access to an external variable. Example 8–7 shows the C++ protocols that are required to use the functions in this library file in a C++ program, provided the library is linked to the program.
The LIB program begins with the copyright message from Microsoft, followed by the prompt Library name. The library name chosen is case for the CASE.LIB file. Because this is a new file, the library program must be prompted with the object file name. You must first assemble CASE.ASM with ML. The actual LIB command is listed in Example 8–8. Notice that the LIB program is invoked with the object name following it on the command line.
A utility program called DUMPBIN.EXE is provided to display the contents of the library or any other file. Example 8–9 shows the outcome of a binary dump using the /all switch to show the library module CASE.LIB and all its components. Near the top of this listing are the public names for _UpperCase and _LowerCase. The Raw Data #1 section contains the actual hexadecimal-coded instructions for the two procedures.
Once the library file is linked to your program file, only the library procedures actually used by your program are placed in the execution file. Don’t forget to use the extern “C” statement in the C++ program to use a function from a library file.
In Visual C++ Express, a library is created by selecting the Class Library choice at the Create menu. This feature creates a DLL (dynamic link library) file that can be included in any C++ application. The DLL can contain C++ code or assembly code. To include the DLL in any program, under Project, select the “add reference” choice and browse to the DLL file. Once the DLL is added, place an #include at the start of the class where the DLL is to be used in a program.
Macros
A macro is a group of instructions that perform one task, just as a procedure performs one task. The difference is that a procedure is accessed via a CALL instruction, whereas a macro, and all the instructions defined in the macro, is inserted in the program at the point of usage. Creating a macro is very similar to creating a new opcode, which is actually a sequence of instructions, in this case, that can be used in the program. You type the name of the macro and any parameters associated with it, and the assembler then inserts them into the program. Macro sequences execute faster than procedures because there is no CALL or RET instruction to execute. The instructions of the macro are placed in your program by the assembler at the point where they are invoked. Be aware that macros will not function using the inline assembler; they only function in external assembly language modules.
The MACRO and ENDM directives delineate a macro sequence. The first statement of a macro is the MACRO instruction, which contains the name of the macro and any parameters associated with it. An example is MOVE MACRO A,B, which defines the macro name as MOVE. This new pseudo opcode uses two parameters: A and B. The last statement of a macro is the ENDM instruction, which is placed on a line by itself. Never place a label in front of the ENDM statement. If a label appears before ENDM, the macro will not assemble.
Example 8–10 shows how a macro is created and used in a program. The first six lines of code define the macro. This macro moves the word-sized contents of memory location B into word-sized memory location A. After the macro is defined in the example, it is used twice. The macro is expanded by the assembler in this example, so that you can see how it assembles to generate the moves. Any hexadecimal machine language statement followed by a number (1, in this example) is a macro expansion statement. The expansion statements are not typed in the source program; they are generated by the assembler (if .LISTALL is included in the program) to show that the assembler has inserted them into the program. Notice that the comment in the macro is preceded with ;; instead of ; as is customary. Macro sequences must always be defined before they are used in a program, so they generally appear at the top of the code segment.
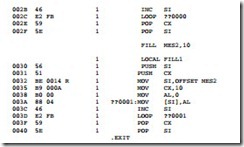
Example 8–11 shows a FILL macro that stores any number (parameter HOW_MANY) of 00H into the memory location addressed by parameter WHERE. Notice how the address FILL1 is treated when the macros are expanded. The assembler uses labels that start with ?? to designate them are assembler-generated labels.
The LOCAL directive must always be used on the line immediately following the MACRO statement or an error occurs. The LOCAL statement may have up to 35 labels, all separated with commas.
Placing MACRO Definitions in Their Own Module. Macro definitions can be placed in the program file as shown, or they can be placed in their own macro module. A file can be created that contains only macros to be included with other program files. We use the INCLUDE directive to indicate that a program file will include a module that contains external macro definitions. Although this is not a library file, for all practical purposes it functions as a library of macro sequences.
When macro sequences are placed in a file (often with the extension INC or MAC), they do not contain PUBLIC statements as does a library. If a file called MACRO.MAC contains macro sequences, the INCLUDE statement is placed in the program file as INCLUDE C:ASSMMACRO.MAC. Notice that the macro file is on drive C, subdirectory ASSM in this example. The INCLUDE statement includes these macros, just as if you had typed them into the file. No EXTRN statement is needed to access the macro statements that have been included. Programs may contain both macro include files and library files.


