Fan Installation
The following recommendations are offered as guidelines for proper fan installation.
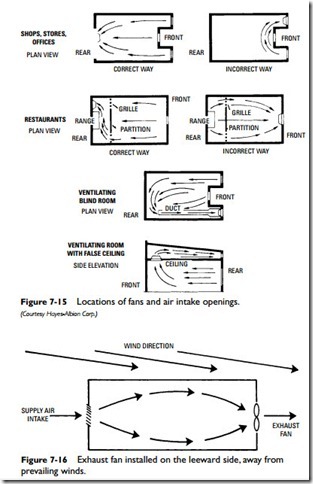
1. Install the fan and air intake openings at opposite ends of the enclosure so that the intake air passes lengthwise through the area being ventilated (see Figure 7-15).
2. When possible, install exhaust fans or air outlets on the lee- ward side so that the air leaves with the prevailing winds (see Figure 7-16).
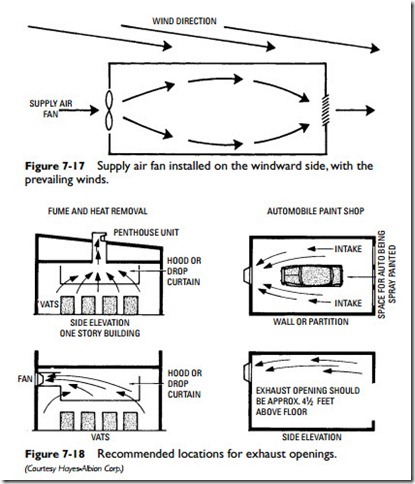
3. When possible, install ventilation (supply) fans or air intakes on the windward side so that the entering air utilizes pressure produced by prevailing winds (see Figure 7-17).
4. Provide a net intake area at least 30 percent greater than the exhaust fan opening.
5. When filters are used, increase the net intake area to allow minimum pressure loss from resistance of the filter.
6. Steam, heat, or odors should be exhausted by fans using totally enclosed motors mounted near the ceiling. The air intakes should be located near the floor (see Figure 7-18).
7. An explosion-proof motor with a spark-proof fan should be used when the exhaust air is hazardous.
8. Spring-mount fans and connect them to the wall opening by a canvas boot when extremely quiet operation is required.
Fan Installation Checklist
A properly installed fan motor (unless defective) will operate efficiently and will never overheat or burn out. To ensure proper installation, the following guidelines are suggested:
1. Check the line current to be sure it is not more than plus or minus 10 percent voltage deviation.
2. Check belt tension for looseness after the first or second day of operation.
3. Check to be sure the fan is running in the right direction.
4. Inspect and lubricate fans subject to heavy usage. Do this after the first 15,000 hours or 5 years of service (whichever comes first).
5. Use open, drip-proof motors where fan motors are installed outside the airstream.
6. Use enclosed, nonventilated, air-over motors where fan motors are mounted in the airstream to reduce obstruction by dirt, grease, or other contaminants.

