Room Thermostats
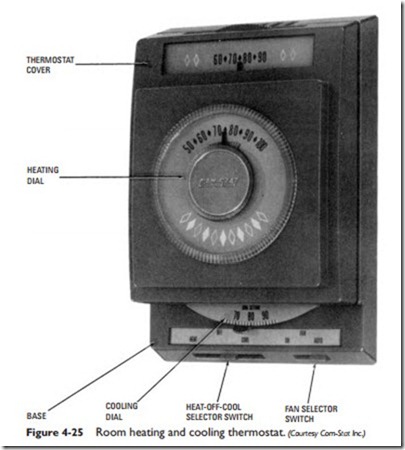
The room thermostat (see Figure 4-25) is regarded as the nerve center of the heating and cooling system because it controls the operation of the furnace, boiler, or air conditioner. Ideally, it should be mounted in an area of the living or working spaces where it is not subjected to temperature or moisture extremes (see the following section, Location of Room Thermostats).
Low-voltage room thermostats are recommended over the line voltage types for residential heating and/or cooling systems. The low-voltage thermostats respond more quickly to temperature
changes and will maintain the temperature and humidity more closely than the line voltage types. A low-voltage thermostat requires the use of a transformer to reduce the line voltage for the control circuit, but the cost of the transformer is more than offset by the lower installation cost of this thermostat.
Location of Room Thermostats
The location of the room thermostat is very important to the efficient operation of the heating and/or cooling system. If the room thermo- stat is improperly located, it will often call for heat or cool air when neither is necessary. It is therefore important to locate the thermostat where it will measure the actual temperature conditions of the space.
The following recommendations are offered as a guide for the proper location of a room thermostat:
1. Never locate the thermostat on the interior surface of an out- side wall. Outside walls are subject to temperature extremes caused by weather changes. Always locate the thermostat on a suitable inside partition.
2. Never locate the thermostat in the path of warm or cold air drafts. The thermostat should not be placed opposite warm air outlets or near a window or an outside door.
3. Never locate the thermostat where it will be subjected to the direct rays of the sun or other forms of heat radiation. Fireplaces, table lamps, and floor lamps are common sources of this type of heat.
When you select a location for the room thermostat on an inside wall, make certain that you are not placing it over a warm air duct, steam pipe, or hot-water pipe. The warmth from these ducts or pipes will interfere with the operation of the thermostat.
For the most satisfactory operation, locate the room thermostat about 5 feet above the floor on an inside wall where there is good natural air circulation and where the thermostat will be exposed to average room temperatures.
Installing a Room Thermostat
Before attempting to install the thermostat, read the manufacturer’s installation instructions. These instructions should be followed as closely as possible to ensure efficient thermostat operation.
Always handle the thermostat carefully. Rough handling may decrease its accuracy. Inspect the thermostat carefully when you unpack it. Report any damage to the shipper if the damage was caused after it left the factory or distribution center. Their insurance should pay for any replacement. Any other damage or malfunction should be reported to the thermostat manufacturer or his field rep- resentative. The thermostat is the basic controller in any heating and/or cooling system. It must operate accurately and efficiently.
Make sure the thermostat selected for the heating and cooling system is the appropriate one for the job. Heat pumps require two- stage thermostats. Furnaces and boilers used with air-conditioning systems commonly require thermostats with extra terminals. Thermostats with changeover terminals are required for many zoned systems. Check the manufacturer’s specification sheet before making a final selection.
The installation instructions differ from one thermostat manufacturer to another, usually on the basis of design and construction; however, the following points are common to all:
1. Mercury-switch thermostats are usually shipped with some form of protection around the mercury tube to prevent break- age. This must be removed before operating the thermostat.
2. Disconnect the power supply before connecting the wiring to the thermostat in order to prevent electrical shock and/or equip- ment damage. Low-voltage thermostats are used in heating and cooling systems. These low voltages are not fatal, but they can deliver a nasty shock and may damage the system controls.
3. All wiring must be done in accordance with local electrical codes and ordinances. Be sure to follow the thermostat manu- facturer’s wiring diagram when making the connections.
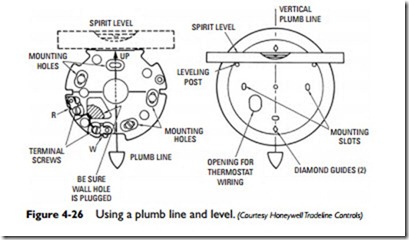
4. Use a plumb line or spirit level to accurately level the subbase or wall plate when mounting it on the wall (see Figure 4-26). Thermostat control deviations are often caused by inaccurate leveling.
5. Follow the manufacturer’s instructions for making any inter- nal wiring connections (e.g., connecting lead wires to terminal screws), connecting a heating thermostat to a cooling base, and so on.
6. Check out the installation to make sure the thermostat is operating correctly.
Thermostat Calibration
Thermostats are accurately calibrated at the factory under controlled conditions and should not require recalibration. Sometimes a thermostat will appear to require recalibration when the problem is actually a quite different one. For example, a thermostat that is not level or one subjected to a high degree of radiant heat from the sun, radiators, convectors, or other heat sources often fails to function properly. Before jumping to the conclusion that it needs to be recalibrated, check out the possibility that some external cause may be the source of the difficulty. If you are certain the problem is in the thermostat, then you should call a trained serviceman to recalibrate it. Do not attempt to recalibrate it yourself unless you have the necessary experience.
A new thermostat is generally shipped with complete installation literature. This literature also usually contains instructions for recalibrating the thermostat. By way of example, the instructions for recalibrating a Honeywell T87 Room Thermostat include the following steps:
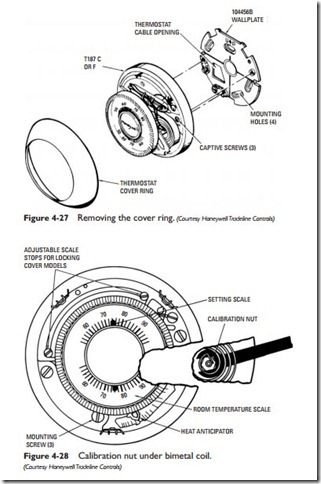
1. Remove the thermostat cover ring (see Figure 4-27). The lock- ing cover will require the use of an Allen wrench to loosen the screws securing the cover.
2. Set the thermostat below the room temperature, and allow it to remain in an off position for approximately 10 minutes.
3. Slowly raise the setting until the switch just makes contact. If the thermostat pointer and setting indicator do not read the same the instant the switch makes contact, then the thermo- stat requires recalibration.
4. Turn the setting dial a few degrees above room temperature.
5. Slip the calibration wrench onto the calibration (hex) nut under the bimetal coil (see Figure 4-28).
6. If the thermostat has a stationary pointer, hold the dial firmly and turn the calibration nut counterclockwise until the mer- cury breaks contact. If the thermostat has a movable pointer, turn the calibration nut clockwise.
7. Turn the thermostat dial to a low setting, and wait approxi- mately 5 minutes.
8. Slowly turn the dial until the pointers read the same.
9. Hold the dial firmly, and turn the calibration in the opposite direction from the one in step 6 until the mercury switch slips to the heating contact end of the tube.
10. Recheck the calibration, select the desired temperature, and replace the cover.


