Objectives
• To understand the fundamentals of control circuits
• To understand types of control circuits
• To troubleshoot control circuits.
Basic control circuits
Basic control circuits are used in starting, stopping, sequencing, and safety automatic interlocking of equipment and machines.
The control circuit consists of relays, relay contacts, contactors, timers, counters, etc.
Control circuits can also be configured or programed in the PLCs. This is done, using ladder logic diagram, statement lists, or control flowcharts software, by representing the logical conditions, sequences, and interlocks required for operating equipment or a machine in an automatic sequence.
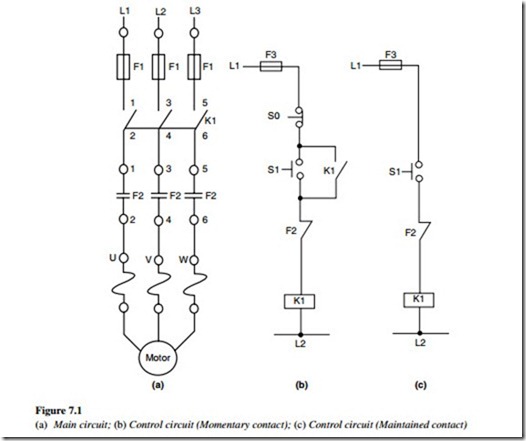
To understand how to troubleshoot control circuits, it is very important to understand the working of some basic control circuits, as given in Figure 7.1.
Basic control circuit for DOL (direct-on-line) starter
Figure 7.1(a) shows a typical circuit for a DOL starter for a three-phase motor. A full-line voltage is applied across the windings with this starter. The rating of motors which can be started direct-on-line depends on the capacity of the distribution system and the acceptable bus voltage drop during starting. In large industrial systems it is not unusual for even a 200 kW motor to be DOL started especially when fed by a transformer of 1600 kVA or higher. However, when a motor is fed by an LV emergency generator, DOL starting has to be planned with due consideration to starting voltage drop.
Main circuit
Figure 7.1(a) shows the circuit with a three-phase power supply (L1, L2, and L3), main circuit fuses (F1), main contactor (K1), and an overload protection relay (F2) for a three- phase motor.
The motor can be started by the following two methods:
1. Momentary contact control with press and release type pushbutton
2. Maintained contact control with press and latch type pushbutton.
Momentary contactor control
Figure 7.1(b) shows a momentary control circuit to start and stop the three-phase motor using a DOL starter with a start and stop pushbutton S1and S0 respectively.
The control circuit consists of an overload relay (F2) NC contact, an NC contact of stop pushbutton (S0), NO contact of start pushbutton (S1) connected in series to the main contactor (K1) coil. The control supply for the circuit passes through a control fuse (F3).
The main contactor coil gets the phase line (L1) through the control circuit only when all the contacts are closed. In this case, when the start pushbutton is pressed, the control circuit is closed and the main contactor is energized. As shown in Figure 7.2, an NO contact of the main contactor is connected in parallel to the start pushbutton. As the main contactor is switched on, it is latched through this parallel NO contact (K1) even after the start pushbutton is released. The main contactor remains on and the motor continues to run until the stop pushbutton is pressed to stop the motor or the motor trips due to an overload relay operation.
Maintained contactor control
Figure 7.1(c) shows a control circuit to start and stop the three-phase motor using a DOL starter with a single pushbutton (S1).
The control circuit consists of an NC contact of overload relay (F2) and NO contact of a toggle type switch (S ), connected in series to the main contactor (K) coil. The control supply for the circuit passes through the control fuse (F3).
The main contactor (K1) coil gets power only when all the contacts are closed. In this case, when the switch (S ) is closed, the control circuit closes and the main contactor (K1) is energized.
As long as switch (S ) is maintained on, the main contactor remains on and the motor continues to run until the switch (S ) is opened or the motor trips due to an overload relay operation.
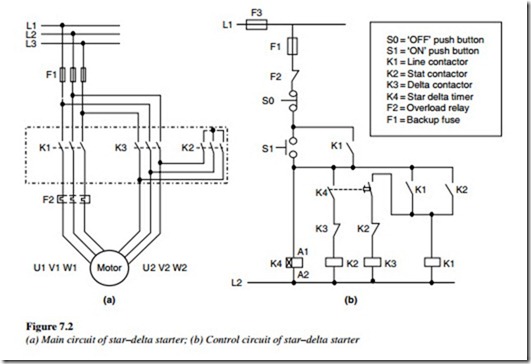
The circuit shown in Figure 7.2(a) is the main circuit for the star–delta starter and Figure 7.2(b) is the control circuit.
Usually, a motor has the tendency to draw 500% higher current than the full load of normal current from the supply line during startup. This in turn increases the starting torque that is higher than normal, which can result in a mechanical damage. To avoid this, reduced voltage starters are used. Star–delta starters are also used when a weak system cannot support the DOL starting of a large capacity motor. The starting current (line) when using this method is reduced by factor of 3 (i.e. 200% in place of 600%). The starting torque however also reduces by a factor 3. This method is therefore not suitable for loads with high inertia or those that require high starting/break away torque.
During the startup in a star–delta starter, the winding is connected in a star configuration with contactor K1 and K2, which applies reduced voltage (approximately 58% of rated). Then after a while, connect the windings in delta configuration with contactor K1 and K3.
Star–delta starter working
The main contactor K1 will energize only when the control circuit fuse (F3), backup fuse (F1), and the overload relay (F2) are healthy and the start pushbutton (S1) is pressed.
Reduced-voltage configuration (star configuration)
Star–delta timer coil (K4) gets power through fuses F3, F1, NC contact of stop pushbutton (S0), and NO contact of start push button. As start PB (S1) is pressed, the timer coil K4 will pickup and in turn energize the star contactor coil K2. The main line contactor (K1) coil gets power via the NC contact of S0, NO contact of S1, NO contact of K2 and remains latched unless the stop pushbutton (S0) is pressed.
Now, the main line contactor (K1) and the star contactor (K2) are in a pickup condition, which will drive the motor in the star configuration.
Full voltage (delta configuration)
As the time duration set on a K4 timer (star to delta timer) elapses, the contactor coil (K3) is picked up and at the same time, the star contactor (K2) is de-energized.
Now, the main line contactor (K1) and the delta contactor (K3) are in a pickup condition, which will drive the motor in a delta configuration. When the motor trips in an
overload condition either in a star or delta configuration, the control circuit always ensures that the motor restarts in a star configuration, rather than the delta configuration.
Autotransformer 3φ starter
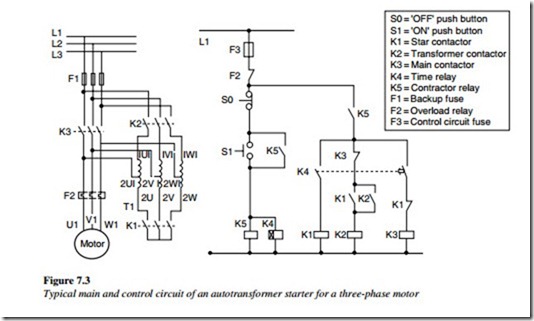
Figure 7.3 shows the autotransformer three-phase starter circuit. This type of starter circuit uses an autotransformer to apply reduced voltage across the windings of the motor during startup. Three autotransformers are connected in the star configuration and taps are selected, to provide an adequate starting current for the motor.
After a certain time lapse, full voltage is applied to the motor bypassing the autotransformers.
The working of an autotransformer
The fuse (F1) and the overload relay (F2) provide protection to the main circuit. Similarly, the control circuit has the fuse (F3) and overload relay (F2) NC contact.
Reduced voltage configuration
In this circuit, the contactor (K5) will pickup when the start push button is pressed and will remain latched until the stop push button is pressed or the control circuit fuses or the motor trips on overload.
As K5 picks up, it will energize the timer relay (K4) coil. This in turn will energize the contactor K1 coil. The closing contactor K1 contact will energize the contactor K2 coil. So, contactors K5, K4, K1, and K2 are in an energized condition at this stage. This will result in starting the motor through an autotransformer at a reduced voltage and with star configuration because of the contactor K1 and K2.
Full voltage configuration
As timer relay (K4) time lapses, it de-energizes the contactor K1 coil. At the same time contactor K3 coil is energized, this will in turn de-energize the contactor K2 coil.
The motor will now run at full voltage as contactor K3 is in a pickup condition. If in the interim, the motor trips on overload, then the control circuit has to be checked, so the motor restarts in a star configuration and at a reduced voltage after the overload reset.


