Trouble Shooting
TESTS IN EMERGENCIES
When an engine overheats, the trouble is indi cated in several ways. In addition to high reading on the temperature gauge, there is usually a noticeable “ping” and loss of power when the engine is accelerated. In extreme cases of over heating, the engine will continue to rotate for several seconds after the ignition switch has been turned off. Should the engine overheat when the ignition timing is known to be correct, valves properly adjusted and valves in good condition, then look for cooling system failure, a clogged exhaust system, or a mechanical failure in the engine.
When overheating occurs, turn off the ignition switch and allow the engine to cool. At three- or four-minute intervals, rotate the engine a few times with the starter to prevent the piston rings from sticking in the ring grooves. When the en gine has cooled to 180 degrees or less, start it up and slowly fill the cooling system. Then examine the system to determine whether the coolant has been lost because of boiling or because of leaking.
To see whether or not the thermostat is operat ing, start the engine and allow it to run at a fast idle. If the thermostat is closed no water activity will be apparent when looking into the filler neck. When the engine reaches operating temperature, if the thermostat has opened, there will be some stirring around in the water which, of course, is caused by the operation of the water pump. No stirring around of the water means that the thermostat has not opened.
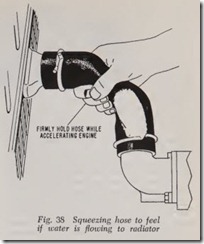
Another way of checking this is to run the engine at a fast idle until operating temperature is reached. Then compress the upper hose with your hand, Fig. 38, and accelerate the engine. If the water is forced through the restricted hose as the engine is accelerated, the thermostat is operating and, therefore, open.
If neither of these methods produce the results desired, replace the thermostat or remove it and operate the car until convenient to install a new one.
If the possibility of thermostat trouble has been eliminated and overheating continues, test the pump by squeezing the upper hose again, Fig. 38. There should be an increased flow of coolant through the hose as the engine is accelerated. If the flow does not increase, the pump is at fault.
If the coolant is leaking from a hose connection,tighten the hose clamp screw. If the leak con tinues, replace the hose or tightly wrap the con nection with tape until a permanent repair can be made. Do the same thing if the leakage is due to a defective pipe.
If the leak is due to a defective radiator core,remove the core and have it repaired. In an emer gency, whittle a plug of soft wood slightly larger than the hole and insert it in the opening. Allow the plug to remain until a permanent repair can be made.
If the leak is coming from the water pump shaft it indicates the seal is defective. The water pump must be replaced. If, on the other hand, the leak is coming from the joint between the water pump and the engine a broken gasket is indicated. This can be replaced by removing the water pump.
If inspection shows that the overheating is not caused by leakage, it indicates that the coolant is not circulating properly. Adjust the fan belt if necessary, or if the belt is broken install a new one.
Should tests and corrective adjustments of the pump and thermostat fail to relieve the overheat ing, test the radiator for clogging. To do this, start the engine and allow it to run until it reaches operating temperature. Turn the ignition off and feel each part of the core surface with the hand, beginning with the top center section. If some sections arc cool to the touch while others are warm, the radiator core is probably clogged and must be cleaned.
The foregoing instructions are suggestions for locating the cause of cooling system troubles in emergencies. Special trouble shooting procedure for locating and testing for relatively uncommon cooling system complaints are as follows:
FROZEN COOLANT
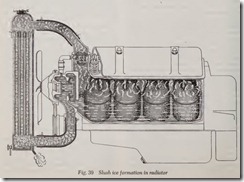
In freezing weather, a sudden rise in engine temperature when the engine is first started may indicate frozen coolant. A freeze-up can be checked by examining the coolant in the upper radiator tank or by attempting to draw it into a hydrometer, or by opening a drain cock. Squeezing the radiator hose is not a dependable test because the hose may feel hard when cold, even though the coolant is not frozen. Feeling the radiator core with the bare hand for cold spots after the engine has been running a short time may reveal the temporary clogging condition caused by a slush freeze in cooling system, Fig. 39.
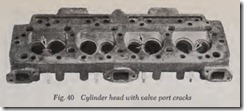
If water is allowed to freeze solid in the system,the practical way to thaw it out, without causing further damage to engine and cooling system, is to allow the car to stand in a warm place until all the ice is melted. Under no circumstances should operation of the engine be attempted when solid freezing occurs as this may cause freeze-cracking of the cylinder head, Fig. 40, cylinder block, radi ator, water pump and connections. After the ice has thawed, examine the cooling system care fully to be sure this has not occurred.
At temperatures below the freezing point of anti freeze solution, there is no solid freezing but the mass of small ice crystals (slush ice), Fig. 39, is formed in the solution which may stop circulation through the radiator. The safest way to thaw out this slush ice is to stand the car in a warm place without running the engine. But depending upon the severity of the freeze-up, it may be safely thawed by running the engine if certain precautions are taken: Cover the radiator, start th e engine and allow it to idle for about a minute. Then stop the engine and allow it to remain at rest for the same period of time. Repeat this procedure several times, each time length ening the running time interval. The heat radiated from the engine in this manner will slowly thaw the ice.
FOAMING
Some water h as a greater tendency to foam than others, due to th e minerals or impurities contained in them. Contamination of anti-freeze solution or aging of solution from extended service increases foaming ten dencies. Foaming of the coolant does not mean a head of foam on the surface of the coolant in th e radiator, but ref ers to the small air bubbles that are caught and h eld in the body of the coolant, giving the coolant a milky appearance and incr easing its volume. Foamin g, therefore, may indicate combustion gas leakage into the coolant, air suction into the system , or abnormal foaming tenden cies in th e coolant itself.
If foaming is found, drain th e cooling system and replace with fresh water. Then operate the engine under the same conditions of speed and temperature as before. If there is no foaming, discard the drained coolant and add corrosion inhibitor to the water in the system, or drain the water and install fresh anti-freeze solution, de pending on the season. If foaming continues with plain water, test for air suction, and for combus tion gas leakage into the system, if found neces sary after the air suction test.
AIR SUCTION TEST
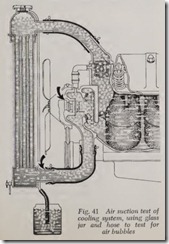
First be sure the coolant level is low enough to pre_vent it being lost through the overflow pipe during the test. Then, if the car is equipped with a radiator pressure cap, block open the pressure valve and put the cap on tight. Attach a suitable length of hose to the overflow pipe, allowing the hose to stand in a vessel of water, Fig. 41. Run the engine until the temperature gauge stops rising and remains stationary. With the engine running at maximum safe speed for several minutes, watch for air bubbles in the water. In the absence of combustion gas leakage, a continuous stream of bubbles indicates that air is being sucked into the system.
To be sure of this, however, carefully examine the water pump shaft seal, lower hose connec tions, lower part of radiator, and all other possible points of leakage on the suction side of the pump. Correct the leaks and repeat the test. If air bubbles continue, or if no leaks are located, make a combustion leakage test. If combustion leakage is found, correct the condition and repeat the air suction test to be sure the condition is remedied. If no combustion leakage is found or if the air suction test still shows bubbles, repair the water pump.
COMBUSTION LEAKAGE TEST
Combustion leakage is most commonly caused by a defective cylinder head gasket or loose head, but it may also be eaused by warpage in the head joint or small cracks in the cylinder head or bloek.
To make the test, start with the engine cold.
Remove the drive belt entirely or at least from the crankshaft pulley, Fig. 42. Drain the system until the coolant is level with the top of the cylinder block. Then remove the upper hose and thermo stat and pour water in the radiator until it flows out of the thermostat opening (engine outlet). If necessary, block the upper hose connection at the radiator with a hand to avoid spillage.
Start the engine. Accelerate it six or eight times and watch the engine outlet opening for bubbles or sudden rise of liquid while accelerating, and also when the engine drops back to idling. Either bubbles or liquid rise indicates combustion leak age into the coolant.
To detect very small leaks, jack up the rear wheels, run the engine at maximum safe speed in high gear and load it gradually and intermittently by applying the foot brake. Make this test quickly before boiling starts, since steam bubbles give misleading results.
If leakage is apparent, remove the cylinder head and inspect the gasket, head and block gasket surfaces, cylinder bores, combustion chambers and water jackets for evidence of leaks, blowby, coolant obstructions and any other defects.
THERMOSTAT TEST
Hang the thermostat by its frame in a vessel of water, Fig. 43, so the thermostat unit does not touch the bottom of the container. Heat the water and measure the temperature (an oven thermom eter will do). If the valve opens at a temperature more than 10 degrees below the specified opening or does not open at a temperature 10 to 15 degrees above the specified opening, the thermostat should be replaced with a new one.
If the valve can be pulled or pushed off its seat with a slight effort when the thermostat is cold, the unit m ay be considered defective.
Whenever the thermostat is removed for any reason, it should be cleaned, tested and examined carefully.
PRESSURE CAP TEST
To test a radiator pressure cap for airtightness, attach a rubber tube to the bottom of the radiator overflow pipe and . block open the pressure valve. With th e cooling system cold, suck on the tube and apply your tongu e to the tube opening. If your tongue adheres to the tube the system is reasonably airtight. If not, the point of air leakage can usually be determined by blowing tobacco smoke into the tube and watching to see where it comes out. These tests will generally reveal air leaks above the liquid level, including leakage at th e valve cap gasket, but will not show whether or not the valves leak.
Pressure and vacuu m valves may be checked for leakage by putting the bottom side of the cap in your mouth with the lips over the valve cage opening. If it is possible to blow through the opening, one or both valves are leaking. Collaps ing of hose or other cooling system parts indicates that the vacuum valve is not opening when the engine cools down, and the cap should be re placed with a new one.
The cap and valves should be flushed by spraying a stream of water, preferably hot, through the holes in the cap valve cage while moving the pres sure valve up and down with a suitably-shaped blunt pin or pencil. The valve should work freely and seat pmperly, otherwise, the cap should be replaced. The gasket and seats in the cap and filler neck should be examined for damage that may cause leakage.
TEMPERATURE GAUGE TEST
With the engine started and running at fast idle, watch the action of the gauge to see that it indicates gradual temperature rise. No movement of the gauge after a reasonable warm-up period may indicate that the thermostat is stuck open. Suddenly rising or unusually high temperature may indicate coolant shortage or freeze-up or other serious defect in the cooling system.
The possibility of a false temperature indication fwm a defective gauge should not be overlooked when checking for overheating or overcooling. An appmximate check for gauge accuracy can be made by inserting a thermometer into the coolant in the upper radiator tank. Stop the engine when the thermometer indicates rated full open thermo stat temperature. Wait until the thermometer stops rising and compare its reading with the temperature gauge on the instrument panel. The gauge should normally read within 10 degrees of the thermometer reading.
For a more accurate test, remove the tempera ture gauge thermal unit from the engine and sus pend it in water which is heated to at least 120 degrees. Then suspend a thermometer in the water and compare the thermometer readings at several temperatures with readings of the tem perature gauge on the instrument panel taken at the same time.
RADIATOR CLOGGING
Severe clogging may be detected by feeling the radiator core for cold spots immediately after engine operation. Another approximate method of checking for radiator clogging is to r emove the lower hose. Then plug the radiator outlet, block the inlet openings and fill the radiator with water. Remove the radiator cap and radiator outlet plug and check the time it takes for draining. The radi ator may be considered clogged if the draining time is noticeably longer than that required for a clean radiator of the same type.
AIR COOLED ENGINE COOLING
TROUBLES
Overheating of the cooling system on an air- cooled car may be due to any of the following:
1. Oil cooler dirty.
2. Blower belt loose.
3. Blower belt worn or oil soaked.
4. Thermostat sticking closed.
5. Incorrect cooling air valve opening.
6. Engine cooling fins plugged.
7. Incorrect ignition or valve timing.
8. Brakes dragging.
9. Improper grade and viscosity oil being used.
10. Fuel mixture too lean.
11. Valves improperly adjusted.
12. Defectiv e ignition system.
13. Exhaust system partly restricted.
14. Loose engine shield seals.
15. Spark plug boots loose.
16. Engine sheet metal loose.
When tuning up an air cooled engine, be certain that all metal shmuds and shields are in place and properly fitted to prevent air leaks. Inspect the blower belt to be sure it has the proper tension and that the blower assembly is in good condition.
Examine the openings in the rear lid to see that they are free of dirt, twigs, leaves, paper, and so on, as this is the source of engine cooling air. Lubricate hinges of air outlet baffie and see that they move freely.


