Maintenance of Electric Motors
The care given to an electric motor while it is in operation directly affects the life and usefulness of the motor. A motor that receives good mainte nance practices will outlast a poorly treated motor many times over. Ac tually, if a motor is initially installed correctly and it has been properly selected for the job, very little maintenance is necessary-provided it does receive a little care at regular intervals.
CLEANLINESS
The frequency of cleaning motors will depend on the type of environment in which it is used. In general, keep both the interior and exterior of the motor free from dirt, water, oil, and grease. Motors operating in dirty areas should be periodically disassembled and thoroughly cleaned.
If the motor is totally enclosed- fan-cooled or nonventilated- and is equipped with automatic drain plugs, they should be free of oil, grease, paint, grit, and dirt so they don’t clog up.
LUBRICATION
Most motors are properly lubricated at the time of manufacture, and it is not necessary to lubricate them at the time of installation. However, if a motor has been in storage for a period of 6 months or longer, it should be relubricated before starting.
To lubricate conventional motors:
1. Stop the motor.
2. Wipe clean all grease fittings (filler and drain).
3. Remove the filler and drain plugs, A and B in Fig. 14-1.
4. Free the drain hole of any hard grease (use a piece of wire if necessary).
5. Add grease* using a low-pressure grease gun.
6. Start the motor and let it run for approximately 30 min.
7. Stop the motor, wipe off any drained grease, and replace the filler and drain plugs.
8. The motor is ready for operation.
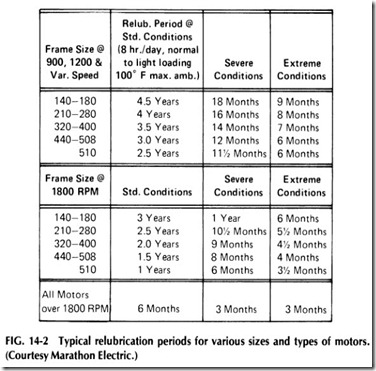
Every 4 years (every year in the case of severe duty) motors with open bearings should be thoroughly cleaned, washed, and repacked with grease. Figure 14-2 shows the relubrication period. Standard conditions reflected in the figure mean 8-h/day operation, normal or light loading, clean at 100°F maximum ambient. Severe conditions are 24-h/day opera tion, or shock loadings, vibration, or in dirt or dust, clean at 100-150°F ambient, and extreme conditions are defined as heavy shock or vibration, dirt or dust, clean at 100-150°F ambient.
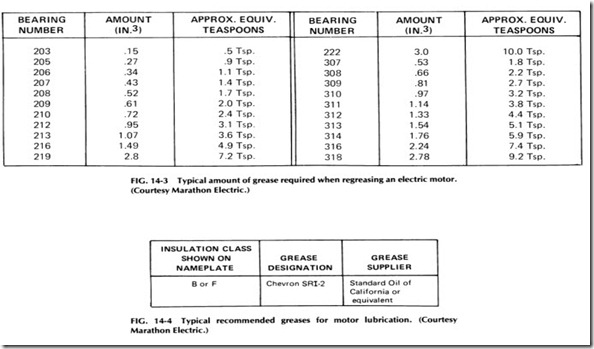
The quantity of grease is important. The grease cavity should be
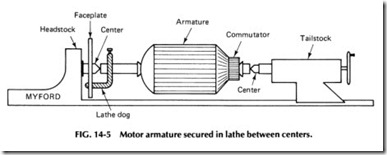
filled one third to one half full. Always remember that too much grease is as detrimental as insufficient grease. Figure 14-3 shows the amount of grease required, and Fig. 14-4 gives the recommended greases.
PRACTICAL MAINTENANCE TECHNIQUES
The key to long, trouble-free motor life-once the motor has been sized and installed properly-is proper maintenance. Maintaining a motor in good operating condition requires periodic inspection to determine if any faults exist ‘and then promptly correcting these faults. The frequency and thoroughness of these inspections depend on such factors as the following:
• Number of hours and days the motor operates
• Importance of the motor in the production scheme
• Nature of service
• Environmental conditions
Each week every motor in operation should be inspected to see if the windings are exposed to any dripping water, acid, or alcoholic fumes as well as excessive dust, chips, or lint on or about the motor. Make certain that objects that will cause problems with the motor’s ventilation system are not placed too near the motor and do not come into direct contact with the motor’s moving parts.
In sleeve-bearing motors, check the oil level frequently (at least once a week) and fill the oil cups to the specified line with the recommended lubricant. If the journal diameter is less than 2 in., always stop the motor before checking the oil level. For special lubricating systems, such as forced, flood and disc, and wool-packed lubrication, follow the manufac turer’s recommendations. Oil should be added to the bearing housing only when the motor is stopped, and then a check should be made to en sure that no oil creeps along the shaft toward the windings where it may harm the insulation.
Always be alert to any unusual noise which may be caused by metal to-metal contact (bad bearings, etc.), and also learn to detect any abnor mal odor which might indicate scorching insulation varnish.
Feel the bearing housing each week for evidence of vibration and listen for any unusual noise. A standard screwdriver with the blade on the bearing housing and the handle clasped with the hand while the ear is positioned so as to rest on the cupped hand will magnify the noise. Also inspect the bearing housings for the possibility of creeping grease on the inside of the motor which might harm the insulation.
Commutators and brushes should be checked for sparking and should be observed through several cycles if the motor is on cycle duty. A stable copper oxide carbon film- as distinguished from a pure copper surface- on the commutator is an essential requirement for good com mutation. Such a film, however, may vary in color from copper to straw or from chocolate brown to black. The commutator should be clean and smooth and have a high polish to prevent problems. All brushes should be checked for wear, and connections should be checked for looseness. The commutator surface may be cleaned by using a piece of dry canvas or other hard, nonlinting material which is wound around and securely fastened to a wooden stick and held against the rotating commutator.
The air gap on sleeve-bearing motors should be checked frequently, especially if the motor has recently been rewound or otherwise repaired. After new bearings have been installed, for example, make sure that the average reading is within 10o/o, provided the reading should be less than .020 in. Check the air passages through punchings and make sure they are free of all foreign matter.
Compressed air may be used to blow motor windings clean, provided too much pressure is not used. Industrial-type vacuum cleaners have also been used with success. Before performing either of these cleaning opera tions, however, make certain that the motor is disconnected from the line. Then the windings may be wiped off with a dry cloth. In doing so, check for moisture, and see if any water has accumulated in the bottom of the motor frame. Check also to see if any oil or grease has worked its way up to the rotor or armature windings. If so, clean with AWA 1,1,1 or a similar cleaning solution.
When performing any of the preceding maintenance operations, check other motor parts and accessories such as the belt, gears, flexible couplings, chain, and sprockets for excessive wear or improper location. Also check the starter and that the motor comes up to proper speed each time it is started.
Once every month or so maintenance personnel should check the shunt, series, and commutating field windings for tightness. Do this by trying to move the field spools on the poles, as drying out may have caused some play. If this condition exists, the motor(s) should be serviced
immediately. Also check the motor cable connections for rightness and tighten if necessary.
At the same time the preceding checks are made, also check the brushes in their holders for fit and free play. The brush spring pressure should also be checked. Tighten the brush studs in the holders to take up slack from the drying out of washers, making sure that studs are not dis placed, particularly on de motors. All worn or damaged brushes should be replaced at this time. Look for chipped toes or heels and for heat cracks during the inspection.
Each month examine the commutator surface for high bars and high mica or evidence of scratches or roughness. See that the risers are clean and have not been damaged in any way.
Where motors are subjected to hard use, all ball or roller bearing motors should be serviced by purging out the old grease through the drain hold and applying new grease once each month or more frequently if circumstances dictate the need. After each grease change, check to make sure grease or oil is not leaking out of the bearing housing. If so, correct this condition before starting the motor, or the insulation may be damaged.
Check the sleeve bearings for wear about six to eight times each year. Clean out oil wells if there is evidence of dirt or sludge. Flush with lighter oil before refilling.
For motors with enclosed gears, open the drain plug and check the oil flow for the presence of metal scale, sand, grit, or water. If the condi tion of the oil is bad, drain, flush, and refill as recommended by the manu facturer of the motor. Rock the rotor to see if slack or backlash is increasing.
Loads being driven by motors have a tendency to change from time to time due to wear on the machine or the product being processed through the machine. Therefore, all loads should be checked from time to time for a changed condition, bad adjustment, and poor handling or con trol.
During the monthly inspection, note if belt-tightening adjustments are all used up. If they are, the belts may be shortened. Also see if the belts run steadily and close to the inside edge of the pulley. On chain driven machines, check the chain for evidence of wear and stretch and clean the chain thoroughly. Check the chain-lubricating system and note the incline of the slanting base to make sure it does not cause oil rings to rub on the housing.
Once or twice each year, all motors in operation should be given a thorough inspection consisting of the following:
Windings: Check the insulation resistance by using the instru ments and techniques described in Chapter 17. The windings should also be given a visual inspection; look for dry cracks and other evidence of a need for coating insulating material. Clean all surfaces thoroughly, espe cially ventilating passages. Also examine the frame to see if any mold is present or if water is standing in the bottom. Either will suggest damp ness and may require that the windings be dried out, varnished, and baked.
Air gap and bearings: Check the air gap to make sure that average readings are within 10% provided the readings should be less than .020 in. All bearings, ball, roller, and sleeve, should be thoroughly checked and defective ones replaced. Waste-packed and wick-oiled bearings should have waste or wicks renewed if they have become glazed or filled with metal, grit, or dirt, making sure that new waste bears well against the shaft.
Squirrel cage rotors: Check for broken parts or loose bars as well as evidence of local heating. If the fan blades are not cast in place, check for loose blades. Also look for marks on the rotor surface which indicate the presence of foreign matter in the air gap or else that the motor has a worn bearing or bearings.
Wound rotors: Wound rotors should be cleaned thoroughly, espe cially around collector rings, washers, and connections. Tighten all con nections. If rings appear to be rough, spotted, or eccentric, they should be refinished by qualified personnel. Make certain that all top sticks or wedges are tight; tighten those which are not.
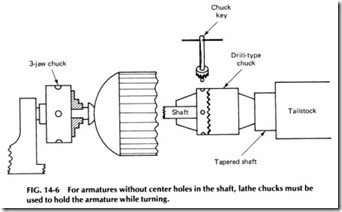
Armatures: Clean all armature air passages thoroughly. In doing so, look for oil or grease creeping along the shaft back to the bearing. Check the commutator for its surface condition, high bars, high mica, or eccentricity. If necessary, turn down the commutator to secure a smooth fresh surface. This operation is performed in a lathe of suitable size as shown in Fig. 14-5.
For armatures with drilled center holes, put a lathe dog on the shaft opposite the commutator and tighten it. If it is necessary to put the lathe dog on a bearing surface, put a piece of thin copper around the shaft so it will not be injured. Put a faceplate on the spindle end of the lathe along with centers in both the headstock and tailstock. Apply some white lead or oil on the tailstock center and then place the commutator between cen ters and tighten the tailstock, but not so tight as to spread the end of the shaft.
Use a sharp-pointed lathe cutting tool in the tool holder to turn the commutator down, running lathe at medium speed, say, around 700 rpm.
Finish the job with a fine file and abrasive paper.
Armatures without drilled center holes will necessitate the use of chucks. The armature shaft opposite the commutator should be chucked in a three-jaw universal chuck in the headstock. Chuck a bearing of proper size in a drill-type chuck and place it in the tailstock of the lathe. Oil this bearing and then place the commutator end shaft into it. See Fig. 14-6. The commutator is then turned in the same manner as described previously.
To summarize, when turning down an armature, always use a pointed tool with a sharp and smooth edge to obtain the cleanest cut pos sible. Take only a fine cut each time to prevent tearing the commutator. To finish the job, smooth down the surface with a soft file while the arma ture is revolving in the lathe between centers. While the armature is still turning, some workers like to polish its surface with various sizes of abrasive paper.
When the armature has been turned, clean between the bars if neces sary and then test with a growler or other test instrument to determine if any shorts are present. The vibration of a hacksaw blade on any coil means that the coil is shorted at the leads or commutator. Clean between the commutator bars and test again. As soon as the armature tests okay, it is ready to put back into service.
Motor loads should be reevaluated from time to time, as they will vary for several reasons. Use testing instruments as described in Chapter 17 and take an ampere reading on the motor, first with no load and then at full load- or through an entire cycle. This should give a fair check as to the mechanical condition of the driven machine.
Without proper maintenance, no motor can be expected to perform its best for any length of time or to remain in service as long as it should.
Although motor maintenance is costly, it is far less expensive than continually replacing motors or overhauling them frequently.


