Starting a Conversion Gas Burner (with Pilot Light)
This section covers the starting of conversion gas burners equipped with pilot lights. Before attempting to start this type of burner, the piping should be checked for leaks. The basic procedure for doing this is as follows:
1. Shut off all other gas appliances (gas water heaters, etc.) that tie into the same system.
2. Turn on the main shutoff valve (Figure 16-13).
3. Turn valve dial A to OFF (Figure 16-13).
4. Turn on gas pressure to the gas supply line.
5. Watch the meter test dial.
If the meter test dial shows no movement for at least 5 minutes, it is safe to say that there are no leaks in the piping. Movement of the meter test dial, however, means that you must locate the leak (or leaks) before starting the burner. The soapsuds test is a simple and effective method for doing this.
The gas line must be purged before starting the burner. To do this, the following steps are recommended:
1. Disconnect the pilot tubing.
2. Depress valve dial A as far as it will go, and turn it counter- clockwise to PILOT (Figure 16-13). Do not release the dial at this point.
3. With valve dial A still fully depressed; lock the dial in position by engaging the lighting latch B (Figure 16-13).
4. Allow the air to escape until the gas line is completely purged (which will be indicated by gas replacing the air issuing from the pilot connection). Caution: Never purge the gas line into the combustion chamber.
5. Turn off valve dial A (depress and turn clockwise).
6. Reconnect the pilot tubing.
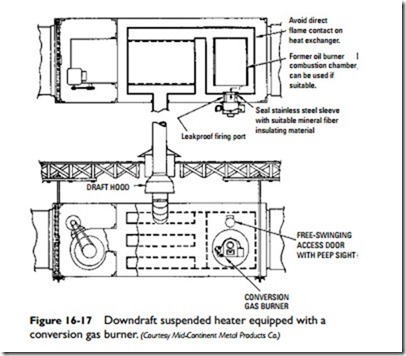
Avoid direct flame contact on heat exchanger.
Former oil burner combustion chamber can be used if suitable.
After you have checked the piping for leaks and have completely purged the gas lines, you are now ready to start the burner. First add a few drops of oil (#20 SAE oil is recommended) to the burner motor bearings. Then, check the setting of valve dial A. At this point, it should be turned to OFF (see step 5 in the purging procedure just described).
You are now ready for the initial startup procedure, which is accomplished as follows:
1. Set the main air shutter at approximately one-quarter open.
2. Turn on the main line switch.
3. Set the room thermostat above room temperature (this will cause the burner motor to start).
4. The burner motor should be allowed to run for about 5 minutes to ensure complete purging of the combustion chamber.
6. Fully depress valve dial A and turn it counterclockwise to PILOT. Keep it depressed.
7. Lock valve dial A in its depressed position by engaging the lighting latch B.
8. Light a match and hold the flame under the igniter valve and at igniter slot C while at the same time depressing button C for at least 10 seconds.
9. Release the lighter button. The pilot should now ignite. If it does not, then repeat Step 8 above.
10. After the pilot has been burning for at least 1 minute, release valve dial A and turn it counterclockwise to the ON setting.


