Building a Combustion Chamber
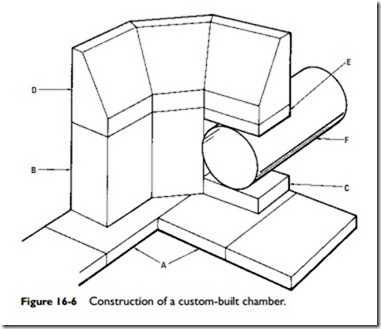
Figure 16-6 illustrates the construction of a typical custom-built combustion chamber. The steps involved in constructing this chamber are as follows:
1. Place split brick A on the ashpit floor to form the floor of the combustion chamber.
2. Mix the refractory binder in a shallow pan to the consistency of a heavy cream.
3. Dip the bottom and sides of brick B in the binder and place it in a circular position on the combustion chamber floor. You should start at the back and work toward the front of the chamber.
4. Follow the same procedure with the rest of the bricks in the tier (i.e., those on the same level as brick B).
5. When the tier is finished, tighten it in position with bands suitable for this purpose.
6. Fill behind the first tier with rock wool.
7. Install top tier D in the same manner described in steps 1 through 5; however, use only one band to tighten it.
8. Cap the chamber with a mixture of 3 parts refractory mortar and 1 part fire clay, and trowel smooth.
9. Place metal sleeve F in the opening, and cement it tightly in place.
10. Insert the draft tube in metal sleeve, and pack with loose rock wool or a suitable insulating material.
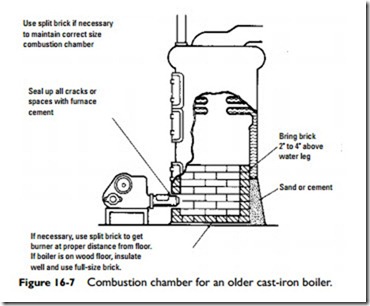
Figure 16-7 shows an old, round, cast-iron boiler that has been converted to oil. Note the height of the combustion chamber wall. The procedure for setting up the oil burner to the combustion chamber is illustrated in Figure 16-8.

