The Immersion Heater
Hot water for domestic use may be provided in various ways: Solid fuel: Coal, turf, timber etc.
Oil: Central heating boiler run on oil.
Gas: Central heating boiler run on gas, gas powered water heaters.
Electricity: Electrically powered water heaters, under sink and over sink types, cistern types and immersion types.
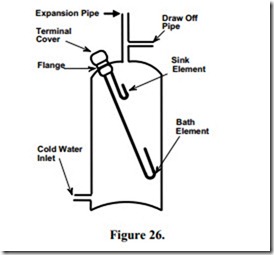
The immersion type water heater is most commonly used, as it is easy to combine with the normal domestic hot water supply. Immersion heaters are available with one heating element or two separate heating elements. The latter is referred to as the Dual Immersion Heater. The dual immersion heater is the more commonly used type in this country. The heater is installed through a threaded flange in the top of the domestic hot water cylinder. See Figure 26.
The short element heats about 10 gallons of water for normal sink or washbasin use. It is rated at approximately 2 kW.
The long element heats about 30 gallons of water for baths and other heavy demands. It is rated at approximately 3 kW.
Since hot water rises, the draw-off pipe is fitted at the top of the cylinder. Cold water enters at the bottom of the cylinder.
Element Construction
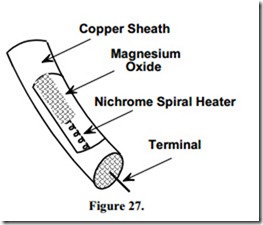
The element of the dual immersion heater is composed of a nichrome spiral heater, surrounded by compacted magnesium oxide insulation. These are contained in a tubular sheath made of copper. The sheath may be nickel-plated to prevent corrosion of the copper. Electric kettle elements and cooker elements are constructed in the same manner.
When power is applied to the spiral heater it will heat to “red hot”. This heat must be dissipated efficiently; otherwise the nichrome wire will overheat and open circuit. This is often the result when an electric kettle is switched on while empty. The magnesium oxide insulation is a very efficient conductor of heat as is the copper sheath. The heat is therefore very efficiently conducted to the water in the cylinder.
Insulation against Heat Loss
A lagging jacket fitted to the cylinder will greatly enhance the efficiency of an immersion heater. However, the terminal block of the immersion heater should not be covered, either by jacket or by clothing, as this may cause overheating of the terminals and cable.
Thermostat Construction and Operation
For obvious reasons the temperature of the domestic hot water must be controlled and a simple thermostat provides this control.
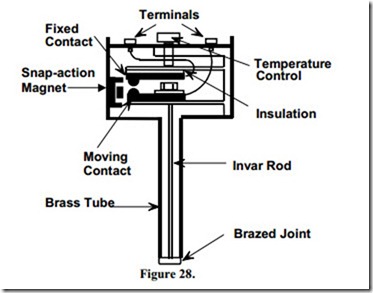
This type of thermostat ( bi-metal ) depends for its operation on the different rate of expansion of an invar rod compared to a brass tube, which form the stem. At “switch-on”, when the water is cold, the contact is closed and current flows in the heating element. As the water temperature rises the brass tube expands more than the invar rod, which will cause the moving contact to be pulled away from the fixed contact, thereby breaking the circuit. The small permanent magnet causes the contact to make or break with a “snap action” in order to reduce arcing to a minimum. The temperature at which the thermostat operates is adjustable by means of the temperature control adjusting screw. Movement of this screw positions the “fixed contact” nearer to, or further from the “moving contact”. This in turn determines how soon a “break” or “make” is affected and therefore determines the temperature at which the thermostat operates.
Thermostat Differential
There is a differential between the “break” and “make” temperatures of the thermostat of approximately 5-15°F ( 2-8°C ). This differential depends on the stem length and on the make of thermostat. It is usual practice to set this thermostat to 140°F ( 60°C ).
The differential means that if the thermostat cuts out at 60°C, it will cut in again when the water cools down to between 52 and 58°C ( a difference of 2-8°C ). Conversely, if the thermostat cuts in at 60°C it will cut out again between 62 and 68°C.
Immersion Heater Control
A heat resistant flexible cord is used to connect between control switch and the heater. The control switch must be connected to a separate final circuit. It should be wired in 2.5 mm2 cable and protected by a 30 mA RCD and a 16 to 20 A MCB or fuse.
A time switch may also be fitted to provide hot water at pre-determined times during the day or night.
Connecting Single Immersion Heaters
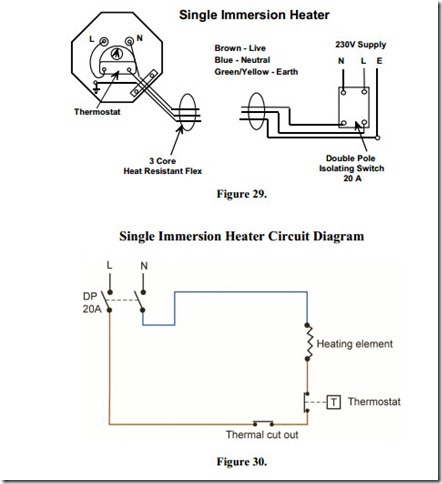
Single immersion heaters are controlled by a 20 A Double Pole switch. See Figures 29 and 30.
Protection Against Overheating
Immersion heaters are now equipped with an over temperature cut-out. This is to prevent the water in the cylinder being overheated in the event of the control thermostat failing in the closed position. It is a manual reset type cut-out and is incorporated into the thermostat.
Any other form of heating incorporated in the system ( solid fuel, oil, gas, ) must be controlled to prevent overheating of the water as this would also operate the cut-out.
Dual immersion heaters
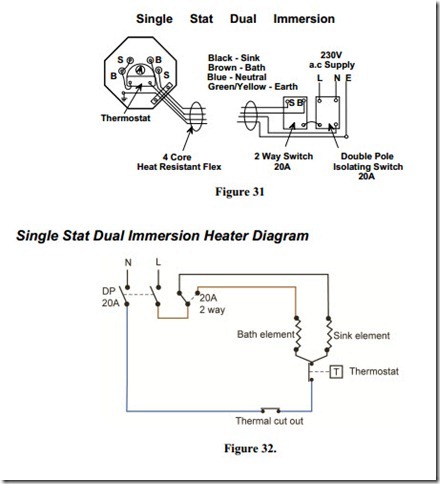
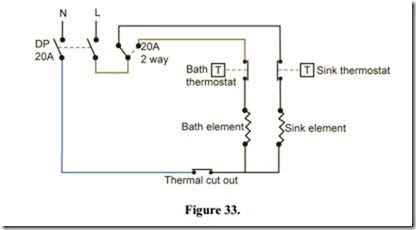
Dual immersion heaters are controlled by a purpose-built switching unit. It consists of a 20 A Double-Pole switch and a 20 A Two-way switch. A neon lamp to indicate that power is applied to the heater, may also be included. In some cases the interconnection between the double-pole and two-way switch is not visible. See Figure 31
Immersion Temperature Setting
Fitted thermostats are pre-set to 70°C ( 168°F ), which should be satisfactory for most locations; however, adjustment is easily made as follows:
· Isolate the electrical supply.
· Remove the cover of the heater using a suitable tool.
· Adjust the thermostat to required setting using a small flat-blade screwdriver.
· Replace the cover being careful not to overtighten.
· Reconnect the mains supply.
The thermostat should be set at 60°C ( 140°F ) for hard water areas,
and up to 80°C ( 176°F ) for soft water areas. In a dual immersion heater, where both elements are controlled by one thermostat, after switching from “sink” to “bath”, having already heated water with the sink element, the thermostat may take a little time to operate the longer bath element. This is because the water temperature must drop a little in order to activate the thermostat.
This reaction time may be speeded up, by drawing off a little water from a hot tap.
Copper sheathed immersion heaters are suitable for use in normal water areas, and will give years of service when properly installed and maintained. In hard water areas, use an alloy sheathed immersion heater. Dual element heaters should be fitted vertically, while short, single element heaters may be fitted horizontally. The element must always be fully immersed in water when in use.
Installation Checklist
· Check that the voltage rating of the element corresponds with the available supply voltage and that the cable and switches used are of the correct rating for the load current. Heat resistant cable should be used to connect the heater to the electrical supply. A double pole switch must be used to isolate the heater from the supply.
· Check that the immersion heater used is of the correct length for the cylinder. When installed, the heater should not be in contact with the indirect heating coil, and should have a clearance of at least 50mm from the cylinder wall or base. ( Remember that in most domestic copper cylinders, the base is dome shaped ).
· Isolate the electrical circuit from the mains supply.
· Drain the cylinder until the water is below the spill level.
· Install the heater, using the joint washer supplied. The element is designed for a pressure gasket fit, and should not need the application of thread tape or jointing compound, provided that the mating flange is smooth and level and the flange threads are a proper fit.
· Connect the heater as per the wiring diagram and ensure that it has a proper earth connection.
· After installation, and before switching on the electrical supply, ensure that the cylinder is full of water and that the water system is functioning normally.
