Installing Electric Heating Mats or Rolls
Electric heating mats or rolls must be installed in accordance with the manufacturer’s instructions and any local codes or ordinances.
Before installing the heating mats or rolls, check the shipment to make sure the manufacturer has included everything. If the order is complete, remove the mats or rolls from their boxes and test the ohm resistance of each to make sure it has not been damaged during shipment.
Note
This will be the first of three resistance tests. The second resistance test is performed after the mats have been secured to the subfloor, and the third after the floor covering has been applied over the mats.
To perform a resistance test, set a digital multimeter to the 200- ohms setting and connect the mat lead wires to the multimeter probes. Make sure the resistance reading is within the range of plus 10 percent to minus 5 percent of the resistance rating listed on the mat tag.
An insulation test should be performed to make sure there is no short or ground in the mat or roll. To conduct an insulation test, set the digital multimeter to the megohms setting and connect the silver braid (ground) and black lead to the multimeter probes. The multi- meter should read “open” or “OL.” Check the instructions with the multimeter to confirm which code represents the “open line.” Repeat this test between the silver braid (ground) and the white lead wire.
Caution
The installation of electrical heating systems involves some risk of fire and/or electrical shock that can result in injury or even death.
With that in mind, only a qualified, certified electrician or some one with similar training and experience should connect the electric heating mats or rolls to the thermostat and the electrical circuit. Connections should be made in accordance with local codes and ordinances and the provisions in the latest edition of the National Electrical Code. The heating mats or rolls must be installed by a qualified contractor or homeowner before the connections to the electrical circuits and control device are made.
Installing Electric Mats or Rolls over Subfloors
Keep a permanent record of the location of the mats or rolls and the floor sensor, if one is installed.
Note
Do not install solid-based furniture, built-in cabinets, bookcases, room dividers, or plumbing fixtures over heating mats or rolls.
The procedure for installing electric heating mats or rolls over a subfloor may be outlined as follows:
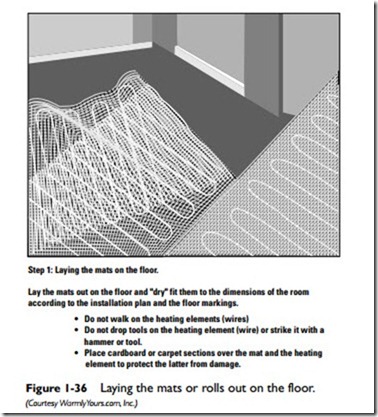
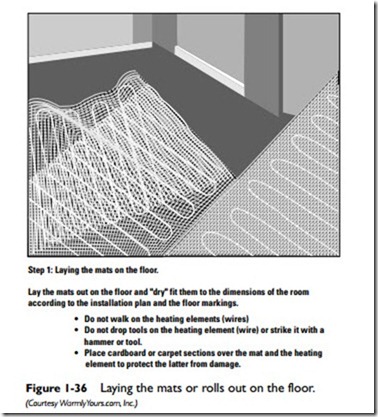
1. Use the installation plan provided by the manufacturer to lay the mats or rolls out in the room. This dry run is done to make sure the mats or rolls cover the floor properly (see Figure 1-36).
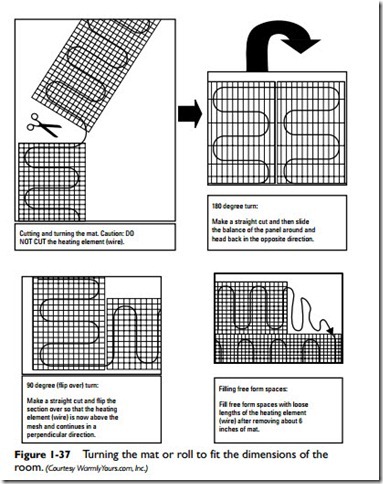
2. Cut the supporting material (but not the heat resistance wire) and turn the mat or roll to fit the dimensions of the room (see Figure 1-37).
3. Glue the mat to the subfloor to prevent it from moving out of position.
4. Test the ohm resistance of each heating roll after it has been secured to the subfloor to make sure it wasn’t damaged during installation. This is the second resistance test.
5. Cover the roll with a layer of thinset cement. Allow the thin- set cement sufficient time to cure. Do not turn on the radiant heating system until the thinset cement has cured according to the recommended time on the packaging.
6. Consult the installation plan and mark the approximate location of the heating elements on the cement surface with chalk.
7. Cover the layer of thinset cement with the floor covering (tile, carpet, and so on). Note: Do not nail, screw, or staple near the heating elements and cold lead wires when installing the floor covering. Use the chalk lines as a guide.
8. Test the ohm resistance of the heating rolls to verify that they were not damaged when the floor covering was applied. This is the third resistance test.
9. Hardwire the electric mat or roll to the thermostat. This step should be done only by an electrician or an individual with the required experience of working with electrical systems.
Installing Electric Heating Mats or Rolls in Joist Cavities under Subfloors Electric heating mats or rolls are also available for use in joist cavities beneath wood subfloors in residential and light commercial construction. The joists are spaced 16 inches on centers.
These mats or rolls may be jointed to fill larger spaces, but they must be wired in parallel (not in series) when joined together. The mats are rated either 120 VAC or 240 VAC. They are wide enough to fit into joist cavities with joists separated 16 inches on center.
The following installation steps are offered only as a guideline. Specific instructions can be obtained from the manufacturer and should be carefully followed.
The procedure for applying electric radiant heating mats or rolls in joist cavities under subfloors may be outlined as follows:
1. Install the floor sensor.
2. Push a length of mat into the joist cavity so that it touches the bottom of the subfloor. The heating wires must be between the supporting mesh and the bottom of the subfloor.
3. Staple one edge of the supporting mesh to the side of the joist.
Place the staples a minimum of 1⁄2 inch from the heating wire and 3⁄4 inch down from the subfloor on the joist.
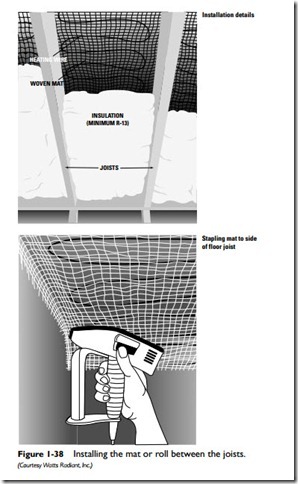
4. Push the other edge of the mat against the subfloor and nail the mesh to the joist surface. Use the same staple locations. Pull the mat snug against the subfloor as you staple the oppo- site edge to the joist. There will be a slight droop when you are finished. A gap of not more than 1 inch between the mat and the subfloor is acceptable (see Figure 1-38).
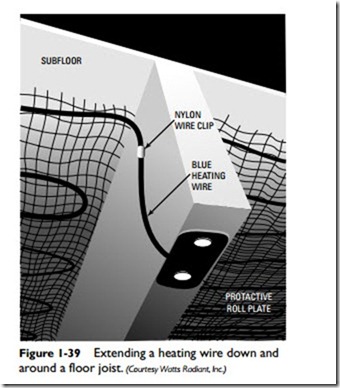
5. Cut the supporting mesh of the mat when it reaches the end of the joist cavity or some other blockage. Do not cut the heating wire. Pull the heating wire (without the mesh) down and across a notch cut into the bottom of the floor joist (see Figure 1-39). The notch must not exceed 1⁄4 inch in depth and must be covered by a steel nailing plate. Avoid nicking or damaging the heating wire when nailing the plate to the bottom of the joist.
Note
Check the local building codes to see if notching the bottom of the joist for routing the heating wire is permitted. Some codes prohibit notching the joist. Notching the joist is allowed by the BOCA National Building Code (Section 2308.8.2 of the 2000 edi- tion) in each of the one-third ends of a joist span (never in the middle one-third of the span).
6. If notching the joist is not permitted, drill a 2-inch diameter hole through the side of the joist and pull the heating wire with its supporting mesh through the hole. Cut away the mesh next to the hole after it has been pulled through.
7. If a second mat is required to finish out a room area, start the second mat flush with the end of the first mat and wire them in parallel (not series). Do not overlap the mats.
8. Connect the mat leads to the junction box in accordance with the provisions of the local building code or the latest edition of the National Electrical Code, if there is no applicable local code. Use additional electrical boxes where required. Connect the floor sensor and power supply.
Caution
Use an experienced and qualified electrician to make these electrical connections. There is always the possibility of severe shock injury, death, and/or property damage if the electrical work is done by inexperienced and unqualified workers.
9. After all the controls have been installed, energize the heating system briefly to see if it is operational.
10. If the system is operating properly, turn off the power and push foil-faced blanket or batt insulation (minimum R-13 rating) into the joist cavities. Leave a clearance of 1⁄2 inch to 1 inch between the mat or roll and the insulation (see Figure 1-40).
11. Seal the ends of the joist cavities by installing the last of the insulation vertically. Push the insulation up tight against the subfloor and staple it there so that no heat can escape through the band joists, rim joists, or the open end of a joist cavity.
