Component Desoldering
Most of the damage in printed circuit board repair occurs during disassembly or component removal. More specifically, much of this damage occurs during the desoldering process. To remove components for repair or replacement, the technician must first determine the type of joint that is used to connect the component to the board. The technician may then determine the most effective method for desoldering these connections.
Three generally accepted methods of solder connection removal involve the use of SOLDER WICK, a MANUALLY CONTROLLED VACUUM PLUNGER, or a motorized solder extractor using CONTINUOUS VACUUM AND/OR PRESSURE. Of all the extraction methods currently in use, continuous vacuum is the most versatile and reliable. Desoldering becomes a routine operation and the quantity and quality of desoldering work increases with the use of this technique.
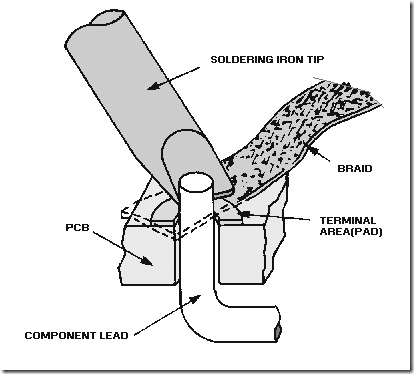
SOLDER WICKING.—IN this technique, finely stranded copper wire or braiding (wick) is saturated with liquid flux. Most commercial wick is impregnated with flux; the liquid flux adds to the effectiveness of the heat transfer and should be used whenever possible. The wick is then applied to a solder joint between the solder and a heated soldering iron tip, as shown in figure 3-10. The combination of heat, molten solder, and air spaced in the wick creates a capillary action and causes the solder to be drawn into the wick.
Figure 3-10.—Solder wicking.
This method should be used to remove surface joints only, such as those found on single-sided and double-sided boards without plated-through holes or eyelets. It can also remove excessive solder from flat surfaces and terminals. The reason is that the capillary action of the wicking is not strong enough to overcome the surface tension of the molten solder or the capillary action of the hole.
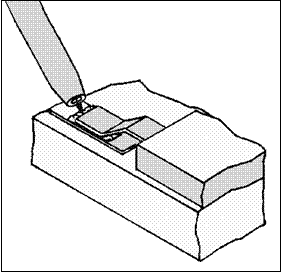
MANUALLY CONTROLLED VACUUM PLUNGER.—The second method of removing solder involves a manually controlled and operated, one-shot vacuum source. This vacuum source uses a plunger mechanism with a heat resistant orifice. The vacuum is applied through this orifice. Figure 3-11 shows the latest approved, manual-type desoldering tool. This technique involves melting the solder joint and inserting the solder-extractor tip into the molten solder over the soldering iron tip. The plunger is then released, creating a short pulse of vacuum to remove the molten solder. Although this method offers a positive vacuum rather than the capillary force of the wicking method, it still has limited application. This method will not remove 100 percent of the solder and may cause circuit pad lifting because of the extremely high vacuum generated and the jarring caused by the plunger action.
Figure 3-11.—Manual desoldering tool.
Because 100 percent of the solder cannot be removed, the extraction method is not usually successful with the plated-through solder joint. The component lead in a plated-through hole joint usually rests against the side wall of the hole. Even though most of the molten solder is removed by a vacuum, the small amount of solder left between the lead and side walls causes a SWEAT JOINT to form. A sweat joint is a paper-thin solder joint formed by a minute amount of solder remaining on the conductor lead surfaces.
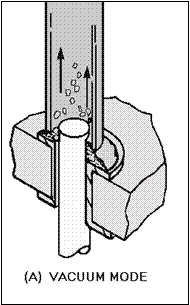
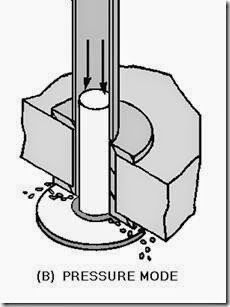
MOTORIZED VACUUM/PRESSURE METHOD.—The most effective method for solder joint removal is motorized vacuum extraction. The solder extractor unit, described in topic 2, is used for this type of extraction. This method provides controlled combinations of heat and pressure or vacuum for solder removal. The motorized vacuum is controlled by a foot switch and differs from the manual vacuum in that it provides a continuous vacuum. The solder extraction device is a coaxial, in-line instrument similar to a small soldering iron. The device consists of a hollow-tipped heating element, transfer tube, and collecting chamber (in the handle) that collects and solidifies the waste solder. This unit is easily maneuvered, fully controllable, and provides three modes of operation (figure 3-12): (1) heat and vacuum (2) heat and pressure, and (3) hot-air jet. Some power source models provide variable control for pressure and vacuum levels as well as temperature control for the heated tubular tip. The extraction tip and heat source are combined in one tool. Continuous vacuum allows solder removal with a single heat application. Since the slim heating element allows access to confined areas, the technician is protected from contact with the hot, glass, solder-trap chamber. Continuous vacuum extraction is the only consistent method for overcoming the resweat problem for either dual or multilead devices terminating in through-hole solder joints.
 Figure 3-12A.—Motorized vacuum/pressure solder removal. VACUUM MODE.
Figure 3-12B.—Motorized vacuum/pressure solder removal. PRESSURE MODE.
 Figure 3-12C.—Motorized vacuum/pressure solder removal. HOT AIR JET MODE.
Motorized Vacuum Method.—In the motorized vacuum method, the heated tip is applied to the solder joint. When melted solder is observed, the vacuum is activated by the technician causing the solder to be withdrawn from the joint and deposited into the chamber. If the lead is preclipped, it may also be drawn into a holding chamber. To prevent SWEATING (reforming a solder joint) to the side walls of the plated-through hole joint, the lead is "stirred" with the tip while applying the vacuum. This permits cool air to flow into and around the lead and side walls causing them to cool.
Motorized Pressure Method.—In the pressure method, the tip is used to apply heat to a pin for melting a sweat joint. The air pressure is forced through the hole to melt sweat joints without contacting
the delicate pad. This method is seldom used because it is not effective in preventing sweating of the lead to the hole nor for cooling the workpiece.
Hot-Air Jet Method.—The hot-air jet method uses pressure-controlled, heated air to transfer heat to the solder joint without physical contact from a solder iron. This permits the reflow of delicate joints while minimizing mechanical damage.
When the solder is removed from the lead and pad area, the technician can observe the actual condition of the lead contact to the pad area and the amount of the remaining solder joint. From these observed conditions, the technician can then determine a method of removing the component and lead.
With straight-through terminations, the component and lead may be lifted gently from uncoated boards with pliers or tweezers. Working with clinched leads on uncoated boards requires that all sweat joints be removed and that the leads be unclinched before removal.
The techniques that have been described represent the successful methods of desoldering components. As mentioned at the beginning of this section, the 2M technician must decide which method is best suited for the type of solder joint. Two commonly used but unacceptable methods of solder removal are heat-and-shake and heat-and-pull methods.
In the heat-and-shake method, the solder joint is melted and then the molten solder is shaken from the connection. In some cases, the shaking action may include striking the assembly against a surface to shake the molten solder out of the joint. This method should NEVER be used because all the solder may not be removed and the solder may splatter over other areas of the board. In addition, striking the board against a surface can lead to broken boards, damaged components, and lifted pads or conductors.
The heat-and-pull method uses a soldering iron or gang-heater blocks to melt individual or multiple solder joints. The component leads are pulled when the solder is melted. This method has many shortcomings because of potential damage and should NOT be attempted. Heating blocks are patterned to suit specific configurations; but when used on multiple-lead connections, the joints may not be uniformly heated. Uneven heating results in plated-through hole damage, pad delamination, or blistering. Damage can also result when lead terminations are pulled through the board.
When desoldering is complete, the workpiece must undergo a careful physical inspection for damage to the circuit board and the remaining components. The technician should also check the board for scorching or charring caused by component failure. Sometimes MEASLING is present. Measling is the appearance of light-colored spots. It is caused by small areas of fiberglass strands that have been damaged by epoxy overcuring, heat, abrasion, or internal moisture. No cracks or breaks should be visible in the board material. None of the remaining components should be cracked, broken, or show signs of overheating. The solder joints should be of good quality and not covered by loose or splattered solder, which may cause shorts. The technician should examine the board for nicked, cracked, lifted, or delaminated conductors and lifted or delaminated pads.
Q10. When does most printed circuit board damage occur?
Q11. What procedure involves the use of finely braided copper wire to remove solder? Q12. What is the most effective method of solder removal?
Q13. When, if at all, should the heat-and-shake or the heat-and-pull methods of solder removal be used?


