Drive belts and couplings
Drive belts
Correct alignment of the flywheel and drive pulley, and correct tensioning of the drive belt(s), are most important during the installation or replacement of belt(s) or motor. Incorrect alignment and tensioning can result in excessive belt wear, loss of compressor efficiency, and motor failure due to faulty motor or compressor drive shaft bearings.
Alignment
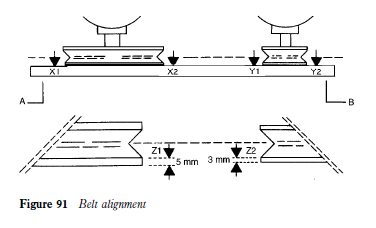
This may be carried out with a piece of string or preferably a straight edge (AB in Figure 91), aligning the drive motor pulley to the compressor flywheel. It is essential that the areas X and Y are aligned accurately. Any variation in the pulley or flywheel thickness must be compensated for when aligning the flywheel and pulley faces (area Z).
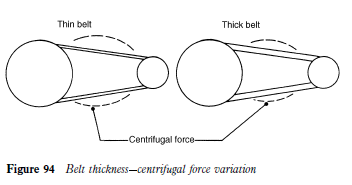
All drive belts are subject to bending and compressing, which will inevitably result in stretching. Centrifugal force also adds to belt stress. The distance between the flywheel and the pulley plays an important part in the amount of stress and force generated during the operation of the motor and compressor.
It is important, therefore, that drive belts are selected to the design char- acteristics, i.e. that they are of the correct length, thickness and section. Any increase in centrifugal force will tend to increase the amount of stretch on a belt. A thin belt will create a greater force.
Tension
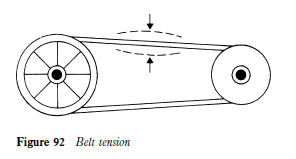
A loosely fitted belt increases centrifugal force, leads to excessive wear and causes the belt to slip. A belt fitted too tightly may break and have a side effect on shaft bearings.
It is said that a belt is too slack when it jumps off the pulley. However, this is an overstatement because even if the belt remains in place it may still be subject to unnecessary flexing, wear and stress. A recognized method of adjusting the belt tension is to allow a maximum of 25 mm (1 in) deflection at the position shown in Figure 92.
Length
For short belts, that is at up to 1.3 m between shaft centres, the following formula is considered to be accurate enough for belt sizing (Figure 93):
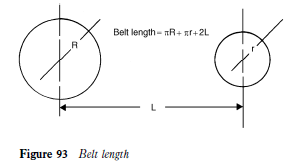 half circumference pulley C half circumference flywheel C twice distance between shaft centres
For example, if R = 225 mm, r = 75 mm and L= 750 mm, the belt length is given by
706.95 C 235.65 C 1500 D 2442.6 mm’ 2.4 m
Thickness
Examples of centrifugal force variation with belts of different thickness are shown in Figure 94.
Drive couplings
Instead of employing a flywheel and drive options, compressors may be designed for direct coupling.
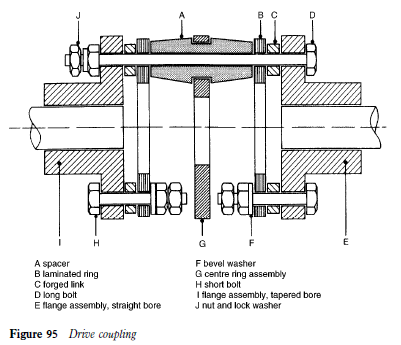
The coupling on small compressors may be of a rigid flange type. Larger compressors will have a more elaborate resilient coupling similar to that shown in Figure 95, consisting of a flange assembly, a centre ring assembly, a number of forged links, and long and short mounting bolts with locking nuts and washers.
Assembly and alignment
Whenever a coupling is fitted, correct alignment is essential to prevent any undue stresses on the compressor, motor shaft and bearings, and to eliminate
vibration during operation, which is often at high speeds. Should it be necessary to change a motor or compressor, it is important to note the arrangement of bolts, washers, forged links and nuts during the disassembly, since they must be replaced in the same order.
The most accurate method of aligning a coupling is by using a level indicator gauge, but it can be accomplished with a straight edge and caliper. Both methods will be dealt with in turn. It is advisable to align the coupling to the tolerances stated by the manufacturer of the equipment.
Level indicator gauge
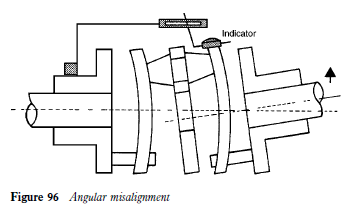
Test for angular misalignment
1 Mount the indicator on the left hand flange as shown in Figure 96, with the stem on the face of the right hand flange.
2 Rotate the equipment, notion the maximum and minimum indicator readings.
3 Move the equipment as necessary to reduce the total indicator reading to 0.0508 mm (0.002 in) or less for each millimetre (inch) of diameter at the indicator stem.
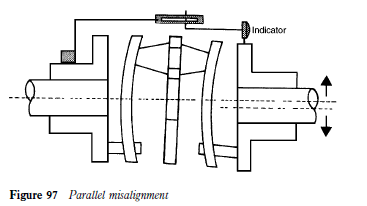
Test for parallel misalignment
1 Set the indicator on the outer surface of the flange as shown in Figure 97.
2 Rotate the equipment, noting maximum and minimum readings.
3 Move the equipment as necessary to reduce indicator readings to a minimum, taking care not to disturb the setting made in step 1.
4 The coupling should be rotated several complete revolutions to make sure that no endwise creep in the connected shafts is measured.
5 Tighten all bolts. Recheck tightness after several hours operation.
Calipers and straight edge
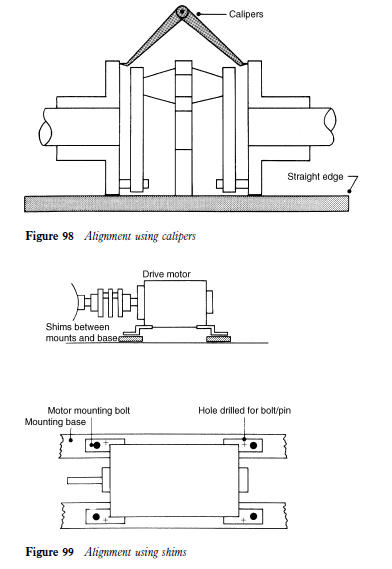
1 Place a straight edge on the flange rims at the top and sides (Figure 98).
When the coupling is in alignment, the straight edge should rest in full contact upon the flange rims.
2 Check the dimension with inside calipers on at least four points of the circumference of the flanges. If these dimensions are within 0.39 mm 64 inch) of each other, the alignment is satisfactory. Refer to the manufacturer’s instructions if available.
3 Move the equipment and repeat steps 1 and 2 if necessary.
4 Tighten all bolts. Recheck tightness after several hours operation.
Appearance
When the coupling is in correct alignment, both laminated ring assemblies will be in a perfect plane at right angles to the shaft centre line.
When the equipment is operating at full speed, both laminated rings should have a distinct and clearly defined appearance when viewed from both the top
 and the side. Should they have a blurred appearance, the coupling needs to be realigned.
Mounting
During the coupling alignment it may be necessary to raise the level of the drive shaft to coincide with that of the compressor shaft. This can be achieved by placing shims (Figure 99) beneath the motor mounts; the shims are holed for location of motor mounting bolts. It will then be necessary to conduct a parallel alignment test several hours after the equipment has been operating in case the shims have bedded down, thereby putting the coupling out of alignment.
When a coupling has been correctly aligned and operated satisfactorily, holes should be drilled through the motor mounts and mounting base. These can be either tapped to receive a bolt or left untapped for insertion of a dowel pin. Securing will ensure that no angular movement of the driver shaft is possible.

