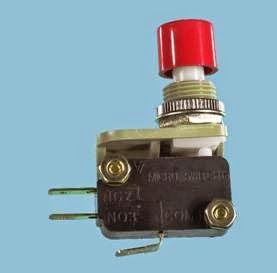
Often referred to as a pushbutton switch and sometimes as a momentary switch. In this encyclopedia, a pushbutton is considered separately from a switch, which generally uses a lever-shaped actuator rather than a button, and has at least one pole contact where a pushbutton generally has contacts that are not distinguishable from each other.
What It Does
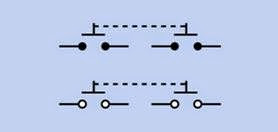
A pushbutton contains at least two contacts, which close or open when the button is pressed. Usually a spring restores the button to its original position when external pressure is released. Figure 5-1 shows schematic symbols for push buttons. The symbols that share each blue rec tangle are functionally identical. At top is a normally-open single-throw pushbutton. At center is a normally-closed single-throw push button. At bottom is a double-throw pushbutton.
Unlike a switch, a basic pushbutton does not have a primary contact that can be identified as the pole. However, a single pushbutton may close or open two separate pairs of contacts, in which case it can be referred to, a little misleadingly, as a double-pole pushbutton. See Figure 5-2. Different symbols are used for slider pushbuttons with multiple contact pairs; see “Slider” (page 31).
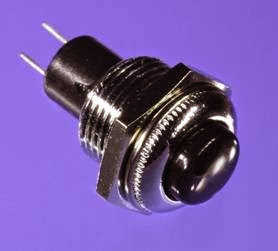
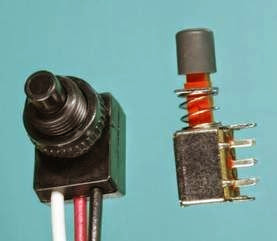
A generic full-size, two-contact pushbutton is shown in Figure 5-3.
Figure 5-1. Commonly used schematic symbols to repre- sent a simple pushbutton. See text for details.
How It Works
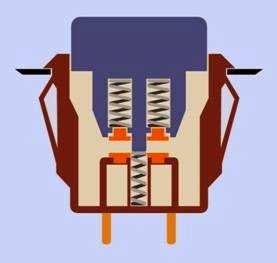
Figure 5-4 shows a cross-section of a pushbutton that has a single steel return spring, to create resistance to downward force on the button, and a pair of springs above a pair of contacts, to hold each contact in place and make a firm connection when the button is pressed. The two upper contacts are electrically linked, although this feature is not shown.
Figure 5-2. Commonly used schematic symbols to represent a double-pole pushbutton.
Figure 5-4. Cross-section of a pushbutton showing two spring-loaded contacts and a single return spring.
Variants
Poles and Throws
Abbreviations that identify the number of poles and contacts inside a pushbutton are the same as the abbreviations that identify those at tributes in a switch. A few examples will make this clear:
SPST, also known as 1P1T
DPST also known as 2P1T
Double pole, single throw
Figure 5-3. The simplest, traditional form of pushbutton, in which pressing the button creates a connection be- tween two contacts.
SPDT also known as 1P2T
Single pole, double throw
3PST also known as 3P1T
Three pole, single throw
While a switch may have an additional center position, pushbuttons generally do not.
On-Off Behavior
Parentheses are used to indicate the momentary state of the pushbutton while it is pressed. It will return to the other state by default.
OFF-(ON) or (ON)-OFF
Contacts are normally open by default, and are closed only while the button is pressed. This is sometimes described as a make-to- make connection, or as a Form A pushbutton.
ON-(OFF) or (OFF)-ON
Contacts are normally closed by default, and are open only while the button is pressed. This is sometimes described as a make-to- break connection, or as a Form B pushbutton.
ON-(ON) or (ON)-ON
This is a double-throw pushbutton in which one set of contacts is normally closed. When the button is pressed, the first set of contacts
is opened and the other set of contacts is closed, until the button is released. This is sometimes described as a Form C pushbutton.
For a single-throw pushbutton, the terms NC or NO may be used to describe it as normally closed or normally open.
Slider
This type, also known as a slide pushbutton, contains a thin bar or rod that slides in and out of a long, narrow enclosure. Contacts on the rod rub across secondary contacts inside the enclosure. Closely resembling a slider switch, it is cheap, compact, and well adapted for multiple connections (up to 8 separate poles in some models). However, it can only tolerate low currents, has limited durability, and is vulnerable to contamination.
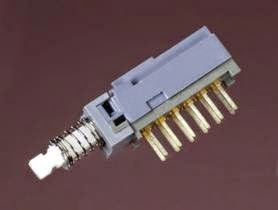
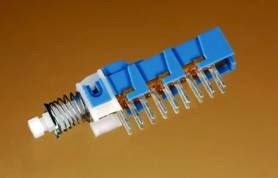
A four-pole, double-throw pushbutton is shown in Figure 5-5. A variety of plastic caps can be obtained to press-fit onto the end of the white nylon actuator.
Figure 5-5. A 4PDT slider pushbutton, shown without the cap that can be snapped onto the end of the actuator.
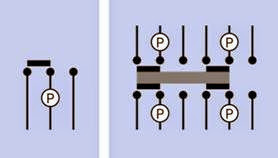
Figure 5-6 shows schematic symbols for two possible slide pushbuttons, with a black rectangle indicating each sliding contact. The lead that functions as a pole is marked with a P in each case. Standardization for slide pushbutton schematic symbols does not really exist, but these examples are fairly typical. An insulating section that connects the sliding contacts internally is shown here as a gray rectangle, but in some datasheets may appear as a line or an open rectangle.
Since the symbols for a slide pushbutton may be identical to the symbols for a slide switch, care must be taken when examining a schematic, to determine which type of component is intended.
Figure 5-6. Left: schematic symbol for a simple SPDT slide pushbutton, where a movable contact shorts together either the left pair or right pair of fixed contacts. Right: A 4PDT pushbutton in which the same principle has been extended. The movable contacts are attached to each other mechanically by an insulator. Each pole terminal is marked with a P.
Styles
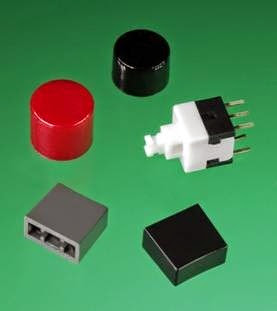
Many pushbutton switches are sold without caps attached. This allows the user to choose from a selection of styles and colors. Typically the cap is a push-fit onto the end of the rod or bar that activates the internal contacts. Some sample caps are shown in Figure 5-7, alongside a DPDT push button. Any of the caps will snap-fit onto its actuator.
An illuminated pushbutton contains a small in candescent bulb, neon bulb, or LED (light-emitting diode). The light source almost always has its own two terminals, which are isolated from the other terminals on the button housing and can be wired to activate the light when the button is pressed, when it is released, or on some other basis. Pushbuttons containing LEDs usually
Figure 5-7. Caps (buttons or knobs) that may be sold as separate accessories for some pushbuttons, shown here alongside a compatible pushbutton switch.
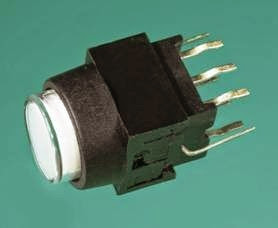
require external series resistors, which should be chosen according to the voltage that will be used. See the LED entry in Volume 2 for additional commentary on appropriate serie resis tors. An example of an illuminated pushbutton is shown in Figure 5-8. This is a DPDT component, designed to be mounted on a printed circuit board, with an additional lead at each end connecting with an internal LED underneath the translucent white button.
Termination and Contact Plating These options are the same as for a switch and are described in that entry.
Mounting Style
The traditional panel-mounted button is usually secured through a hole in the panel by tightening a nut that engages with a thread on the bushing of the pushbutton. Alternatively, a push
Figure 5-8. This pushbutton contains an LED underneath the white translucent button.
button housing can have flexible plastic protrusions on either side, allowing it to be snapped into place in an appropriate-sized panel cutout. This style is shown in Figure 5-4.
PC pushbuttons (pushbuttons mounted in a printed circuit board, or PCB) are a common variant. After the component has been installed in the circuit board, either the button must align with a cutout in the front panel and poke through it when the device is assembled, or an external (non-electrical) button that is part of the product enclosure must press on the actuator of the pushbutton after assembly.
Surface-mount pushbuttons that allow direct fingertip access are uncommon. However, about one-quarter of tactile switches are designed for surface mount at the time of writing. They are typically found beneath membranes that the user presses to activate the switch beneath—for example, in remotes that are used to operate electronic devices.
Sealed or Unsealed
A sealed pushbutton will include protection against water, dust, dirt, and other environmental hazards, at some additional cost.
Latching
This variant, also known as a press-twice push button, contains a mechanical ratchet, which is rotated each time the button is pressed. The first press causes contacts to latch in the closed state. The second press returns the contacts to the open state, after which, the process repeats. This press-twice design is typically found on flash lights, audio equipment, and in automotive applications. While latching is the most commonly used term, it is also known as push-push, locking, push-lock push-release, push-on push-off, and alternate.
In a latching pushbutton with lockdown, the but ton is visibly lower in the latched state than in the unlatched state. However, buttons that behave this way are not always identified as doing so on their datasheets.
A six-pole double-throw pushbutton that latches and then unlatches each time it is pressed is shown in Figure 5-9.
Figure 5-9. This 6PDT pushbutton latches and then un- latches, each time it is pressed.
Two more variants are shown in Figure 5-10. On the right is a simple DPDT latching pushbutton with lockdown. On the left is a latching pushbutton that cycles through four states, beginning with one “off” state, the remaining three connecting a different pair of its wires in turn.
A simple OFF-(ON) button may appear to have a latching output if it sends a pulse to a micro controller in which software inside the micro
Figure 5-10. At right, a simple DPDT latching pushbutton with lockdown. At left, this pushbutton cycles through four states, one of them an “off” state, the others connecting a different pair of its wires in turn.
controller toggles an output between two states. The microcontroller can step through an unlimited number of options in response to each but ton press. Examples are found on cellular phones or portable media players.
A mechanically latching pushbutton has a higher failure rate than a simple OFF-(ON) button, as a result of its internal mechanism, but has the ad vantage of requiring no additional microcontroller to create its output. Microcontrollers are dis cussed in Volume 2.
Foot Pedal
Foot pedal pushbuttons generally require more actuation force than those intended for manual use. They are ruggedly built and are commonly found in vacuum cleaners, audio-transcription foot pedals, and “stomp boxes” used by musi cians.
Keypad
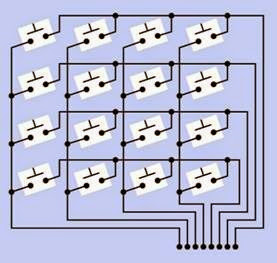
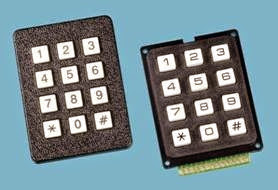
A keypad is a rectangular array of usually 12 or 16 OFF-(ON) buttons. Their contacts are accessed via a header suitable for connection with a ribbon cable or insertion into a printed circuit board. In some keypads, each button connects with a separate contact in the header, while all the but tons share a common ground. More often, the buttons are matrix encoded, meaning that each of them bridges a unique pair of conductors in a matrix. A 16-button matrix is shown in Figure 5-11. This configuration is suitable for polling by a microcontroller, which can be programmed to send an output pulse to each of the four horizontal wires in turn. During each pulse, it checks the remaining four vertical wires in sequence, to determine which one, if any, is carrying a signal. Pull up or pull down resistors should be added to the input wires to prevent the inputs of the microcontroller from behaving unpredictably when no signal is present. The external appearance of two keypads is shown in Figure 5-12.
Figure 5-11. Buttons in a numeric keypad are usually wired as a matrix, where each button makes a connection between a unique pair of wires. This system is suitable for being polled by a microcontroller.
Tactile Switch
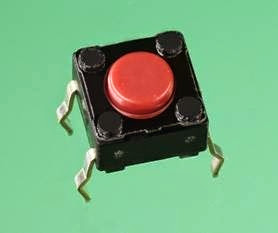
Despite being called a switch, this is a miniature pushbutton, less than 0.4” square, designed for insertion in a printed-circuit board or in a solder less breadboard. It is almost always a SPST device but may have four pins, one pair connected to each contact. Tactile switches may be PC- mounted behind membrane pads. An example is shown in Figure 5-13.
Figure 5-12. The keypad on the left is matrix-encoded, and is polled via seven through-hole pins that protrude behind it. The keypad on the right assigns each button to a separate contact in its header. See the text for details about matrix encoding.
Figure 5-13. A typical tactile switch.
Membrane Pad
Typically found on devices such as microwave ovens where contacts must be sealed against particles and liquids. Finger pressure on a mem brane pad closes hidden or internal pushbut tons. They are usually custom-designed for specific product applications and are not generally available as generic off-the-shelf components. Some surplus pads may be found for sale on auc tion websites.
Radio Buttons
The term radio buttons is sometimes used to identify a set of pushbuttons that are mechanically interlinked so that only one of them can make an electrical connection at a time. If one button is pressed, it latches. If a second button is pressed, it latches while unlatching the first but ton. The buttons can be pressed in any sequence. This system is useful for applications such as component selection in a stereo system, where only one input can be permitted at a time. How ever, its use is becoming less common.
Snap-Action Switches
A snap-action switch (described in detail in the switch section of this encyclopedia) can be fitted with a pushbutton, as shown in Figure 5-14. This provides a pleasingly precise action, high reliability, and capability of switching currents of around 5A. However, snap-action switches are almost always single-pole devices.
Figure 5-14. A pushbutton mounted on top of a SPDT snap-action switch.
Emergency Switch
An emergency switch is a normally-closed de vice, usually consisting of a large pushbutton
that clicks firmly into its “off” position when pressed, and does not spring back. A flange around the button allows it to be grasped and pulled outward to restore it to its “on” position.
Values
Pushbutton current ratings range from a few mA to 20A or more. Many pushbuttons have their current ratings printed on them but some do not. Current ratings are usually specified for a particular voltage, and may differ for AC versus DC.
How to Use it
Issues such as appearance, tactile feel, physical size, and ease of product assembly tend to dictate the choice of a pushbutton, after the fundamental requirements of voltage, current, and durability have been satisfied. Like any electromechanical component, a pushbutton is vulnerable to dirt and moisture. The ways in which a device may be used or abused should be taken into ac count when deciding whether the extra expense of a sealed component is justified.
When a pushbutton controls a device that has a high inductive load, a snubber can be added to minimize arcing. See “Arcing” (page 47) in the switch entry of this encyclopedia, for additional information.
What Can Go Wrong
No Button
When ordering a pushbutton switch, read data sheets carefully to determine whether a cap is included. Caps are often sold separately and may not be interchangeable between switches from different manufacturers.
Mounting Problems
In a panel-mount pushbutton that is secured by turning a nut, the nut may loosen with use, al lowing the component to fall inside its enclosure when the button is pressed. Conversely, over tightening the nut may strip the threads on the pushbutton bushing, especially in cheaper components where the threads are molded into plastic. Consider applying a drop of Loctite or similar adhesive before completely tightening the nut. Nut sizes vary widely, and finding a re placement may be time-consuming.
LED Issues
When using a pushbutton containing an LED, be careful to distinguish the LED power terminals from the switched terminals. The manufacturer’s datasheet should clarify this distinction, but the polarity of the LED terminals may not be clearly indicated. If a diode-testing meter function is un
available, a sample of the switch should be tested with a source of 3 to 5VDC and a 2K series resistor. Briefly touching the power to the LED terminals, through the resistor, should cause the LED to flash dimly if the polarity is correct, but should not be sufficient to burn out the LED if the polarity is incorrect.
Other Problems
Problems such as arcing, overload, short circuits, wrong terminal type, and contact bounce are generally the same as those associated with a switch, and are summarized in that entry in this encyclopedia.


