Basic measurements in physics:1- Length
1- Measurement of length: Definition of the meter
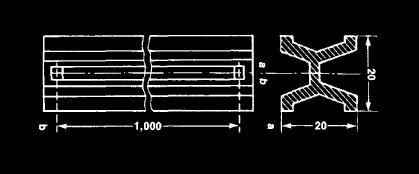
The SI unit of length is the meter, originally defined as the distance, at 0 °C, between two lines on a platinum-iridium bar kept at the International Office of Weight and Measures at Sevres near Paris.
Copies of this standard were made and sent to other countries.
 |
| Meter prototype |
The trouble with metal standard of this kind is that they are liable to undergo minute changes in length as the years go by. For instance, tests have revealed that the imperial standard yard has shrunk by a few parts in a million since it was made in 1854. Small thought this error is, the exacting requirements of modern science demand something better.
The standard meter is, of course, open to the same objection. It was therefore decided to choose the wavelength of light as a length standard which we believe to be fixed and unalterable.
So, in 1960 the meter was redefined as equal to the distance occupied by 1650763.73 wavelengths of a specified orange-red light from the gas krypton-86.
These figures are given for interest only:
one is not expected to memorize them. Some simple experiments for measuring the wavelength of light will be explained later. So come back soon:).
Various other metric units of length are related to the meter by either multiplies or submultiples of 10. Thus,
1 kilometer (km) = 1000 meters (m)
1 meter (m) = 100 centimeter (cm)
1 centimeter (cm)= 10 millimeters (mm)
Very small lengths are measured in micrometers (µm) and nanometers (nm).
1 meter = 1000000 (or 106 ) µm
= 1000000000 ( or 109 ) nm
For day-to-day work in elementary physics laboratories we use meter and half-meter rules made of boxwood. They are graduated in centimeters and millimeters.
Care should be taken to avoid damage to the ends of these rules, as they do not have a short ungraduated portion at the ends to take the wear. However, since a small amount or wear is almost inevitable, it is best, whenever possible, to measure from the 10 cm graduation and subtract 10 cm from the reading at the other end.
Owing to the thickness of the wood, the eye must always be placed vertically above the mark being read, in order to avoid errors due to parallax ( in the next paragraph). For example, a millimeter scale giving a reading of 28 cm 3.5 mm. Since, in science, we invariably use decimals rather than vulgar fraction, we write this as 28.35 cm. The last digit has to be estimated.
Parallax
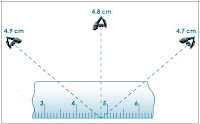
When we look out of the window of a moving train, trees, chimneys, towers and other objects in the landscape appear to be moving relatively to each other. Thus, at one moment a tree may appear to be to the right of a church spire and a few seconds later to the left of it. Their actual positions in space have, of course, remained fixed. This apparent relative movement of two objects owing to a movement on the part of the observer is called parallax.
 |
| Parallax error |
No parallax is observed between the cross surmounting a spire and the spire itself, since these two objects coincide in position.
Use of calipers
The picture shows a pair of engineer’s calipers used for measuring distances on solid objects where an ordinary rule cannot be applied directly.
| Engineer’s callipers |
 |
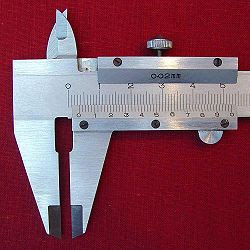
| Slide callipers |
They consist of a pair of hinged steel jaws which are closed until they touch the object in the desired position. The distance between the jaws is afterwards measured on an ordinary scale:
For some purposes, slide or vernier calipers are preferred.
These consist of a steel scale with a fixed jaw at one end. The object to be measured is placed between this and a sliding jaw.
The calipers shown in the illustration also have inside jaws so that they can be used for such measurements as the internal diameter of tubes.
Who invented it?
The short scale of 10 divisions seen on the sliding jaw is called a vernier. This is named after its inventor, Pierre Vernier, a French technician who lived in the seventeenth century. The vernier enables us to obtain accurately the second decimal place in centimeter measurements without having to estimate fractions of a division by eye.
How to read a vernier
For use with a scale of millimeters, the vernier is a short scale 9 mm long divided into 10 equal parts, so that the difference in length between a vernier division and a scale division is 0.1 mm or 0.01 cm.
The vernier slides along the scale until its zero mark just touches the end of the object being measured. More details.
The micrometer screw gauge
For measuring the diameter of a piece of wire and similar distances, a micrometer screw gauge is used. The first person to think of using a screw for this purpose was an astronomer named William Gascoigne, who was killed at the battle of Marston Moor in 1644.
| Micrometer screw gauge |
The chief feature of the instrument are shown in the image.
The most important part is a screwed spindle which is fitted with a graduated thimble. The screwed portion is totally enclosed to protect it from damage.
The pitch of the screw is 0.5 mm, so that the spindle moves through 0.5 mm for each complete turn.
When taking a reading, the thimble is turned until the object is gripped very gently between the anvil and spindle.
Some gauges are fitted with a spring ratchet which prevents the user from exerting undue pressure. The sleeve shown in the diagram has a scale of half millimeters, each of which represents one complete turn of the screw.
Fractions of a turn are indicated on the thimble, which has a scale of 50 equal divisions. Each division on the thimble, therefore, represents a screw travel of one-fiftieth of half a millimeter or 0.001 cm.
Expressing the result in centimeters and remembering that 0.5 mm = 0.05 cm, it follows that the sleeve reading gives the units and the first two decimal places, while the thimble reading gives the third decimal place.
Coming up: Measurements of mass and time.
