Troubleshooting examples
In the above sections, various basic and complex control circuits for a three-phase motor have been dealt with.
The following is an example of troubleshooting a control circuit. Consider the control circuit for a three-phase motor with a DOL starter with a maintained-contact control as shown in Figure 7.1(b).
Motor startup or running problems are listed below:
1. The motor starts running as the start pushbutton is pressed, but stops as soon as the start pushbutton is released.
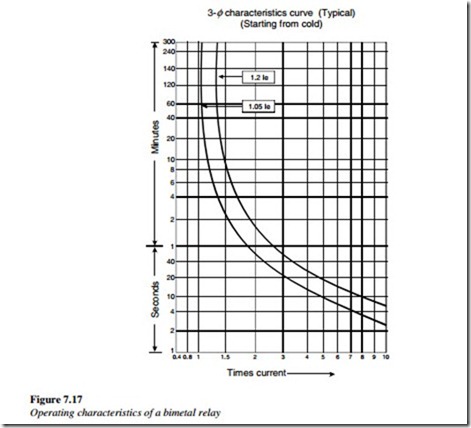
2. The motor starts running and trips 2 min after the start pushbutton is released.
Let us assume the main circuit fuses are not blown.
The following is the solution to the above-listed problems:
• Since the motor starts running as the start pushbutton is pressed, it indicates that the main contactor (K1) coil gets control supply when the circuit is completed on pressing the start pushbutton. However, the motor trips as soon as the start pushbutton is released.
• In the control circuit, as soon as the main contactor is switched on, the NO contact parallel to the start pushbutton contact must also close and hold the control circuit on until the stop pushbutton is pressed or the overload relay trips and its NC contact is open.
To troubleshoot the problem, perform the following steps:
(i) Check the control supply (L1), check control voltage between L1, and neutral (N).
(ii) Check the control fuse (F3) with the multimeter. If the control fuse (F3) is blown, change the fuse and restart the motor, the motor must start if control fuse (F3) blown was the only problem.
(iii) If the control fuse is OK, check whether the overload relay has tripped.
Check this with the help of a multimeter. Check voltage between the neutral terminal and the outgoing terminal of the overload relay contact, connected
to the stop pushbutton. If the overload relay has not tripped and the multimeter shows that the control voltage between the two points is OK, then go to point (iv).
(iv) Check the control voltage at the stop pushbutton outgoing terminal to the start pushbutton. If the voltage is OK, then go to point (v).
(v) If two NO contacts are connected in parallel to each other, and the motor runs only when the start pushbutton is pressed, it indicates that, the NO contact of the main contactor must close as soon as the main contactor is switched on. It also indicates that the contactor that holds the control circuit on is not closing. The wires connected in parallel from the NO contact to the start pushbutton NO contact may be closed, or the NO contact of the main contactor is not closed, due to a faulty contact. To confirm this, take a loop of insulated wire, and short the contact K1; if the motor starts, it confirms that the NO contact is faulty. Change the NO contact block of the main contactor.
If the motor runs and trips after 2 min, to troubleshoot this perform the following steps:
(i) Check the control supply (L1), check control voltage between L1 and neutral (N).
(ii) Check the control fuse (F3) with the multimeter. If the control fuse (F3) is blown change the fuse and restart the motor. The motor must start if the control fuse (F3) blown was the only problem.
(iii) If the control fuse is OK, check whether the overload relay has tripped.
Check this with the help of a multimeter, by checking the voltage between the neutral terminal and the outgoing terminal of the overload relay contact connected to the stop pushbutton. If the overload relay has tripped, you will
not get control voltage between the two points. Reset the overload relay and look into the reasons for which the motor tripped on overload.
If there is a voltage between the two points, look for a loose contact or loose wiring at the subsequent contacts in the control circuits.
