Oiling System Service
CHECKING OIL LEVEL
The level of the oil in the engine crankcase is checked from time to time with a gauge rod or dipstick usually on the right or left side of the engine. It is recommended that the oil level be checked whenever gasoline is put into the fuel tank.
Oil is consumed more rapidly when the car is operated at high speeds, when the oil is thin and during very hot weather conditions. Oil consump tion due to worn cylinders, pistons, piston rings or other parts is usually eviden ced by a bluish smoke from the exhaust. Leakage will lower th e oil level.
The correct level is at the FULL mark on the dipstick or slightly below. It is not necessary to add oil until the level of the oil has dropped about 1qt. below full.
The level should never be carried higher than the FULL mark. Excess oil will be thrown on the cylinder walls, will likely bypass the piston rings and cause excessive carbon deposits as well as wasting the oil.
The level should never be allowed to drop below the lower mark on the dipstick. This mark is usually about one quart below the FULL mark. An average engine with a crankcase capacity of 5 qts. would be operating on less than 4 qts. with oil at the low level. Less than this amount is not safe for adequate lubrication as the oil does not get a chance to lose its heat after cooling the parts it is supposed to cool and the remaining oil will have to do a bigger job in lubricating and cleaning. If a long trip is contemplated, if the weather is ex cessively hot, or if fast driving is to be done or there are tough hills to climb, it is best to carry the level right up to but not higher than the FULL mark.
CAUSES OF EXCESSIVE OIL
CONSUMPTION
Excessive oil consumption may be due to any of the following:
1. Loose or leaky drain plug or gasket.
2. Defective oil pan gasket or loose pan bolts.
3. Cracked or broken crankcase oil pan.
4. Leakage of oil through faulty rear main bearing oil seal.
5. Leaky valves.
6. Carrying oil level too high.
7. Oil leaks around valve cover gaskets or covers, loose oil line connections, loose oil filter cover, leaks around overhead valve covers or seals.
8. Leaks in any part of the oil system where the crankcase oil also serves as an automatic trans mission fluid.
9. Loose bearings which permit too much oil to leak out of the ends of the bearings to be thrown onto the cylinder walls.
10. Poor quality oil or oil that has been diluted beyond the point of safe lubrication.
11. Oil that is thinner or of a lower viscosity than that recommended for the existing tempera ture or driving conditions.
OIL DRAINING PROCEDURE
For best results, drain crankcase oil when the oil is hot or at normal operating temperature. If the draining can be done immediately after the car has been on a long or fast run, a maximum amount of dirt and sediment will be in suspension in the oil and will drain out when the plug is removed. The hot oil will also be thin and will drain rapidly.
1. Allow the crankcase to drain for at least 3 minutes, preferably longer, especially if the oil is cold. Ideal conditions are to allow draining for 3 minutes after the stream of oil has dwindled to a succession of drops.
2. Examine any deposit of sediment on drain plug for possible worn metal, sludge or foreign matter in the discarded oil. Excessive deposit of sediment indicates the desirability of using a cleaning or highly detergent oil to “digest” foreign material. Evidence of excessive thinning of oil, water in the oil or other irregularitie s calls for appropriate action.
OIL CHANGE INTERVALS
When to drain the crankcase and replace with fresh oil depends largely on how the car is driven. Car manufacturers recommend that the oil be drained at mileages of from 2,000 to 6,000 under ideal driving conditions but at lesser intervals when subjected to abnormal conditions.
The old statement that oil never wears out is probably somewhere near true. Oil wearing out is not the cause for changing oil. It is the contamina tion of the oil from outside sources that makes it necessary.
Stop-and-go driving and running the engine cold can add enough contaminants to the oil to require an oil change at as low an interval as a few hundred miles. The contaminants help to form cold weather sludge and some types of fuels may contain sulfur which combines to form corro sive acids.
Cars operated under very dusty conditions will also need more frequent oil changes. A car that has been driven through a dust storm may take enough gritty dust into the engine in a few minutes to require a change of oil.
These are operating conditions at their worst.
Between the best of conditions that may require engine oil changes only every 3,000 or more miles and the worst of conditions which may require a change every few hundred miles lie a great variety of driving conditions. For proper lubrication, the oil change interval should fit the kind of driving.
Ideal driving conditions for engine oil are when the car is driven for long distances at moderately high speeds with the engine at top operating temperature and when the driving is through air that has little dust, when the air cleaner is ser viced regularly and when the oil filter is changed at proper intervals.
Under these conditions, with the aid of the air cleaner and oil filter, the crankcase keeps itself clean of foreign contaminants, dirt, fuel dilution and water and the oil will stay in serviceable condition for a long time and for many miles. This is engine lubrication at its best and under these conditions the crankcase oil might last indefinitely except for a small amount of worn metal.
At the other end of the scale of driving condi tions is the car that is driven at low speeds, low mileages and with many stops during which the engine cools off. This is generally referred to as stop-and-go driving. It is at its worst in cold weather.
In stop-and-go driving, the engine warms up a little, then gets cold again and this is repeated time after time. Typical of such driving is that of doctors who drive a little, then stop for a patient or at a hospital; salesmen who go short distances and make stops; commuters who drive short distances to a railroad station, then park the car for the day; women who use the car for shopping and so on.
ANALYSIS OF HIGH OIL CONSUMPTION
Before tearing down an engine for the purpose of eliminating the cause of excessive oil consump tion, it should first be checked to see whether or not it is actually burning too much oil. A black oily deposit in the end of the mufRer tail pipe, coupled with the fact that blue smoke comes out of the tail pipe when the engine is running at moderate speeds, are definite indications that too much oil is being burned in the engine. Blue smoke burned should not be confused with black smoke caused by too rich a carburetor mixture or with white steam coming from th e tail pipe during engine warm-up period, especially on a cool but humid day.
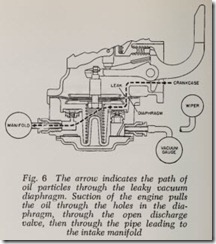
Many cars have a combination fuel and vacuum pump, the vacuum section being used to operate windshield wipers. A broken or porous diaphragm in the vacuum section of these pumps can cause plenty of blue smoke when the rest of the engine is in perfect condition. Such a diaphragm allows oil to be drawn from the crankcase to mix with the fuel in the intake manifold and be injected di rectly into the combustion chamber where it is burned and wasted. Fig. 6 shows how this is accomplished.
CHECK FOR LEAKY VACUUM DIAPHRAGM
One way to check for this condition is to dis connect the vacuum line running to the intake manifold and blow through it to see if any oil comes out. Another way is to stick a wooden match in the vacuum hole in th e manifold to get an oil smear. If there is any trace of oil on th e match the diaphragm is defective and the pump should be repaired. How ever, the fact that a new diaphragm is installed does not necessarily mean that the vacuum pump is in good condition as it is possible for a new diaphragm to be sufficiently porous to allow oil to pass through it. Therefore , after the engine has been operated, it is a good idea to check again for the pres ence of oil in the manifold vacuum line.
GENERAL ENGINE WEAR
If the engine is actually burning too much oil,inspection may show that it is caused by a general wear of parts in addition to piston rings. It may be that valve guides and bearings are worn and if these parts are not replaced, it will do no good merely to install a new set of piston rings because they will not prevent oil from getting into the combustion chambers. Therefore, since there is a close relationship between rings, pistons, cylin ders, piston pins, valves and bearings, all these parts should be checked and replaced as necessary.
EXTERNAL OIL LEAKS
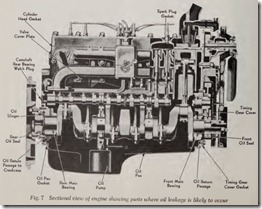
Fig. 7 indicates points to be checked in looking for an external oil leak. Fresh oil on the clutch housing, oil pan, oil pump, edges of valve covers, external oil lines, distributor shaft, base of oil filler tube, or on the bottom of the timing case cover are points to look for external oil leaks.
Any area under the engine that is washed clean with oil is conclusive proof that there is an exter nal oil leak somewhere in front of the washed area.
Sometimes the camshaft rear welch plug is not tight. Oil leaking downward from this opening is often thought to be a rear main bearing oil leak because the oil is found on the bottom of the clutch housing or on the rear of the oil pan.
OIL PRESSURE
On all modern automobile engines the normal oil pressure at cruising speeds is upwards of 30 pounds per square inch.
The gradual increase in engine bearing clear ances as a result of normal wear produces a proportional drop in oil pressure. An engine hav ing seen much service will register generally lower oil pressure than a new or rebuilt one. It may be justifiable on a worn engine to use a heavier oil to cut down oil pumping and a smoky exhaust and thus, incidentally, raise the oil pressure to that wh en n ew. But it would be altogether wrong to raise th e oil pressure by ch anging the adjustment of the oil pressure relief valve. The outcome of the latter procedure would only aggravate the trouble by allowing less oil to be by-passed and forcing a greater quantity to the cylind ers and bearings..
Bear in mind that th e registered oil pressure is merely an indication of the proper functioning of th e oilin g system. Sudden changes in oil pressure are sure signs of trouble.
NO OIL PRESSURE
If th e oil pressure drops to zero, stop the engine and check the oil level. If the dipstick indicates that the proper quantity of oil is in the engine, check the following:
1. Oil gauge may be broken.
2. Line leading from engine to gauge may be clogged.
3. There may be trouble in the engine itself .
To locate the cause of the trouble, disconnect the oil gauge line at the engine end and start the engine. If no oil flows from the open connection, stop the engine immediately because the trouble is most likely due to a broken oil line or a clogged oil pump or oil strainer screen.
However, if oil flows from the connection when the engine is running, either the oil gauge is defective or the line to the gauge is clogged. To determine which it is, connect the line to the engine again and disconnect it at the gauge end. Start the engine and if oil comes out of the open end of the line the gauge is at fault. If no oil comes out the line is clogged.
Sometimes an accumulation of dirt or sludge plugs the small hole in the oil gauge connection either at the tip of the line or the hole in the gauge. This may be reopened with a fine wire and the gauge action will be restored. If this is not the case, however, the defective part should be re placed.
It sometimes happens that the oil gauge regis ters normal for a brief period and then suddenly drops to zero. If this occurs, stop the engine and, after about a minute, start it up again to see if this action recurs. If it does, very likely the oil screen is clogged. Oil screens in modern engines usually are provided with some means of prevention for such emergencies as will be explained further on.
OIL PRESSURE WARNING LIGHT
Some cars utilize a warning light on the instru ment panel in place of the conventional oil gauge to warn the driver when the oil pressure is dangerously low. The warning light is wired in series with the ignition switch and the engine unit-which is an oil pressure switch.
The oil pressure switch contains a diaphragm and a set of contacts. When the ignition switch is turned on the warning light circuit is energized and the circuit is completed through the closed contacts in the pressure switch. When the engine is started, build-up of oil pressure compresses the diaphragm, opening the contacts, thereby break ing the circuit and putting out the light.
The oil pressure warning light should go on when the ignition is turned on. If it does not light, disconnect the wire from the engine unit and ground the wire to the frame or engine block. Then if the warning light still does not light when the ignition switch is on, replace the light bulb.
If the warning light goes on when the wire is grounded to the f rame or cylinder block, the engine unit should be checked for being loose or poorly grounded. If the unit is found to be tight and properly grounded, it should be removed and a new one insta lled. ( The presence of sealing compound on the threads of the engine unit will cause a poor ground. )
If the warning light rem ains lit when it normally should be out, repla ce the engine unit be fore proceeding further to determ ine the cause for a low oil pressure indication.
The warning light sometimes will light up or will flicker when the engine is idling even though the oil pressure is adequate. However, the light should go out when the engine is speeded up. There is no cause for alarm in such cases; it simply means that the pressure switch is not cali brated precisely correct.
HIGH OR LOW OIL PRESSURE
Oil pressure should not be j udged too high or too low until it is known wheth er the proper oil for the season is being used and th e engine is warmed up to normal operating temperature. If the correct oil is being used and the pressure remains high after the engine is w armed up, a sludged condition is indicated. This calls for a good flushing job and a thorough cleaning of the engine.
Low oil pressure is a sign of insufficient oil or badly diluted oil. If the oil level dipstick indicates the oil to be “rusty,” is too thin, or if it feels gritty when rubbed between the fingers, it should be replaced with clean oil, preferab ly after first flush ing ou:t the engine.
Low oil pressure may also be caused by worn engine bearings, worn oil pump gears, leaky con nection in oil lines, a sticking oil relief valve plunger, or an oil pump cover gasket that is too thick, allowing too much clearan ce between gears and cover.
OIL LINES
Any investigation involving low or no oil pres sure should include an inspection of external oil lines, such as the line leading to the oil gauge and those to the oil filter. A leak at any of these lines may result from a crack or from a loose or defec tive connection. A leaky connection or cracked line will gener ally be indicated by oil leaking at the defective point. But, leaving nothing to chance, tighten all connections with a wrench. Then start the engine to create pressure in the lines and look closely for cracks all along the lines. A cracked oil line must be replaced.
REMOVING OIL PAN
To remove an oil pan, lift out the oil level dip stick. Unscrew the drain plu g and allow the oil to drain in a suitable receptacl e. After the oil has drained, install and tighten the drain plug, using a new plug gasket as a precaut ion against future leakage. Then, after making a careful inspection of the front suspension and oil pan attaching points to see what (if any ) preliminary work is necessary befor e the pan can be removed, perform this work and th en rem ove all screws or bolts holding th e pan in position.
Howev er, befor e removing the two last screws complet ely, steady the p an to prevent its drop ping. Aft er taking out the two remaining screws, lower th e pan. While being lowered, if the crank shaft interf eres with th e pan’s removal, turn the engine over by means of the flywheel or the starter until the p an clears the crankshaft throws or counter-w eights.
Removing the oil p an on some cars involves no more work other than raising the car to provide working space and r em oving the attaching screws or bolts. On oth er cars it may be necessary to disconnect a steering tie rod or drag link to pro vid e room to release the pan. Sometimes this can be avoided by j acking up the engine. In this way, the engine is r aised while the front end remains on the floor, thus increasing the area between the steering rods and oil pan. In some instances, such as some 6-cylinder Chevrolet cars, the removal procedur e is so complex and time-consuming that it is recommend ed that the engine be removed from the chassis.
REPLACING OIL PAN
Be sure the oil pan and strainer are thoroughly clean. Scrape all traces of old gasket material and gasket cement from the oil pan flanges and crank case surfaces. If the flanges on the pan around the bolt holes are bellied as a result of a previous tightening, they should be flattened with a ham mer as a precaution against oil leakage. Be sure the oil pan flanges are clean and dry before apply ing the new gasket.
Spread a thin film of gasket cement on the oil pan flanges and stick on the gasket, being sure to line up the gasket holes with those on the pan. Allow the cement to become “tacky” (sticky) be fore installing the pan. If gasket cement is not available, stick on the gasket with heavy grease.
Th e general procedure for replacing an oil pan after the gaskets have been applied is to raise it until it contacts the crankcase. Line up the holes and insert two cap screws, one on each side of the pan. Before going any further, be sure the gaskets were not damaged or disturbed as the pan was set in place. Install the remaining cap screws or bolts and tighten them securely. As the gaskets are soft and compress with tension, it is necessary to test the tightness of the cap screws two or three times. Tightening should stop when the edge of the gasket near the cap screw begins to bulge, as further tightening may crush the gasket.
Complete the job by connecting or replacing any parts that were removed. Test the tightness of the oil pan drain plug. Fill the pan with the proper grade and amount of oil. Start the engine and inspect the oil gauge for pressure. After the engine has warmed up, inspect the oil pan for possible leaks.
OIL SCREENS
The possibility of oil screen clogging, resulting in loss of oil pressure, is remote because most car engines incorporate provisions to by-pass the oil in case the screen becomes clogged.
If the screen becomes clogged, and the oil pump draws oil directly from the crankcase, the benefit of the screen is lost and the engine bear ings may be damaged by large abrasive particles. This is less serious, however, than engine failure due to loss of oil pressure.
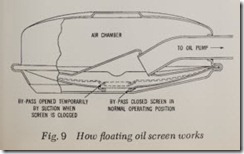
In the majority of present designs, an automatic by-pass is used in the oil screen. Should screen clogging occur due to sludge, varnish or ice for mation, the increased suction opens this by-pass.
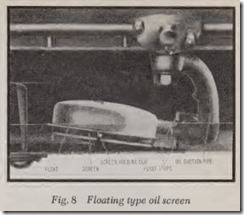
This construction is part of the floatin g type screen shown in Fig. 8. Clogging is unlikely with the floating screen due to the pos ition of the screen away from the bottom where ice, sludge and other objectionable material usu ally ac cumulate.
The by-pass in this design, Fig. 9 is formed as an integral part of the screen. A passageway in the center o£. the screen is normally closed by pressure of the screen against the bottom plate of the assembly. Increased suction on the screen pulls it away from this plate, thereby opening the by-pass.
To clean floating type screens, unf asten the screen holding clip and detach the screen . Wash it in kerosene or other suitable solvent and blow all openings clear with compressed air. If the en gine is badly sludged, unfasten the oil suction pip e and give it a good cleaning by swabbing the inside of the pipe with a rag. After connecting the pip e and replacing the screen, be sure the hinge action is free and that th e assembly is positioned so that the crankshaft throws will not interfere w ith it as it floats upward against the stop.
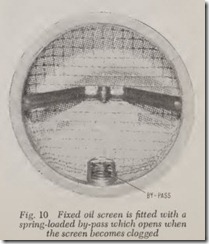
Fig. 10 shows a fixed screen design in which a separate spring-loaded bypass is used . When the screen is clean this bypass is closed but when suction increases, the valve opens. Be sure to check the spring action before replacing the pan.
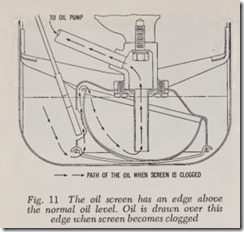
Several engine makers employ a fixed bypass and depend upon its position above the normal oil level to prevent continuous flow of oil through the opening, Fig. 11. The screen is inclined at an angle with a portion extending above the oil level. An open-bottom shroud or housing around the screen takes oil from a relatively large area at the bottom of the oil pan and insures oil supply even if the level becomes low. This shroud also reduces the possibility of the pump drawing air if the oil becomes too stiff in cold weather for free flow to the intake. Increased suction due to screen clog ging raises the liquid level inside the housing and oil spills over the top of the screen. If ice is the cause of clogging the level drops as soon as the ice melts. The screen then functions normally .
